
When it comes to fitness, there are a variety of exercises that can help you reach your goals. One such exercise that has gained popularity in recent years is the windmill exercise. This exercise works the core, glutes, and hamstrings, and can be done with or without weights.
What Is A Windmill Exercise?
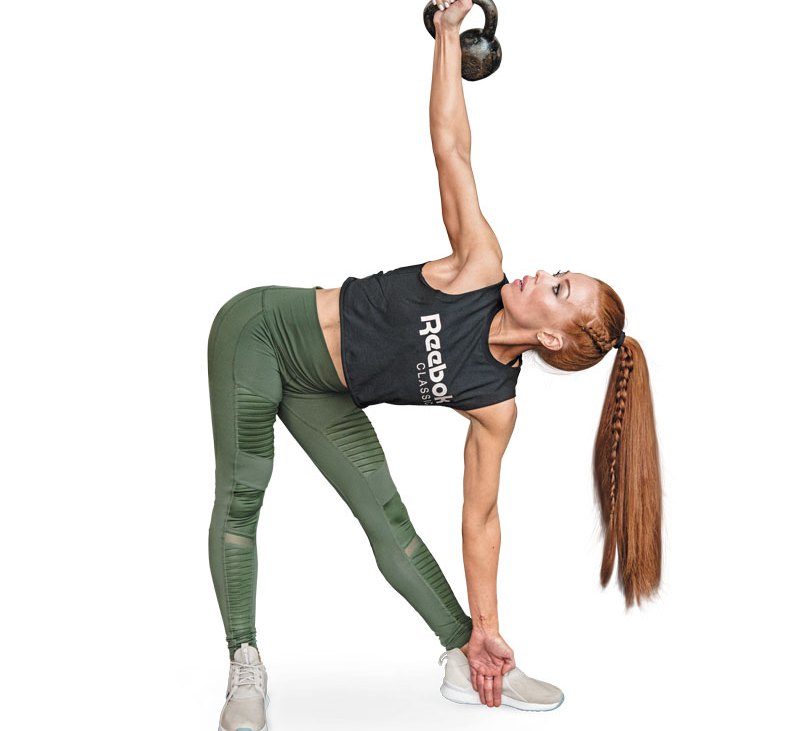
The windmill exercise is a compound movement that involves bending at the hip while keeping your legs straight. This exercise requires flexibility and strength, and is great for improving posture and reducing lower back pain. It is also a great exercise for athletes, as it can improve balance and stability.

How To Do A Windmill Exercise
To do a windmill exercise, stand with your feet shoulder-width apart and your arms extended out to the sides. Raise one arm straight up, keeping your eyes on your hand. Slowly lower your other arm and your torso to the side, keeping your legs straight. Keep your eyes on your hand throughout the movement. Return to the starting position and repeat on the other side.
If you are using weights, hold the weight in the opposite hand of the raised arm. The weight should be held close to your body throughout the movement.

Benefits Of The Windmill Exercise
The windmill exercise has a variety of benefits, including:
- Improved flexibility
- Reduced lower back pain
- Improved posture
- Improved balance and stability
- Stronger core, glutes, and hamstrings
Variations Of The Windmill Exercise
There are a few variations of the windmill exercise that can add variety to your workout:
- Single-leg windmill: This variation is done with one leg lifted off the ground.
- Dumbbell windmill: This variation is done with weights in both hands.
- Kettlebell windmill: This variation is done with a kettlebell in one hand.
Who Should Do The Windmill Exercise?
The windmill exercise is a great exercise for anyone looking to improve their flexibility, posture, and core strength. It is also a great exercise for athletes looking to improve their balance and stability. However, if you have any injuries or health conditions, it is important to speak to your doctor before starting any new exercise program.
Conclusion
The windmill exercise is a great exercise for anyone looking to improve their core strength, flexibility, and posture. It is important to start with a light weight or no weight until you are comfortable with the movement. As with any exercise, it is important to listen to your body and stop if you feel any pain or discomfort.
Related video of What Is A Windmill Exercise?

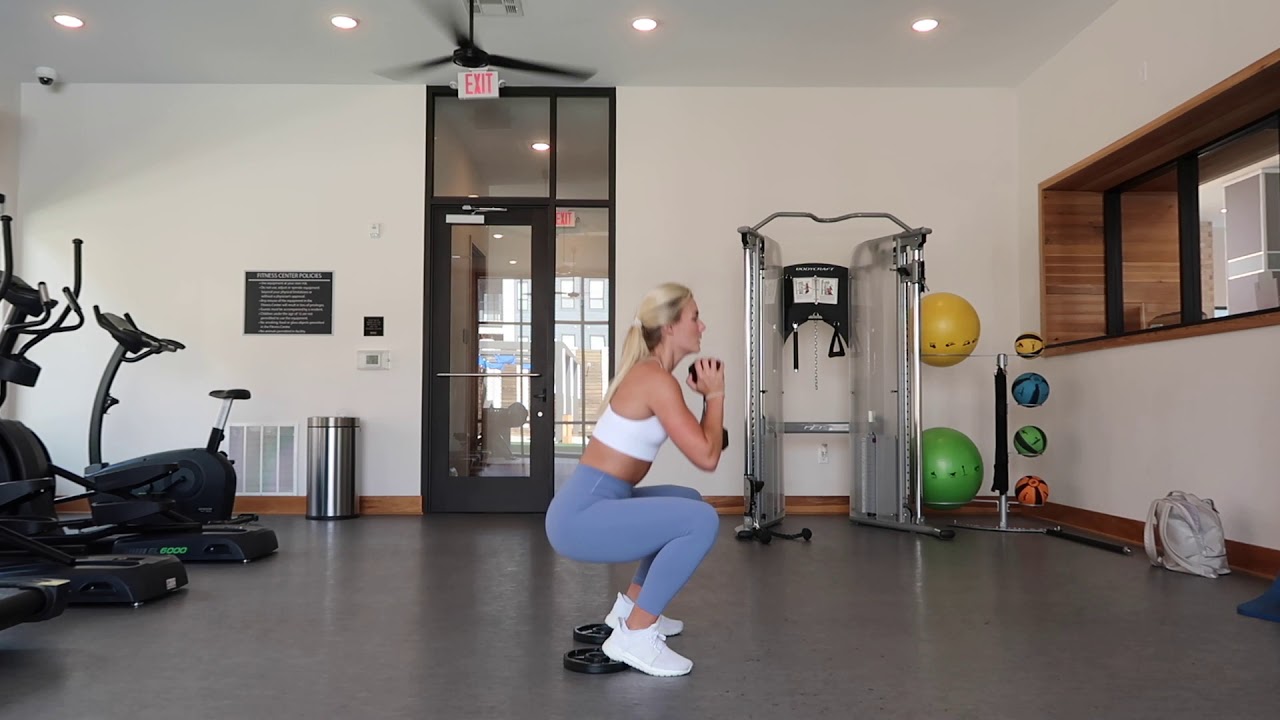
Squatting is one of the most effective exercises for building strength and muscle mass in the lower body. However, not everyone can perform the traditional barbell squat due to mobility or equipment limitations. If you're one of those people, don't worry - there's an alternative exercise you can try: the squat on a plate.
What Is Squat On A Plate?

Squat on a plate is a variation of the squat exercise in which you stand on a weight plate instead of the ground. This exercise allows you to perform a deeper squat than you would be able to on the ground, which can help you recruit more muscle fibers in your legs, glutes, and core.
How To Perform Squat On A Plate
Here's how to do a squat on a plate:
- Choose a weight plate that is at least 10-25 pounds.
- Place the plate on the ground and stand on it, with your feet shoulder-width apart.
- Lower your body down into a squat, keeping your weight on your heels and your chest up.
- Pause at the bottom of the squat and then push back up to the starting position.
- Repeat for the desired number of repetitions.
You can also hold a dumbbell or kettlebell in front of your chest to add extra resistance to the exercise.
Benefits Of Squat On A Plate

There are several benefits of squatting on a plate:
- Increased range of motion: Squatting on a plate allows you to perform a deeper squat than you would be able to on the ground, which can help you recruit more muscle fibers in your legs, glutes, and core.
- Improved balance: Standing on an unstable surface like a weight plate can help improve your balance and stability.
- Reduced stress on your knees: Squatting on a plate can reduce stress on your knees by allowing you to sit back further into the squat and keep your weight on your heels.
- Variation: Squatting on a plate is a great alternative to the traditional barbell squat, especially if you don't have access to a barbell or squat rack.
Tips For Doing Squat On A Plate
Here are some tips to help you get the most out of your squat on a plate:
- Start with a light weight: If you're new to squatting on a plate, start with a light weight and focus on your form before adding more weight.
- Keep your weight on your heels: When squatting on a plate, it's important to keep your weight on your heels to reduce stress on your knees and engage your glutes and hamstrings.
- Engage your core: To maintain good form during the exercise, engage your core muscles by pulling your belly button towards your spine.
- Breathe: Inhale as you lower your body down into the squat and exhale as you push back up to the starting position.
Conclusion
Squatting on a plate is a great exercise for building lower body strength and muscle mass, especially if you can't perform the traditional barbell squat. By following the tips and techniques outlined in this article, you can perform the exercise safely and effectively to achieve your fitness goals.
Related video of Squat On A Plate: Benefits, Tips, and Techniques

Are you looking for a way to tone your upper back and shoulders? Look no further than the incline reverse fly exercise. Not only does this exercise work multiple muscle groups, but it can also be done with minimal equipment.
What is an incline reverse fly?
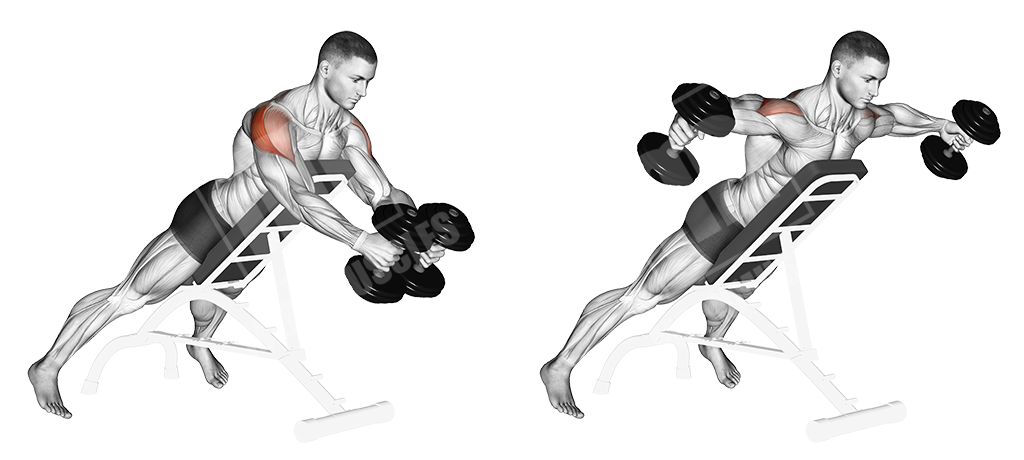
The incline reverse fly is a strength training exercise that primarily targets the muscles of the upper back and shoulders. This exercise involves lying face down on an incline bench and lifting weights out to the side, parallel to the floor, with a slight bend in the elbow.
Muscles worked during incline reverse fly

The incline reverse fly targets several muscles in the upper back, shoulders, and arms. The primary muscles worked during this exercise include:
- Rhomboids
- Posterior deltoids
- Trapezius
- Rotator cuff muscles
- Triceps
These muscles work together to help control the movement of the shoulder blades and upper arms, which is important for good posture and upper body strength.
Benefits of incline reverse fly

In addition to targeting multiple muscle groups, the incline reverse fly has several other benefits:
- Improves posture
- Increases upper body strength
- Reduces risk of injury in shoulders and upper back
- Can be done with minimal equipment
- Can be modified for different fitness levels
How to do incline reverse fly
Follow these steps to perform the incline reverse fly exercise:
- Set an incline bench to a 45-degree angle.
- Hold a set of dumbbells in each hand with your palms facing each other.
- Lie face down on the bench with your chest and stomach resting against the pad.
- Keep a slight bend in your elbows and lift the weights out to the side until they are parallel to the floor.
- Slowly lower the weights back down to the starting position.
- Repeat for 10-12 reps, rest, and then perform another set.
Modifications for incline reverse fly

If you're new to the incline reverse fly, start with a lighter weight and focus on proper form. As you get stronger, you can increase the weight or add additional sets.
You can also modify the incline reverse fly by changing the angle of the bench or using resistance bands instead of dumbbells. Resistance bands offer a different type of resistance than weights and can be a great option for those who want to add variety to their workouts.
Conclusion
The incline reverse fly is a simple yet effective exercise that can help you tone your upper back and shoulders. By targeting multiple muscle groups and improving posture, this exercise is a great addition to any fitness routine. Try incorporating the incline reverse fly into your next upper body workout for a challenging and rewarding experience.
Related video of Incline Reverse Fly Muscles Worked
A back extension is a type of exercise that targets the muscles in your lower back. It involves extending your spine while lying face down on a flat surface, such as a mat or bench. This exercise is frequently used in strength training and rehabilitation programs to help improve posture, reduce lower back pain, and increase overall spinal flexibility.
Types of Back Extensions
There are several variations of back extensions that you can perform, depending on your fitness level and goals. Some of the most common types include:
- Static back extension
- Dynamic back extension
- Reverse hyperextension
- Swiss ball back extension
- Superman back extension
Each of these exercises targets the muscles in your lower back and can help improve your posture, spinal alignment, and overall core strength.
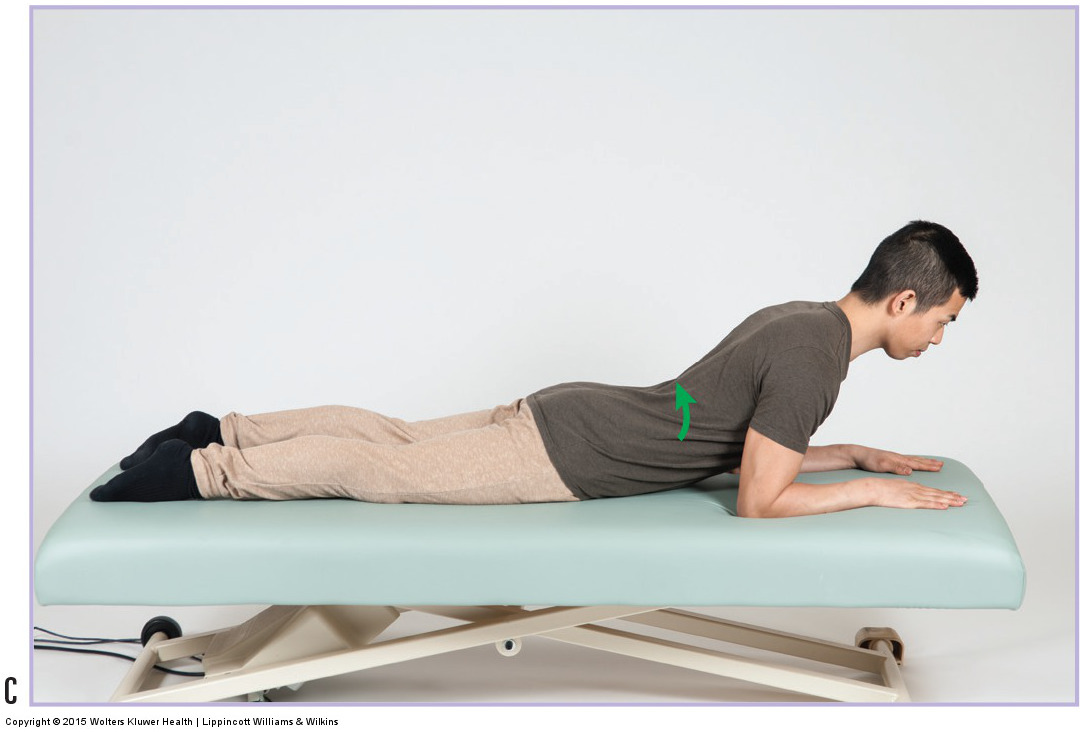
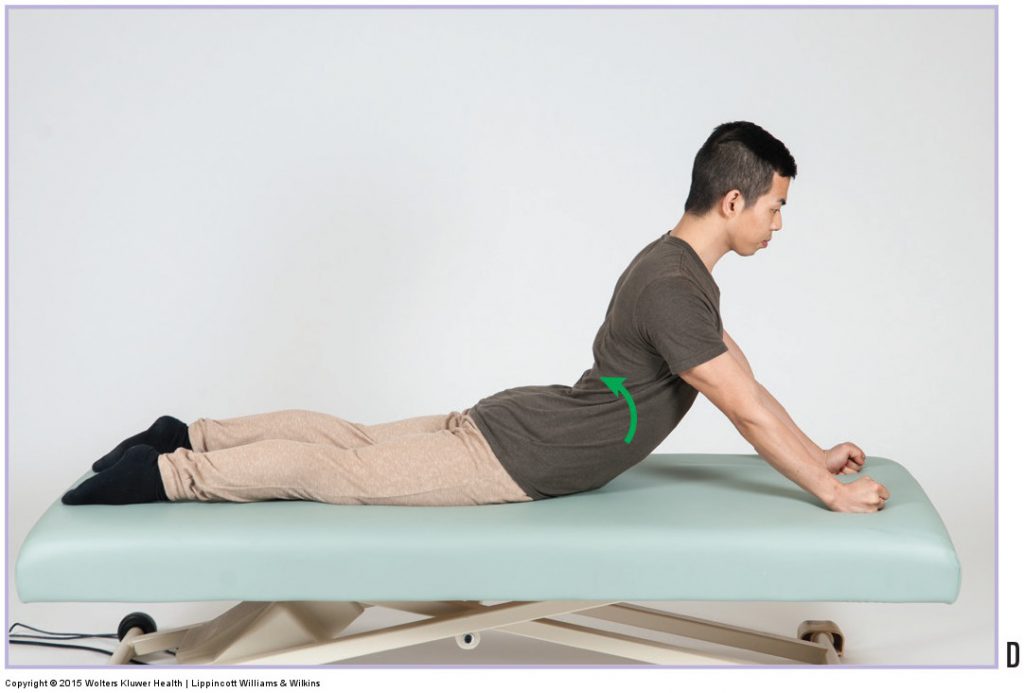
How to Perform a Static Back Extension
/back-extension-569feb9d3df78cafda9f144b.jpg)
To perform a static back extension, follow these steps:
- Lie face down on a flat surface, such as a mat or bench.
- Place your hands behind your head or cross them over your chest.
- Slowly lift your upper body off the ground, keeping your hips and legs in contact with the surface.
- Hold this position for several seconds, then slowly lower your upper body back down to the starting position.
- Repeat for several repetitions.
Remember to engage your core muscles and keep your neck in a neutral position throughout the exercise.
Benefits of Back Extensions

Back extensions offer a variety of benefits for your physical health and well-being. Some of the most notable benefits include:
- Improved posture and spinal alignment
- Reduced lower back pain and discomfort
- Increased spinal flexibility and range of motion
- Strengthened core muscles and improved overall stability
- Improved athletic performance and reduced risk of injury
By incorporating back extensions into your fitness routine, you can help improve your overall health, mobility, and quality of life.
Precautions and Considerations
While back extensions are generally considered safe for most people, there are some precautions and considerations you should keep in mind when performing this exercise. Some tips to keep in mind include:
- Start with a low intensity and gradually increase as your fitness level improves.
- Avoid overextending your spine or forcing your range of motion.
- Consult with a healthcare professional or fitness trainer before starting a new exercise program.
- Avoid performing back extensions if you have any existing back injuries or conditions.
- Listen to your body and stop if you experience any pain or discomfort during the exercise.
By following these tips and using proper form, you can safely enjoy the benefits of back extensions and improve your overall physical fitness.
Conclusion
Back extensions are an effective exercise for improving your posture, reducing lower back pain, and increasing overall spinal flexibility. By incorporating this exercise into your fitness routine, you can strengthen your core muscles, improve your athletic performance, and reduce your risk of injury. Remember to use proper form and start with a low intensity, and consult with a healthcare professional or fitness trainer if you have any concerns or questions about performing back extensions.
Related video of What Is A Back Extension?

The tricep is a muscle that is often overlooked but is essential for arm strength and stability. One exercise that can target the tricep is the reverse grip tricep press down. This exercise is simple to perform and can be done using a cable machine or resistance band. In this article, we will discuss in detail what the reverse grip tricep press down is and how to perform it correctly.
What is Reverse Grip Tricep Press Down?
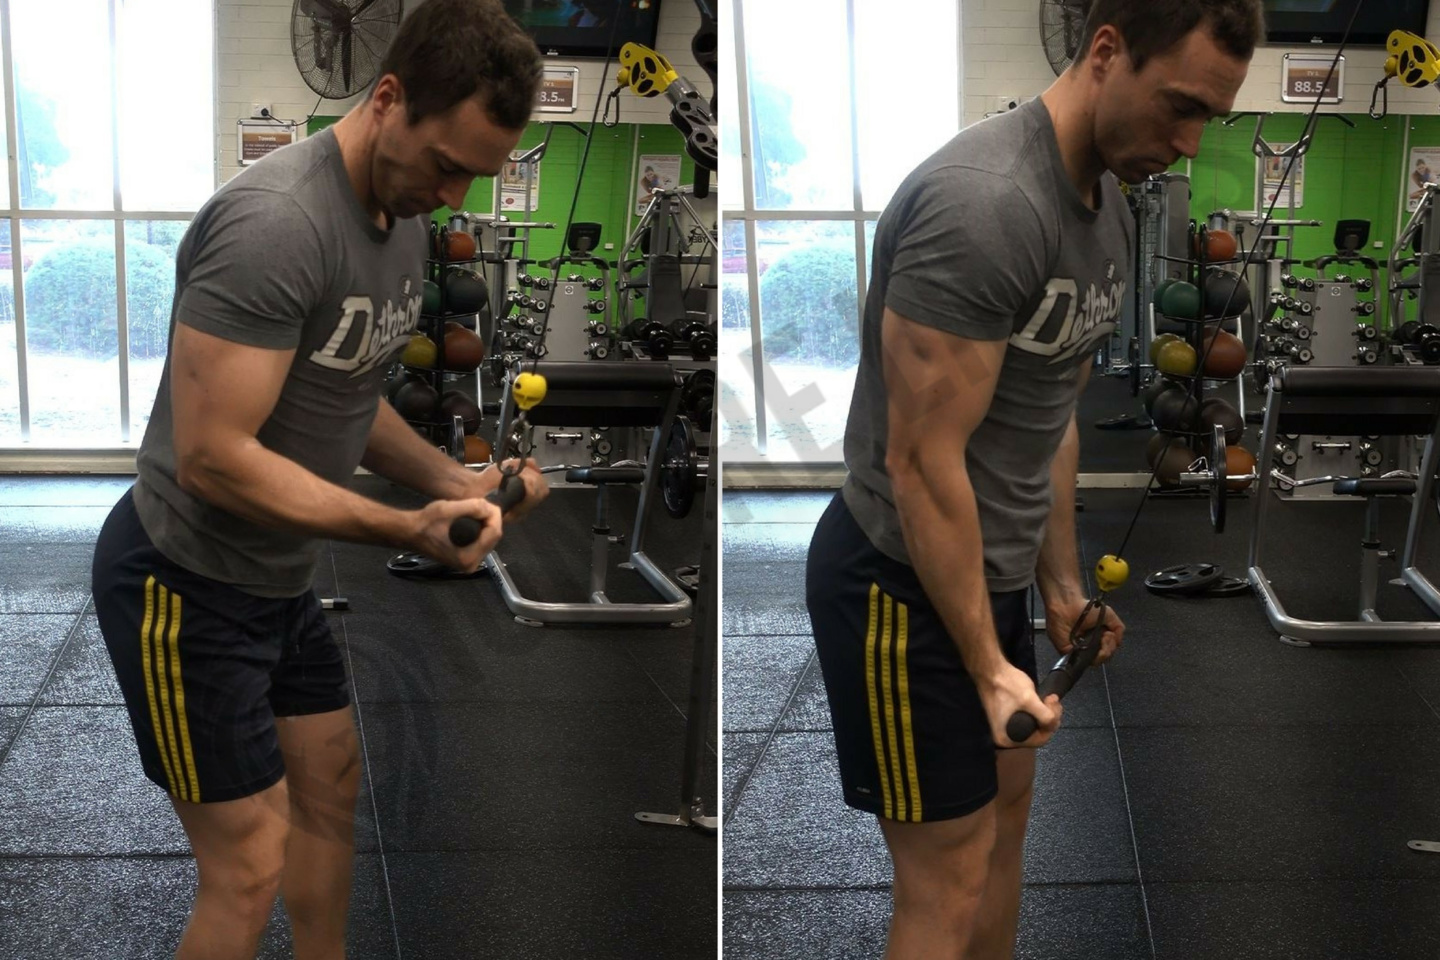
The reverse grip tricep press down is an exercise that targets the tricep muscles. It is performed by using a cable machine or resistance band. The exercise involves gripping the cable or resistance band with an underhand grip and then pressing it down towards the ground. The movement isolates the tricep muscles and helps to build strength and definition.
How to Perform Reverse Grip Tricep Press Down
To perform the reverse grip tricep press down, follow these steps:
- Attach a cable or resistance band to a high anchor point.
- Stand facing the anchor point and grab the cable or resistance band with an underhand grip.
- Stand with your feet shoulder-width apart and your knees slightly bent.
- Keep your arms close to your body and your elbows tucked in.
- Slowly press the cable or resistance band down towards the ground.
- Pause at the bottom of the movement and squeeze your tricep muscles.
- Slowly release the cable or resistance band back up to the starting position.
- Repeat for the desired number of reps.

It is important to keep your form correct while performing the reverse grip tricep press down. Keep your elbows tucked in and your arms close to your body. This will help to isolate the tricep muscles and prevent other muscles from taking over.
Variations of Reverse Grip Tricep Press Down
There are several variations of the reverse grip tricep press down that you can try:
- Overhead Reverse Grip Tricep Press Down - Perform the exercise with your arms extended overhead.
- One-Arm Reverse Grip Tricep Press Down - Perform the exercise with one arm at a time.
- Resistance Band Reverse Grip Tricep Press Down - Perform the exercise using a resistance band instead of a cable machine.

Trying these variations can help to keep your workout routine fresh and challenging. They can also help to target different areas of the tricep muscles.
Benefits of Reverse Grip Tricep Press Down
The reverse grip tricep press down has several benefits:
- Targets the tricep muscles - The exercise isolates and targets the tricep muscles, helping to build strength and definition.
- Easy to perform - The exercise is simple to perform and can be done using a cable machine or resistance band.
- Can be done at home - If you have a resistance band, you can perform this exercise at home.
- Improves arm stability - The exercise can help to improve arm stability, which is important for everyday activities.
Conclusion
The reverse grip tricep press down is a simple but effective exercise for targeting the tricep muscles. It can be done using a cable machine or resistance band and has several variations to keep your workout routine fresh. By incorporating this exercise into your workout routine, you can help to build strength and definition in your tricep muscles.
Related video of Reverse Grip Tricep Press Down

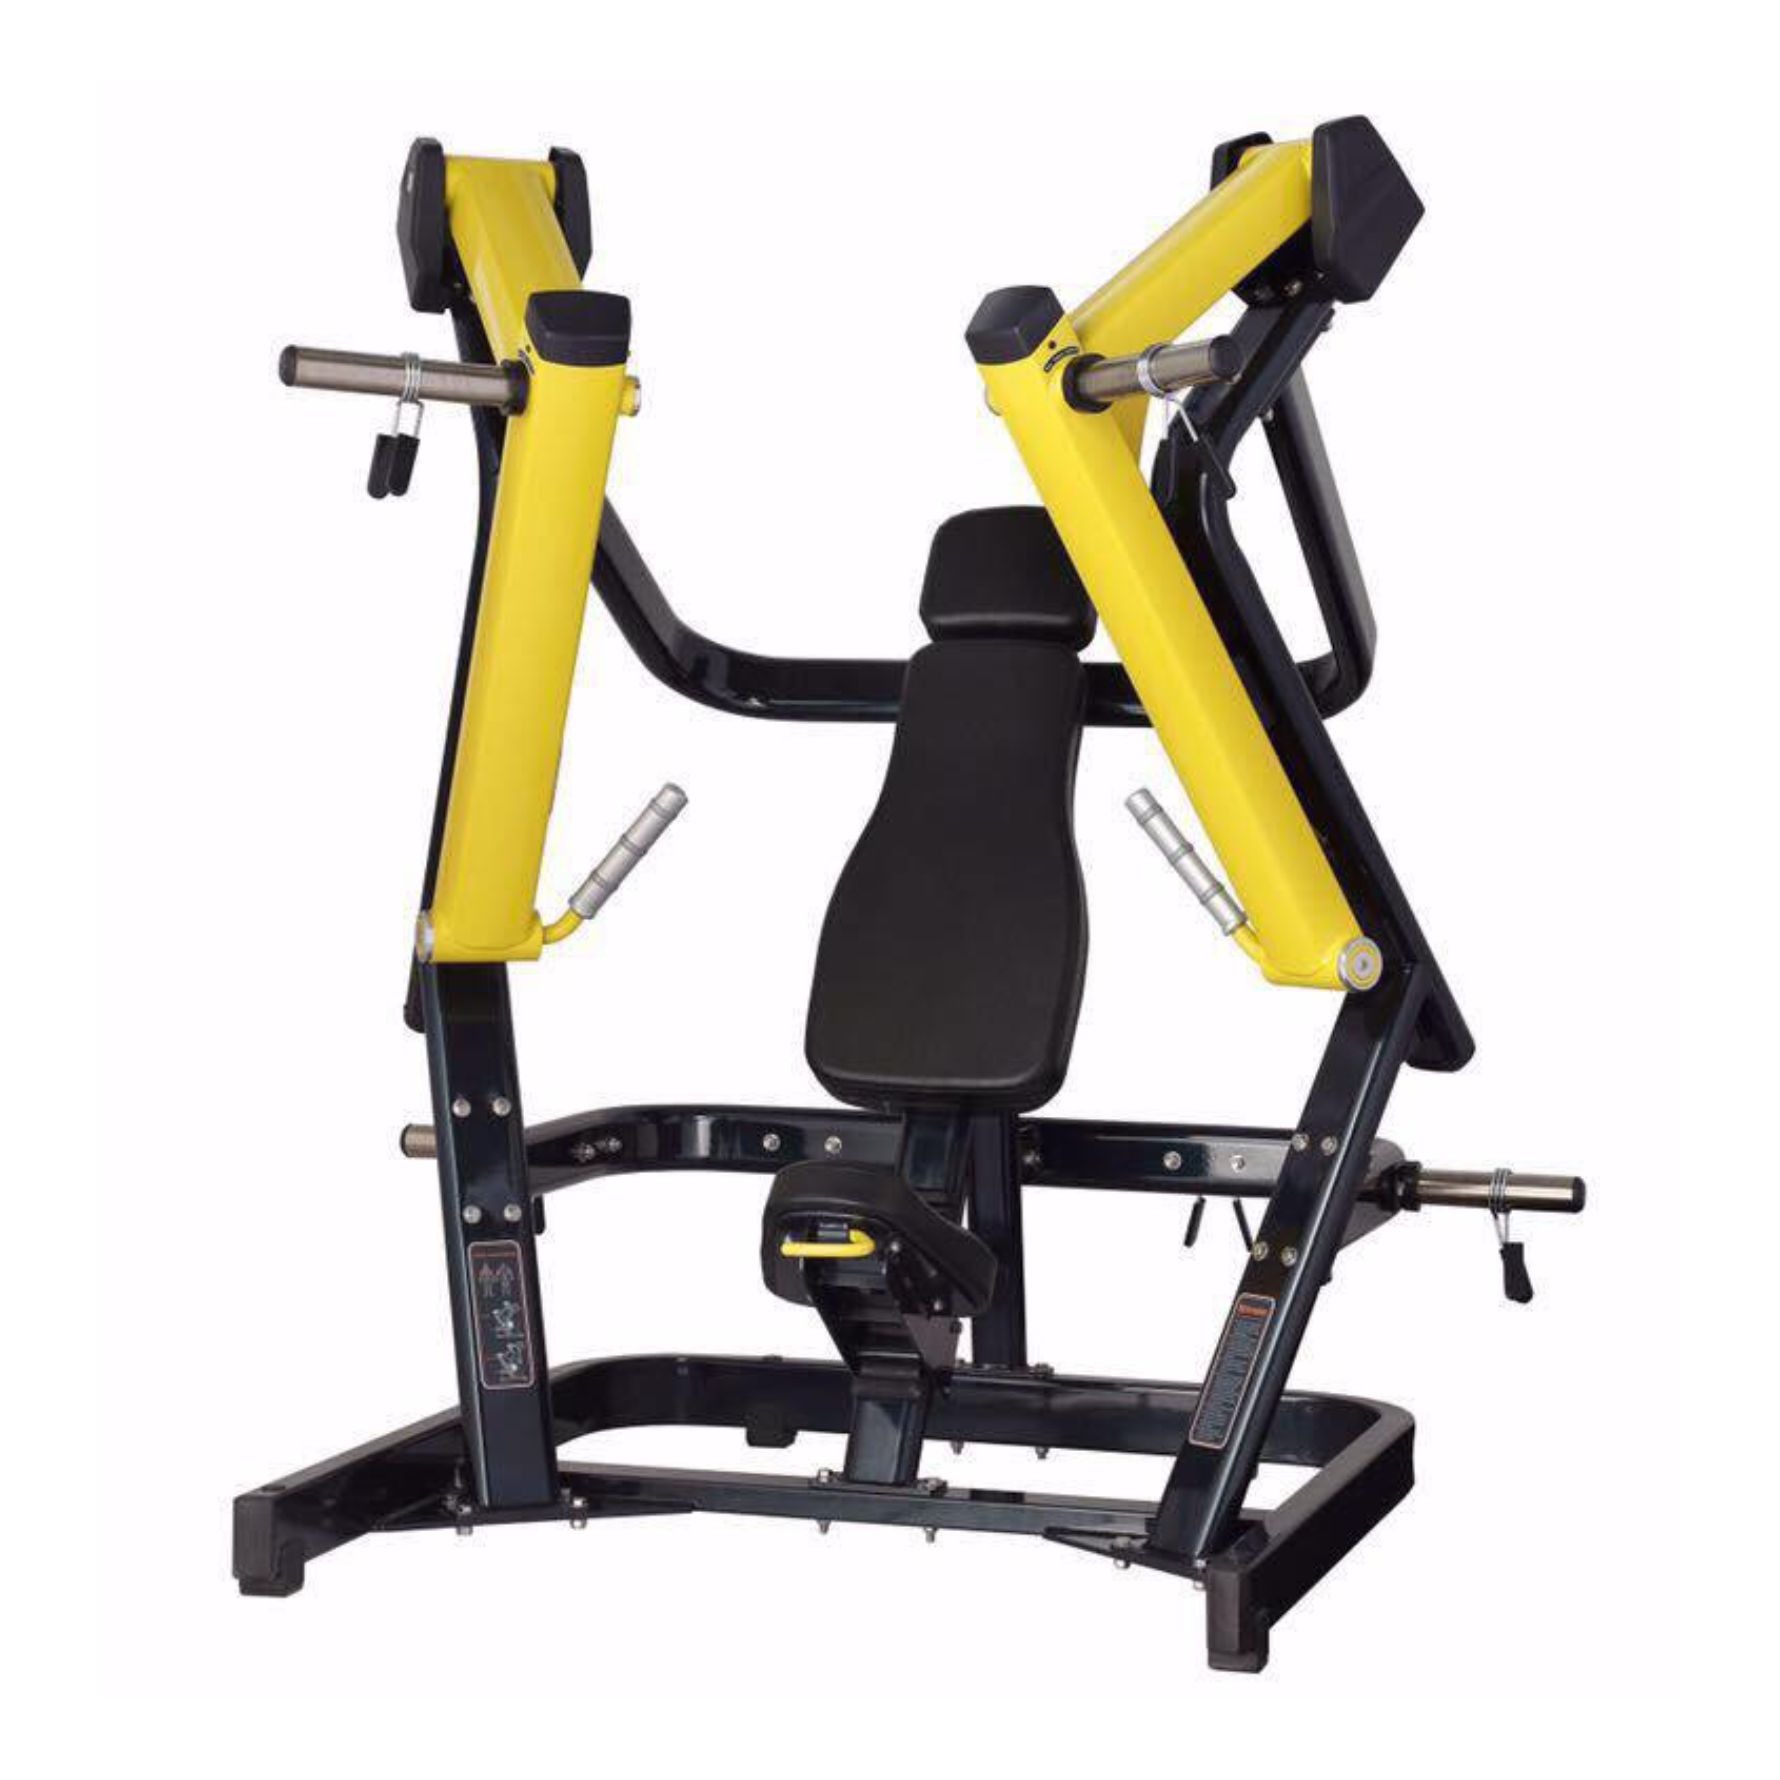
When it comes to building a strong and defined chest, the incline hammer strength chest press is an exercise that should not be overlooked. This compound exercise targets the upper chest, shoulders, and triceps, making it a great addition to any workout routine.
What is the Incline Hammer Strength Chest Press?

The incline hammer strength chest press is a machine-based exercise that uses a plate-loaded machine to simulate the movement of a traditional barbell or dumbbell press. The machine allows for a smooth and controlled motion, making it a great option for those who are new to strength training or want to focus on form and technique.
How to Perform the Incline Hammer Strength Chest Press

To perform the incline hammer strength chest press:
- Adjust the seat and backrest so that the handles are level with your upper chest.
- Sit down on the machine and grab the handles with an overhand grip.
- Press the handles forward until your arms are fully extended.
- Lower the handles back down towards your chest, keeping your elbows at a 45-degree angle to your body.
- Repeat for the desired number of repetitions.
Tips for Performing the Incline Hammer Strength Chest Press

To get the most out of the incline hammer strength chest press:
- Keep your core engaged throughout the exercise to maintain proper form and stability.
- Use a weight that allows you to complete 8-12 repetitions with good form.
- Focus on squeezing your chest muscles at the top of the movement.
- Don't lock out your elbows at the top of the movement to avoid unnecessary strain on your joints.
Variations of the Incline Hammer Strength Chest Press
There are several variations of the incline hammer strength chest press that can help to target different areas of the chest:
- Decline hammer strength chest press: This variation targets the lower portion of the chest.
- Neutral grip hammer strength chest press: This variation places less emphasis on the shoulders and triceps and more on the chest.
- Single-arm hammer strength chest press: This variation helps to improve imbalances between the left and right sides of the body.
The Benefits of the Incline Hammer Strength Chest Press

The incline hammer strength chest press offers several benefits:
- Targets the upper chest, shoulders, and triceps.
- Allows for a smooth and controlled motion.
- Reduces the risk of injury compared to free weights.
- Can be easily adjusted to accommodate different fitness levels.
Incorporating the Incline Hammer Strength Chest Press into Your Workout Routine

The incline hammer strength chest press can be incorporated into your workout routine in several ways:
- As a primary exercise on chest day: Perform 3-4 sets of 8-12 repetitions.
- As a secondary exercise on shoulder day: Perform 2-3 sets of 10-15 repetitions.
- As part of a full-body workout: Perform 2-3 sets of 12-15 repetitions.
Conclusion
The incline hammer strength chest press is a great exercise for building a strong and defined chest. It targets the upper chest, shoulders, and triceps, and can be easily adjusted to accommodate different fitness levels. By incorporating the incline hammer strength chest press into your workout routine, you can take your chest gains to the next level.
Related video of Incline Hammer Strength Chest Press: Build Strong and Defined Chest Muscles

When it comes to building a strong and muscular back, one of the most effective exercises that you can do is the alternating bent over row. This exercise targets the muscles in your upper back, including your lats, rhomboids, and traps, as well as your biceps and forearms. In this article, we'll take a closer look at how to perform this exercise properly, the benefits of doing it, and some tips for incorporating it into your workout routine.
How to Do Alternating Bent Over Rows

To perform alternating bent over rows, you'll need a set of dumbbells and a bench or sturdy chair. Here's how to do it:
- Stand with your feet shoulder-width apart, holding a dumbbell in each hand.
- With your knees slightly bent, hinge forward at the hips until your chest is parallel to the ground.
- Keeping your back straight and your core engaged, lift one dumbbell toward your chest, keeping your elbow close to your body.
- Lower the dumbbell back down to the starting position, and then repeat on the other side.
- Continue alternating sides for the desired number of reps.
It's important to keep your back straight throughout the exercise and to engage your core to avoid putting too much strain on your lower back. You can also vary the width of your grip on the dumbbells to target different areas of your back.
The Benefits of Alternating Bent Over Rows

There are many benefits to incorporating alternating bent over rows into your workout routine. Here are just a few:
- Strengthens your upper back muscles: The alternating bent over row targets the muscles in your upper back, including your lats, rhomboids, and traps, which can help improve your posture and reduce your risk of injury.
- Targets your biceps and forearms: In addition to your back muscles, the alternating bent over row also works your biceps and forearms, helping to build overall arm strength.
- Improves grip strength: Holding onto the dumbbells during the exercise can also help improve your grip strength, which can benefit you in other exercises as well.
- Increases overall muscle mass: Because the alternating bent over row involves multiple muscle groups, it can help you build overall muscle mass and strength more efficiently than other exercises.
- Can be done anywhere: You can perform alternating bent over rows with just a set of dumbbells, making it a convenient exercise to do at home or when traveling.
Tips for Incorporating Alternating Bent Over Rows into Your Workout Routine

If you're new to alternating bent over rows, start with a lighter weight and focus on perfecting your form before increasing the weight. You can also incorporate this exercise into a full-body workout or use it as part of a back-specific workout. Here are some tips for incorporating alternating bent over rows into your workout routine:
- Start with 2-3 sets of 10-12 reps, gradually increasing the weight as you get stronger.
- Alternate between different grip widths to target different areas of your back.
- Combine alternating bent over rows with other back exercises, such as pull-ups or lat pull-downs, for a well-rounded back workout.
- Use a weightlifting belt to support your lower back if you're lifting heavy.
- Take a break between sets to stretch your back and shoulders to help prevent injury.
Conclusion
Alternating bent over rows are a great exercise for building a strong and muscular back, as well as improving your overall arm and grip strength. By following the proper technique and incorporating this exercise into your workout routine, you can see significant improvements in your upper body strength and muscle mass. So what are you waiting for? Grab a set of dumbbells and start rowing!
Related video of Alternating Bent Over Rows: A Great Exercise for Building a Strong Back

Medium grip cable rows are an effective exercise for building back strength and improving posture. This exercise targets the upper and middle back muscles, including the rhomboids, trapezius, and rear delts. In this guide, we will discuss the proper form and benefits of medium grip cable rows.
Proper Form

To perform medium grip cable rows, follow these steps:
- Attach a straight bar to a cable machine at chest height.
- Stand in front of the cable machine with your feet shoulder-width apart.
- Grasp the bar with an overhand grip, keeping your hands shoulder-width apart.
- Keep your chest up and your back straight.
- Engage your shoulder blades and pull the bar towards your chest.
- Pause for a moment at the top of the movement before slowly releasing the bar back to the starting position.
- Repeat for desired reps and sets.
It is important to maintain proper form throughout the exercise to prevent injury and maximize results. Avoid using momentum to pull the bar, and focus on squeezing your shoulder blades together as you pull.
Variations

There are several variations of medium grip cable rows that can be used to target different areas of the back. Some variations include:
- Close grip cable rows: Use a closer grip on the bar to target the lower lats.
- Wide grip cable rows: Use a wider grip on the bar to target the upper lats and rear delts.
- Underhand grip cable rows: Use an underhand grip on the bar to target the biceps and lower lats.
By incorporating these variations into your workout routine, you can add variety and challenge to your back training.
Benefits

Medium grip cable rows offer several benefits for your back and overall fitness:
- Increased back strength: Medium grip cable rows target the upper and middle back muscles, which can improve posture and reduce the risk of back pain.
- Improved pulling strength: This exercise can improve your ability to perform pulling movements, such as pull-ups and rows.
- Increased muscle mass: By incorporating medium grip cable rows into your workout routine, you can build muscle in your back and improve overall muscle definition.
- Versatility: Medium grip cable rows can be performed with a variety of equipment, including cable machines, resistance bands, and dumbbells.
Conclusion
Medium grip cable rows are a versatile and effective exercise for building back strength and improving posture. By following proper form and incorporating variations into your routine, you can maximize the benefits of this exercise and achieve your fitness goals.
Related video of Medium Grip Cable Rows: A Guide to Proper Form and Benefits

If you're looking to strengthen your lower body, the elevated heel goblet squat is an excellent exercise to add to your routine. This squat variation targets your glutes, quads, and hamstrings while also improving your overall stability and balance.
What is an Elevated Heel Goblet Squat?
The elevated heel goblet squat is a squat variation that involves placing your heels on a small platform, such as weight plates or a squat wedge. This elevation helps to increase your ankle mobility and allows you to squat deeper while maintaining proper form.
The goblet squat aspect of this exercise involves holding a weight, typically a dumbbell or kettlebell, in front of your chest. This helps to engage your core muscles and improve your overall posture during the squat.
How to Perform an Elevated Heel Goblet Squat

To perform an elevated heel goblet squat, follow these steps:
- Place a small platform, such as weight plates or a squat wedge, under your heels.
- Hold a weight, such as a dumbbell or kettlebell, in front of your chest with both hands.
- Stand with your feet shoulder-width apart and your toes pointed slightly outward.
- Engage your core muscles and keep your chest up as you lower yourself into a squat, keeping your knees in line with your toes.
- Pause at the bottom of the squat, then push through your heels to return to the starting position.
- Repeat for the desired number of repetitions.
Tips for Performing an Elevated Heel Goblet Squat
Here are some tips to help you perform an elevated heel goblet squat with proper form:
- Make sure the platform you're using is stable and secure before beginning the exercise.
- Keep your chest up and your core engaged throughout the squat.
- Push through your heels as you return to the starting position.
- Don't let your knees collapse inward or outward during the squat.
- Start with a lighter weight and gradually increase the weight as you become more comfortable with the exercise.
Variations of the Elevated Heel Goblet Squat

Here are some variations of the elevated heel goblet squat:
- Single-leg elevated heel goblet squat: Perform the elevated heel goblet squat with one leg lifted off the ground.
- Sumo elevated heel goblet squat: Stand with your feet wider than shoulder-width apart and your toes pointed outward.
- Reverse elevated heel goblet squat: Perform the elevated heel goblet squat with your toes on the platform and your heels on the ground.
Benefits of the Elevated Heel Goblet Squat

The elevated heel goblet squat offers several benefits, including:
- Targets your glutes, quads, and hamstrings.
- Improves ankle mobility and allows you to squat deeper.
- Engages your core muscles and improves your overall posture.
- Increases stability and balance.
- Can be easily modified to suit different fitness levels and goals.
Conclusion
The elevated heel goblet squat is an effective lower body exercise that can help you build strength, stability, and balance. By adding this squat variation to your routine and following proper form and technique, you can reap the many benefits that it has to offer.
Related video of Elevated Heel Goblet Squat

Single leg squats, also known as pistol squats, are a challenging exercise that require immense strength, balance, and flexibility. It's an excellent exercise for improving athletic performance, developing leg strength, and enhancing functional movement patterns. Single leg squats primarily target the quads, hamstrings, and glutes. However, several other muscles also play a crucial role in executing a perfect single leg squat.
Primary Muscles Involved

The quadriceps muscles are the primary muscles worked during a single leg squat. The quadriceps are a group of four muscles located on the front of the thigh that help extend the knee. They work together to control the movement of the thigh and leg during the exercise. The quadriceps muscles include the rectus femoris, vastus intermedius, vastus lateralis, and vastus medialis.

The hamstring muscles are the secondary muscles worked during a single leg squat. The hamstrings are a group of three muscles located on the back of the thigh that help flex the knee and extend the hip. They work together to control the movement of the thigh and leg during the exercise. The hamstring muscles include the biceps femoris, semitendinosus, and semimembranosus.

The gluteus muscles are also worked during a single leg squat. The glutes are a group of three muscles located in the buttocks that help extend the hip and externally rotate the thigh. They play a crucial role in stabilizing the pelvis and controlling the movement of the hip and leg during the exercise. The gluteus muscles include the gluteus maximus, gluteus medius, and gluteus minimus.
Other Muscles Involved

The soleus muscles are worked during a single leg squat. The soleus is a muscle located in the calf that helps plantar flex the ankle. It works together with the gastrocnemius muscle to control the movement of the lower leg during the exercise.

The tibialis anterior muscles are worked during a single leg squat. The tibialis anterior is a muscle located in the shin that helps dorsiflex the ankle. It works together with the soleus muscle to control the movement of the lower leg during the exercise.

The abdominal muscles are also worked during a single leg squat. The abs are a group of muscles located in the abdomen that help stabilize the spine and maintain proper posture during the exercise.
Benefits of Single Leg Squats

Single leg squats offer several benefits, including:
- Improving balance and stability
- Strengthening the lower body
- Enhancing functional movement patterns
- Improving athletic performance
- Reducing the risk of injury
How to Perform a Single Leg Squat
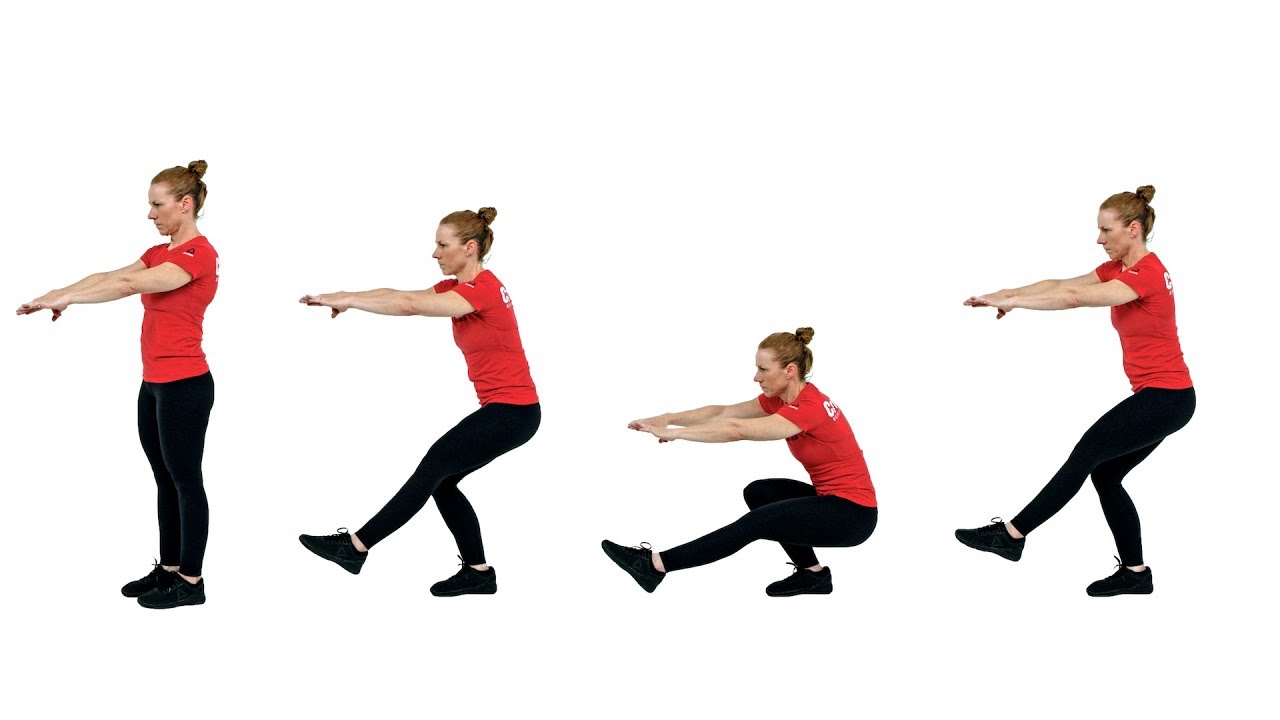
Here's how to perform a single leg squat:
- Stand with your feet hip-width apart
- Lift your right foot off the ground and extend it forward
- Lower your body down into a squat position, keeping your left knee behind your toes
- Extend your left leg back up to the starting position
- Repeat for the desired number of reps
- Switch sides and repeat the exercise with the left leg
Conclusion
Single leg squats are an excellent exercise for improving leg strength, balance, and stability. They primarily target the quads, hamstrings, and glutes, but several other muscles also play a crucial role in executing a perfect single leg squat. Incorporating single leg squats into your workout routine can help enhance your athletic performance, reduce your risk of injury, and improve your overall fitness level.
