
The incline bench press is a popular strength training exercise that targets the upper chest muscles. It involves lying on an incline bench with a barbell and pushing it upwards towards the ceiling. While many people incorporate this exercise into their workout routine, some take it to the extreme and attempt to break world records. In this article, we will explore the world record incline bench press and the people who have achieved it.
What is the World Record Incline Bench Press?
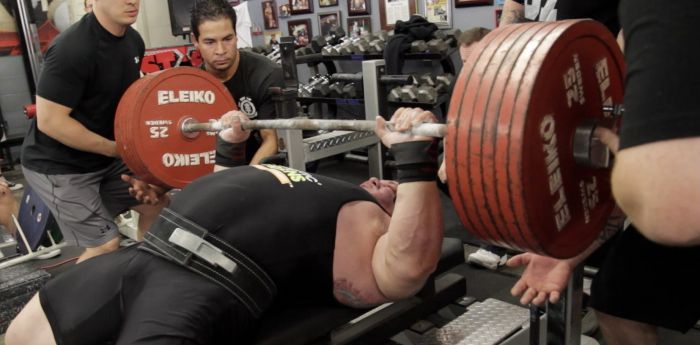
The world record incline bench press is the highest weight lifted in a single repetition for the incline bench press exercise. This record is recognized by the Guinness World Records and has been broken several times over the years. As of 2021, the current world record for the incline bench press is held by Larry Wheels, who lifted 584 pounds (265 kg) in 2020.
Larry Wheels: The Current World Record Holder

Larry Wheels is a powerlifter and bodybuilder from the United States. He began lifting weights at the age of 12 and has since become a well-known figure in the fitness industry. In 2020, Wheels broke the world record for the incline bench press by lifting 584 pounds (265 kg). He achieved this feat at the Hybrid Showdown II, which was held in Miami, Florida.
Previous World Record Holders

Before Larry Wheels, the world record for the incline bench press was held by Ryan Kennelly, who lifted 523 pounds (237 kg) in 2008. Kennelly is a powerlifter from the United States and has broken several world records in his career. He held the world record for the incline bench press for over a decade before it was broken by Wheels.
Other Impressive Incline Bench Press Records

While the world record for the incline bench press is the most impressive, there are several other impressive records for this exercise. For example, the heaviest dumbbell incline bench press is held by Denis Cyplenkov, who lifted 110 kg (242.5 pounds) in 2012. Additionally, the most reps of incline bench press in one minute is held by Rob Blair, who completed 52 reps in 2015.
The Benefits of Incline Bench Press

While breaking world records is impressive, the incline bench press also has several benefits for those who incorporate it into their workout routine. It targets the upper chest muscles, which can help to create a well-defined chest. Additionally, it can improve overall upper body strength and help to prevent injuries.
How to Properly Perform Incline Bench Press

If you want to incorporate the incline bench press into your workout routine, it is important to know how to perform it properly. Here are the steps to follow:
- Set up the incline bench at a 30-45 degree angle.
- Lie down on the bench with your feet flat on the ground and your back flat against the bench.
- Grab the bar with an overhand grip, slightly wider than shoulder-width.
- Lift the bar off the rack and lower it towards your upper chest.
- Push the bar upwards towards the ceiling, keeping your elbows tucked in and your back flat against the bench.
- Lower the bar back down towards your upper chest and repeat for desired reps.
Conclusion
The world record incline bench press is an impressive feat of strength that requires years of dedication and training. Larry Wheels currently holds the record at 584 pounds (265 kg), but there have been several other impressive records set over the years. While breaking records is impressive, the incline bench press also has several benefits for those who incorporate it into their workout routine. By following the proper technique, you can safely and effectively target your upper chest muscles and improve your overall strength.
Related video of World Record Incline Bench Press

The Bosu ball is a versatile piece of equipment that can be used to perform a variety of exercises, including those that target the abs. By incorporating the Bosu ball into your workout routine, you can add an extra challenge to your ab exercises and help to strengthen your core.
What is a Bosu Ball?
A Bosu ball is a half-circle shaped exercise ball that is flat on one side and inflated on the other. It is often used for balance and stability exercises, but can also be used for strength training exercises like squats, lunges, and push-ups.
Why Use a Bosu Ball for Abs?

Using a Bosu ball for ab exercises can add an extra challenge to your workout. Because the ball is unstable, your core muscles have to work harder to maintain your balance. This can help to strengthen your abs and improve your overall core stability.
Bosu Ball Ab Exercises

Here are some Bosu ball ab exercises to try:
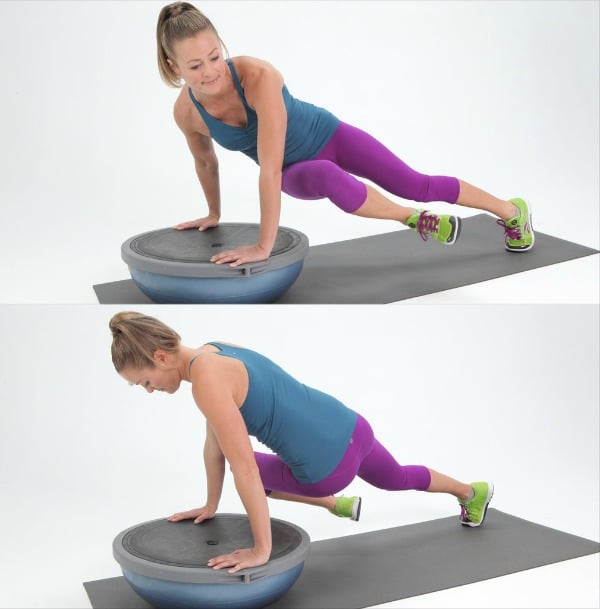
Bosu Ball Plank

Start in a plank position with your forearms on the Bosu ball and your feet on the ground. Hold for 30 seconds to 1 minute, keeping your core engaged and your body in a straight line.
Bosu Ball Crunches
Lie on your back with your feet on the Bosu ball and your hands behind your head. Crunch up, lifting your shoulders off the ground and contracting your abs. Lower back down and repeat for 10-15 reps.
Bosu Ball Bicycle Crunches

Lie on your back with your hands behind your head and your feet on the Bosu ball. Lift your shoulders off the ground and bring your left elbow to your right knee while straightening your left leg. Repeat on the other side, bringing your right elbow to your left knee while straightening your right leg. Continue alternating sides for 10-15 reps.
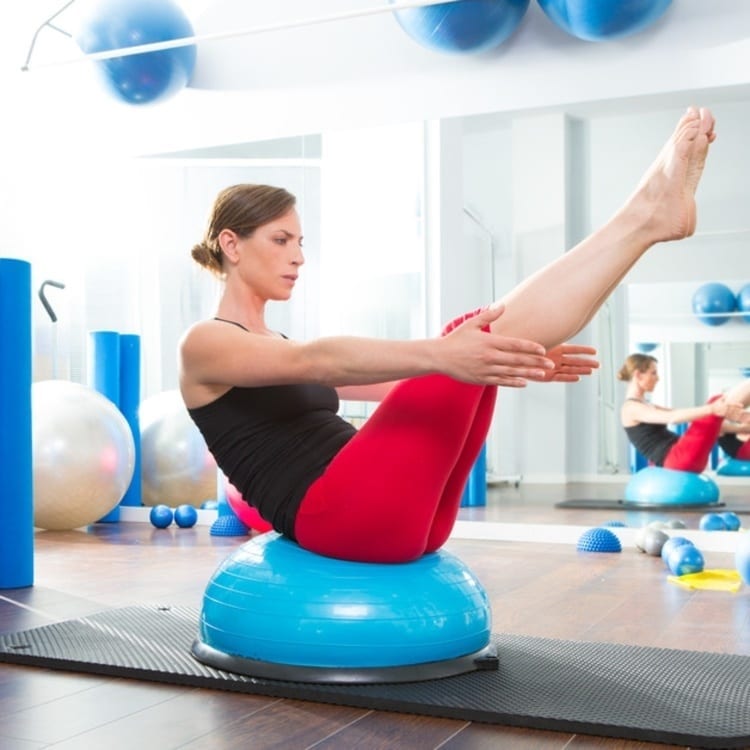
Bosu Ball Russian Twists

Sit on the Bosu ball with your feet flat on the ground and your knees bent. Hold a weight or medicine ball in front of you and twist your torso to the right, bringing the weight to the right side of your body. Twist back to the center and then to the left, bringing the weight to the left side of your body. Continue alternating sides for 10-15 reps.
Bosu Ball Ab Workout Routine

Here's a Bosu ball ab workout routine to try:
Warm-Up
5 minutes of cardio (jumping jacks, jogging in place, etc.)
Circuit 1
- Bosu ball plank - 30 seconds
- Bosu ball crunches - 10-15 reps
- Rest for 30 seconds
Circuit 2
- Bosu ball bicycle crunches - 10-15 reps
- Bosu ball Russian twists - 10-15 reps
- Rest for 30 seconds
Circuit 3
- Bosu ball plank - 30 seconds
- Bosu ball crunches - 10-15 reps
- Bosu ball bicycle crunches - 10-15 reps
- Bosu ball Russian twists - 10-15 reps
- Rest for 30 seconds
Cool-Down
5 minutes of stretching
Conclusion
Adding a Bosu ball to your ab workout routine can help to strengthen your core and improve your balance and stability. Try incorporating some of the exercises and the workout routine above into your next workout for a challenging and effective ab workout.
Related video of Bosu Ball Workout Abs
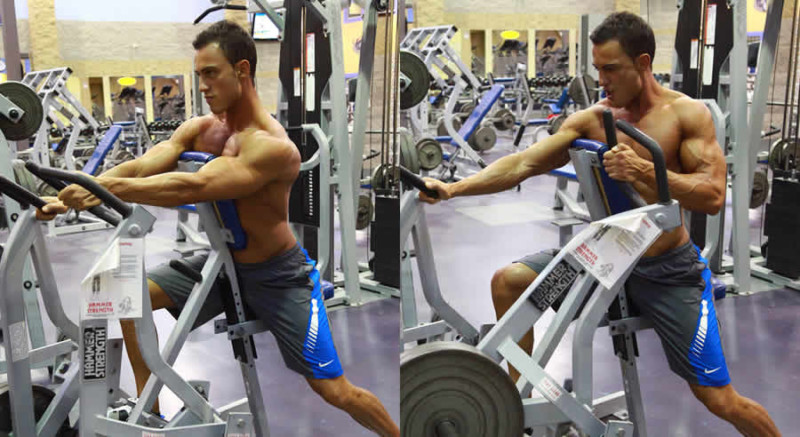
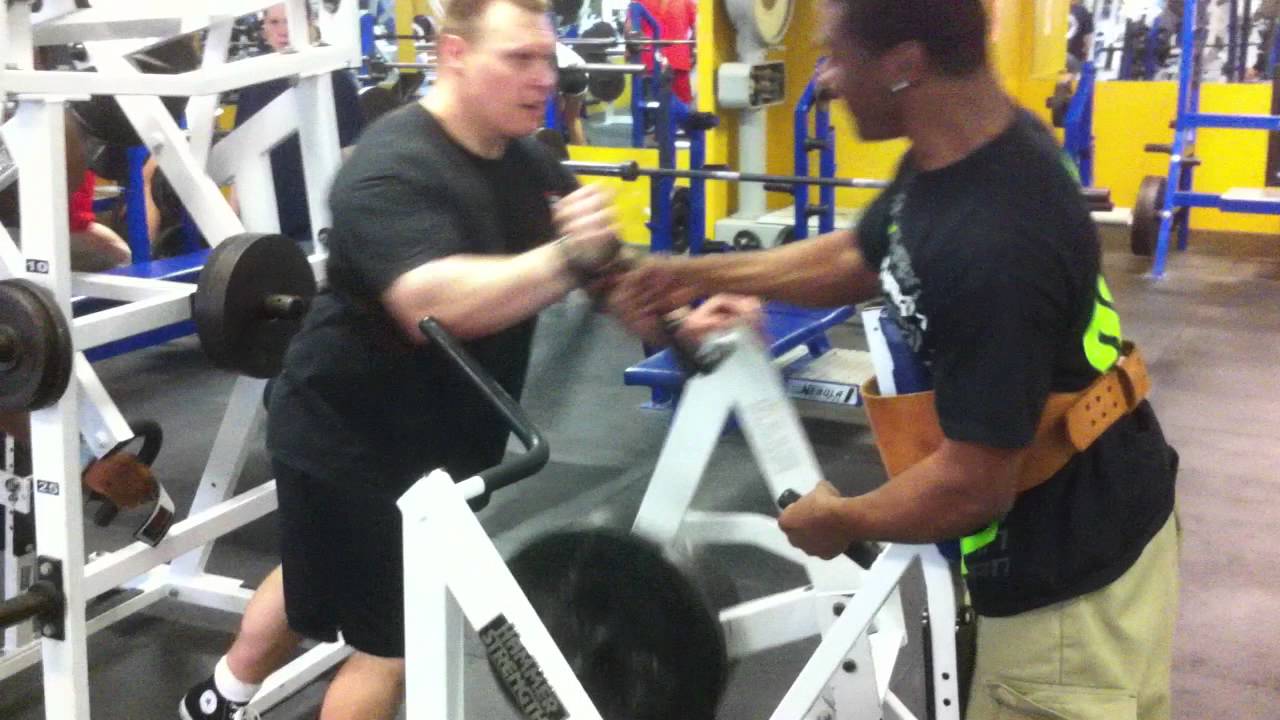
One Arm Hammer Row is a popular exercise that targets the upper back muscles, including the latissimus dorsi, rhomboids, and trapezius. This exercise is performed using a dumbbell, and it is an excellent way to improve your posture, strengthen your back, and increase your overall fitness level.
How to Perform One Arm Hammer Row
Here is a step-by-step guide on how to perform One Arm Hammer Row:
- Start by standing with your feet shoulder-width apart and holding a dumbbell in your right hand.
- Place your left hand on a bench or a sturdy object for support.
- Keep your back straight and your core engaged.
- Slowly lift the dumbbell towards your chest, keeping your elbow close to your body.
- Pause for a moment at the top of the movement and squeeze your shoulder blades together.
- Lower the dumbbell back down to the starting position and repeat for the desired number of reps.
- Switch sides and repeat the exercise with your left arm.
Note: It is important to keep your back straight throughout the exercise and avoid using momentum to lift the weight.
Benefits of One Arm Hammer Row

One Arm Hammer Row is a great exercise for anyone looking to improve their back strength and posture. Here are some of the main benefits of this exercise:
- Strengthening the upper back muscles, including the latissimus dorsi, rhomboids, and trapezius.
- Improving posture by promoting proper alignment of the spine and reducing the risk of back pain.
- Increasing overall fitness level by improving cardiovascular health and endurance.
- Helping to prevent injuries by strengthening the muscles that support the spine and shoulders.
Overall, One Arm Hammer Row is an effective exercise that can help you build a stronger, healthier back. Whether you are a beginner or a seasoned athlete, this exercise is a great addition to any workout routine.
Variations of One Arm Hammer Row

If you are looking to add some variety to your workout routine, here are some variations of One Arm Hammer Row that you can try:
- Single-Arm Dumbbell Row: This exercise is similar to One Arm Hammer Row, but instead of using a hammer grip, you use a neutral grip with your palm facing your body.
- Renegade Row: This exercise involves performing a push-up while holding dumbbells and then lifting each dumbbell towards your chest in a rowing motion.
- Bent-Over Barbell Row: This exercise is performed while holding a barbell with both hands and bending forward at the waist. It targets the same muscles as One Arm Hammer Row but is more challenging.
By incorporating these variations into your workout routine, you can keep your muscles guessing and avoid hitting a plateau in your progress.
Conclusion
One Arm Hammer Row is an effective exercise that targets the upper back muscles and can help improve your posture and overall fitness level. By following the proper technique and incorporating variations into your routine, you can continue to challenge your muscles and see progress over time.
Related video of One Arm Hammer Row: How to Perform and Benefits
:max_bytes(150000):strip_icc()/1-SideLungeWindmill-56fc3ce95f9b586195aaed3c.jpg)
Introduction
The windmill exercise is a popular exercise that targets the muscles in your core, back, and shoulders. This exercise is also known as the Russian Twist and it is a great way to strengthen your obliques and improve your overall fitness level. In this article, we will discuss everything you need to know about the windmill exercise and how to perform it correctly.
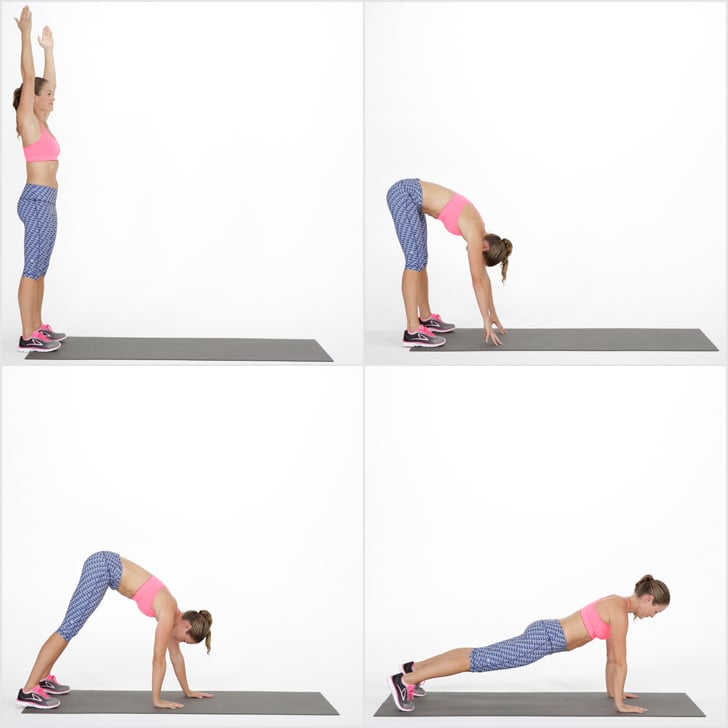
How To Do The Windmill Exercise
To perform the windmill exercise, you need to follow these simple steps:
- Stand with your feet shoulder-width apart and raise your arms straight above your head.
- Slowly bend forward from your hips and reach your right hand towards your left foot.
- As you reach for your foot, rotate your torso towards the left side.
- Return to the starting position and repeat on the other side.
- Perform 10 to 15 repetitions on each side.

Benefits Of The Windmill Exercise
The windmill exercise offers several benefits, including:
- Strengthening your core muscles
- Improving your balance and stability
- Increasing your flexibility
- Reducing your risk of injury
Additionally, the windmill exercise is a low-impact exercise that can be performed by people of all fitness levels. It is also a great exercise to add to your routine if you are looking to improve your overall fitness level.
Variations Of The Windmill Exercise
There are several variations of the windmill exercise that you can perform to target different muscles and add variety to your workout routine. Some popular variations include:
- Weighted windmill - holding a dumbbell or kettlebell in your hand while performing the exercise
- Single-leg windmill - performing the exercise while balancing on one leg
- Side plank windmill - performing the exercise while in a side plank position
It is important to note that if you are new to exercise or have any underlying medical conditions, you should consult with your doctor before attempting the windmill exercise or any other exercise.
Precautions To Take When Doing The Windmill Exercise
While the windmill exercise is a safe and effective exercise, there are a few precautions you should take to avoid injury:
- Do not round your back when bending over
- Keep your knees slightly bent throughout the exercise
- Do not twist your neck when rotating your torso
- Start with a light weight or no weight until you master the correct form
Conclusion
The windmill exercise is a great way to target the muscles in your core, back, and shoulders. It is a low-impact exercise that can be performed by people of all fitness levels. By following the correct form and taking the necessary precautions, you can safely perform the windmill exercise to improve your overall fitness level.
Related video of What Is The Windmill Exercise
A walkout is a form of protest where a group of people leave a designated area in a coordinated manner. This is often done to show disapproval of a particular policy, decision, or action that a group feels is unjust or unfair. Walkouts have been used throughout history as a means of peaceful protest, and they can be effective in drawing attention to specific issues and promoting change.
The History of Walkouts

Walkouts have been used throughout history as a means of peaceful protest. One of the most well-known walkouts in American history was the Delano grape strike in 1965. This was a protest by Filipino and Mexican farmworkers who were demanding better wages and working conditions. The strike lasted for five years and drew national attention to the plight of migrant workers.
Another famous walkout was the East Los Angeles high school walkouts in 1968. This was a protest by Chicano students who were demanding better educational opportunities and an end to discrimination in the school system. The walkouts lasted for several days and led to significant changes in the school system.
Types of Walkouts

There are several different types of walkouts, each with its own purpose and goal. Some of the most common types of walkouts include:
- Political Walkouts: These are walkouts that are organized to protest specific political policies or actions.
- Social Justice Walkouts: These are walkouts that are organized to protest social injustice and inequality.
- Labor Walkouts: These are walkouts that are organized by workers to protest unfair working conditions or wages.
- Student Walkouts: These are walkouts that are organized by students to protest issues related to education, such as curriculum changes or discrimination in the school system.
How Walkouts Work

Walkouts are typically organized by a group of individuals or organizations who are passionate about a particular issue. These organizers will work to spread the word about the walkout, usually through social media, flyers, or other forms of communication. On the day of the walkout, participants will gather at a designated location and then leave in a coordinated manner to show their disapproval of a particular policy or action.
Walkouts can vary in size and scope, from small groups of individuals to large-scale protests that involve thousands of people. They can also take place in a variety of settings, such as schools, workplaces, and public spaces.
Benefits of Walkouts

Walkouts can be an effective way to draw attention to specific issues and promote change. They can also be a powerful way for individuals to come together and show their solidarity with others who share their concerns. Walkouts can also help to raise awareness about particular issues and spark important conversations about social justice, labor rights, and other important topics.
Limitations of Walkouts

While walkouts can be effective in drawing attention to specific issues, they also have their limitations. For example, they may not always lead to immediate change or result in the outcomes that participants are hoping for. Walkouts can also be disruptive to daily life and can sometimes lead to conflicts with law enforcement or other authorities.
Conclusion
Walkouts are a powerful form of peaceful protest that have been used throughout history to promote change and raise awareness about important issues. Whether you are participating in a walkout or simply observing from the sidelines, it is important to remember the impact that these protests can have on society and to support those who are working to make a difference.
Related video of What Is A Walkout?

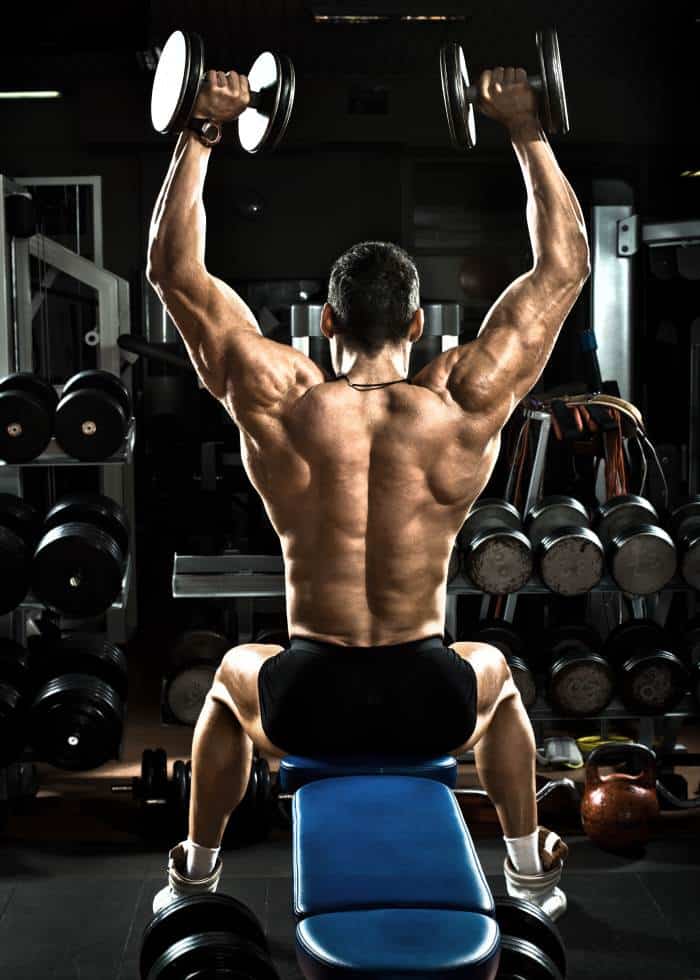
Db neutral grip shoulder press is a type of exercise that targets the shoulder muscles. It involves lifting dumbbells overhead while keeping the palms facing each other. This exercise is a great way to build strength and size in the shoulders.
How to Perform Db Neutral Grip Shoulder Press

Here are the steps to perform db neutral grip shoulder press:
- Start by standing with your feet shoulder-width apart and holding a dumbbell in each hand with a neutral grip.
- Bring the dumbbells up to your shoulders, keeping your elbows close to your body.
- Press the dumbbells overhead, keeping your palms facing each other.
- Lower the dumbbells back down to your shoulders.
- Repeat for the desired number of repetitions.
When performing this exercise, it is important to keep your core tight and maintain proper form throughout the movement. It is also important to use a weight that is appropriate for your strength level.
Benefits of Db Neutral Grip Shoulder Press

Db neutral grip shoulder press offers several benefits, including:
- Increased shoulder strength and size
- Improved shoulder stability
- Reduced risk of shoulder injury
- Engagement of the triceps and upper back muscles
This exercise can also be modified to target different areas of the shoulder muscles by adjusting the angle of the press or using different weights.
Variations of Db Neutral Grip Shoulder Press

Here are some variations of db neutral grip shoulder press:
- Seated db neutral grip shoulder press
- Db neutral grip Arnold press
- Db neutral grip push press
These variations offer slightly different benefits and can help to keep your workouts varied and challenging.
Precautions and Tips

Here are some precautions and tips to keep in mind when performing db neutral grip shoulder press:
- Start with a weight that is appropriate for your strength level
- Warm up your shoulder muscles before starting the exercise
- Maintain proper form throughout the movement
- Avoid locking out your elbows at the top of the press
- Listen to your body and stop the exercise if you experience pain or discomfort
Conclusion
Db neutral grip shoulder press is a great exercise for building strength and size in the shoulders while also engaging other upper body muscles. By following proper form and incorporating variations into your workouts, you can continue to challenge yourself and see progress over time.
Related video of Db Neutral Grip Shoulder Press

The biceps are one of the most important muscles in the upper body. They not only help you lift things but also give your arms a defined look. If you want to strengthen your biceps, the Prone Incline Bicep Curl is an excellent exercise to try. This exercise targets the biceps and helps build muscle mass in your arms.
What is Prone Incline Bicep Curl?

Prone Incline Bicep Curl is a variation of the traditional bicep curl exercise. In this exercise, you lie face down on an incline bench with your arms hanging straight down towards the ground. You then curl the weights up towards your shoulders, contracting your biceps as you lift. This exercise is performed with dumbbells and is suitable for all levels of fitness.
How to Perform Prone Incline Bicep Curl?
Before starting the exercise, you need to ensure that you have the right equipment. You will need an incline bench and a set of dumbbells. Once you have the equipment, follow these steps:
- Adjust the incline bench to a 45-degree angle.
- Lie face down on the bench with your chest and stomach resting against it.
- Keep your feet flat on the ground and your arms straight down towards the floor.
- Hold a pair of dumbbells in each hand with an underhand grip.
- Curl the weights up towards your shoulders while contracting your biceps.
- Hold for a second and then lower the weights back down to the starting position.
- Repeat for the desired number of reps.

Tips for Prone Incline Bicep Curl
Prone Incline Bicep Curl is a challenging exercise, but you can make it easier with these tips:
- Start with a light weight to get used to the movement and build your strength gradually.
- Keep your elbows close to your body while lifting the weights.
- Avoid swinging or using momentum to lift the weights.
- Exhale while lifting the weights and inhale while lowering them.
- Perform the exercise slowly and with control.
- Do not lock your elbows at the bottom of the movement.

Benefits of Prone Incline Bicep Curl
Prone Incline Bicep Curl is an effective exercise that offers several benefits:
- It targets the biceps and helps build muscle mass in the arms.
- It strengthens the forearms, wrists, and grip.
- It improves your overall upper body strength.
- It helps to prevent injuries by strengthening the muscles around the elbow joint.
- It can be done at home or in the gym with minimal equipment.

Conclusion
If you want to strengthen your biceps, the Prone Incline Bicep Curl is a great exercise to try. It targets the biceps and helps build muscle mass in your arms. Remember to start with a light weight and gradually increase the weight as you get stronger. With consistent practice, you can improve your upper body strength and get defined arms.
Related video of Prone Incline Bicep Curl: Strengthen Your Arms with this Effective Exercise

Exercising is one of the most crucial aspects of maintaining healthy living. It not only helps in staying fit but also boosts mental health. There are various types of exercises that people can do to keep themselves healthy. One such exercise is the curtsy lunge. The curtsy lunge is a variation of the traditional lunge that targets different muscle groups. In this article, we will discuss the curtsy lunge muscles worked and how to perform this exercise correctly.
What is a Curtsy Lunge?
The curtsy lunge is a lower body exercise that involves stepping one leg back and across the other leg, similar to a curtsy. This exercise targets the glutes, quads, hamstrings, and calves. Performing this exercise regularly can help in toning the lower body and increasing strength.
How to Perform a Curtsy Lunge?

Before starting any exercise, it is essential to warm up the body to avoid injuries. To perform a curtsy lunge, follow these steps:
- Stand up straight with your feet shoulder-width apart.
- Place your hands on your hips or hold a dumbbell in each hand.
- Step your left leg diagonally behind your right leg, keeping your left foot pointed towards the right.
- Bend both knees, lowering your body towards the floor, while keeping your back straight.
- Push through your right heel to stand back up.
- Repeat on the other side by stepping your right leg diagonally behind your left leg.
- Perform 3 sets of 12-15 repetitions on each leg.
Curtsy Lunge Muscles Worked
The curtsy lunge targets several muscle groups in the lower body, including:
- Glutes: The glutes, especially the gluteus maximus, are the primary muscles worked during the curtsy lunge. This exercise helps in toning and strengthening the glutes, giving your butt a more defined look.
- Quads: The quadriceps, located in the front of the thigh, are also targeted during the curtsy lunge. This exercise helps in toning and strengthening the quads, making them stronger and more defined.
- Hamstrings: The hamstrings, located in the back of the thigh, are also worked during the curtsy lunge. This exercise helps in toning and strengthening the hamstrings, making them less prone to injuries.
- Calves: The calves, located in the back of the lower leg, are also targeted during the curtsy lunge. This exercise helps in toning and strengthening the calves, giving them a more defined look.

Benefits of Curtsy Lunges
Curtsy lunges offer several benefits that can help in maintaining a healthy lifestyle. Some of the benefits of curtsy lunges include:
- Increased lower body strength: Curtsy lunges target several muscle groups in the lower body, helping in increasing overall lower body strength.
- Toning and defining muscles: Curtsy lunges help in toning and defining the glutes, quads, hamstrings, and calves, giving them a more defined look.
- Burns calories: Curtsy lunges are a great way to burn calories, helping in weight loss and maintaining a healthy weight.
- Improved balance and stability: Curtsy lunges require balance and stability, helping in improving overall balance and stability.
- Reduced risk of injuries: Curtsy lunges help in strengthening the muscles in the lower body, making them less prone to injuries.
Conclusion
The curtsy lunge is a great exercise to add to your lower body workout routine. It targets several muscle groups in the lower body, helping in increasing strength and toning muscles. Performing curtsy lunges regularly can offer several benefits, such as improved balance and stability, reduced risk of injuries, and burning calories. So, if you want to maintain a healthy lifestyle, add curtsy lunges to your workout routine today!
Related video of Curtsy Lunge Muscles Worked
When it comes to building an aesthetic and muscular physique, most people focus on chest, back, and biceps exercises. While these muscle groups are essential, neglecting other muscles can lead to imbalances and injuries. One of the most overlooked muscle groups is the upper back, specifically the muscles targeted by face pull exercises.
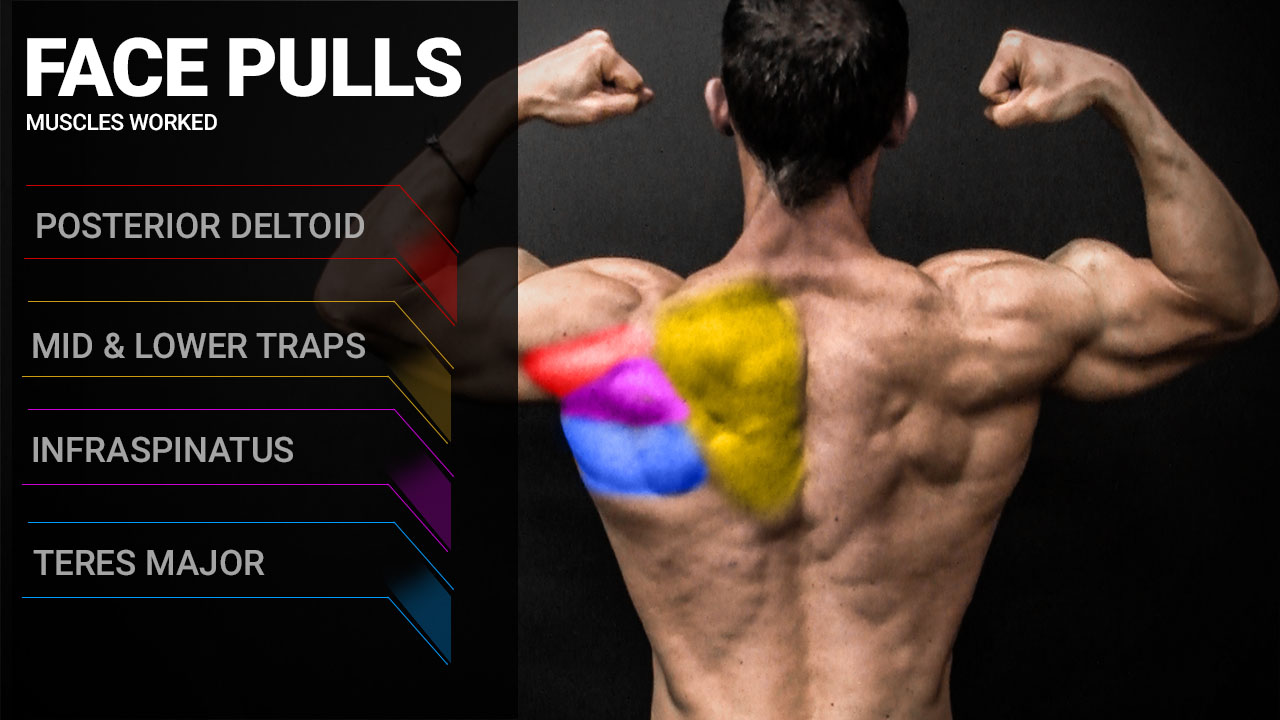
What are Face Pulls?
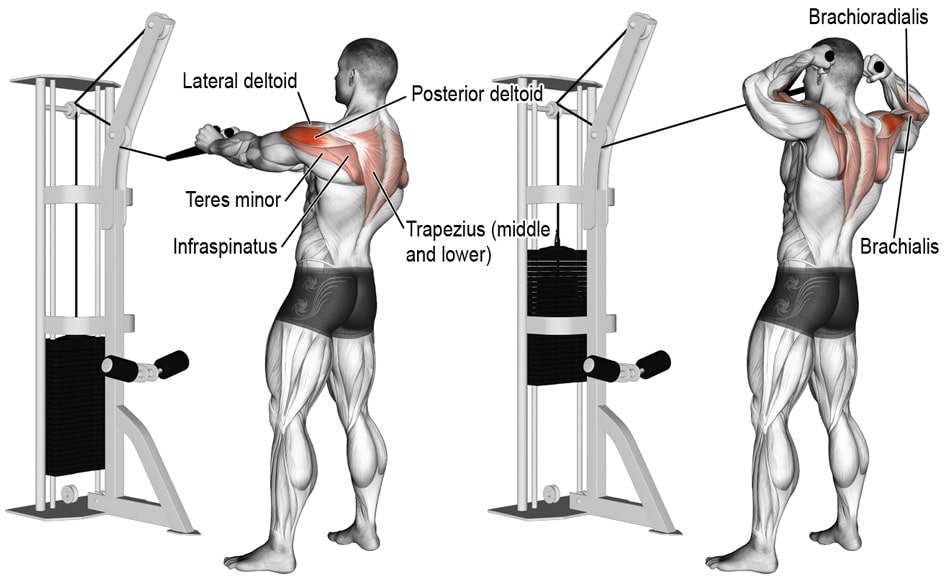
Face pulls are a compound exercise that targets the rear deltoids, rhomboids, and upper traps. This exercise involves pulling a cable or resistance band towards your face while keeping your elbows high and your shoulders back. Face pulls can be performed using various equipment, including cable machines, resistance bands, and TRX straps.
Benefits of Face Pulls
Face pulls offer several benefits, including:
- Increasing shoulder mobility and stability
- Reducing the risk of shoulder injuries
- Improving posture by strengthening the upper back muscles
- Targeting hard-to-hit rear deltoids for a complete shoulder development
- Enhancing overall upper body strength and power
How to Perform Face Pulls
Here is a step-by-step guide to performing face pulls correctly:
- Attach a resistance band or cable to a high anchor point.
- Grasp the handles with overhand grip and step back until you feel tension in the band or cable.
- Assume a shoulder-width stance with your feet firmly planted on the ground.
- Retract your shoulders blades and pull the band or cable towards your face while keeping your elbows high.
- Pause for a second at the end of the movement and squeeze your upper back muscles.
- Slowly reverse the movement and return to the starting position.
- Repeat for the desired number of reps.

Face Pull Variations
Here are some popular variations of face pulls:
- Rope Face Pulls: Perform face pulls using a rope attachment for a different grip and range of motion.
- Single Arm Face Pulls: Perform face pulls one arm at a time to isolate each side and improve symmetry.
- Face Pulls with External Rotation: Add an external rotation at the end of the movement to target the rotator cuff muscles.
- Resistance Band Face Pulls: Use resistance bands instead of cable machines for a portable and affordable option.
Face Pull Workout Routine
If you want to incorporate face pulls into your workout routine, here is a sample face pull workout:
- Warm-up: 3 sets of 10 reps of band pull-aparts
- Face Pulls: 4 sets of 12 reps
- Lat Pulldowns: 4 sets of 10 reps
- Seated Rows: 4 sets of 12 reps
- Reverse Flyes: 3 sets of 15 reps
- Cool-down: Stretch your upper back and shoulders for 5-10 minutes
Conclusion
Face pulls are an excellent exercise for anyone looking to improve their upper back strength, posture, and shoulder health. Incorporating face pulls into your workout routine can lead to better overall upper body development and reduce the risk of injuries. Remember to perform face pulls correctly, use proper form, and gradually increase the weight and intensity.
Related video of Face Pull Muscle Group: The Ultimate Guide
For those who are looking to tone their legs and improve their overall lower body strength, calf raises are a popular exercise choice. But what muscles do calf raises work exactly? In this article, we'll explore the answer to this question and provide some tips on how to perform calf raises effectively.
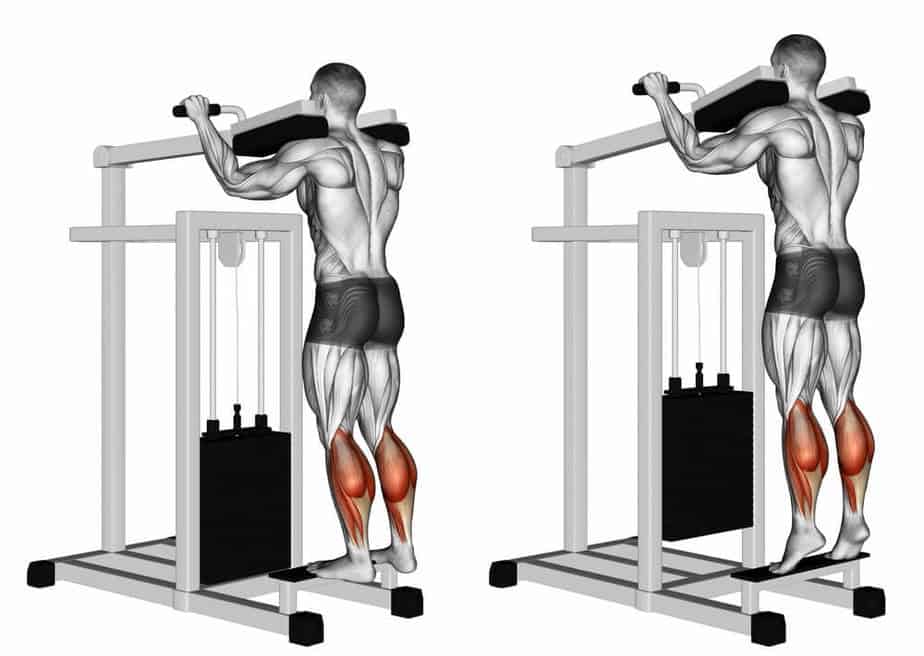
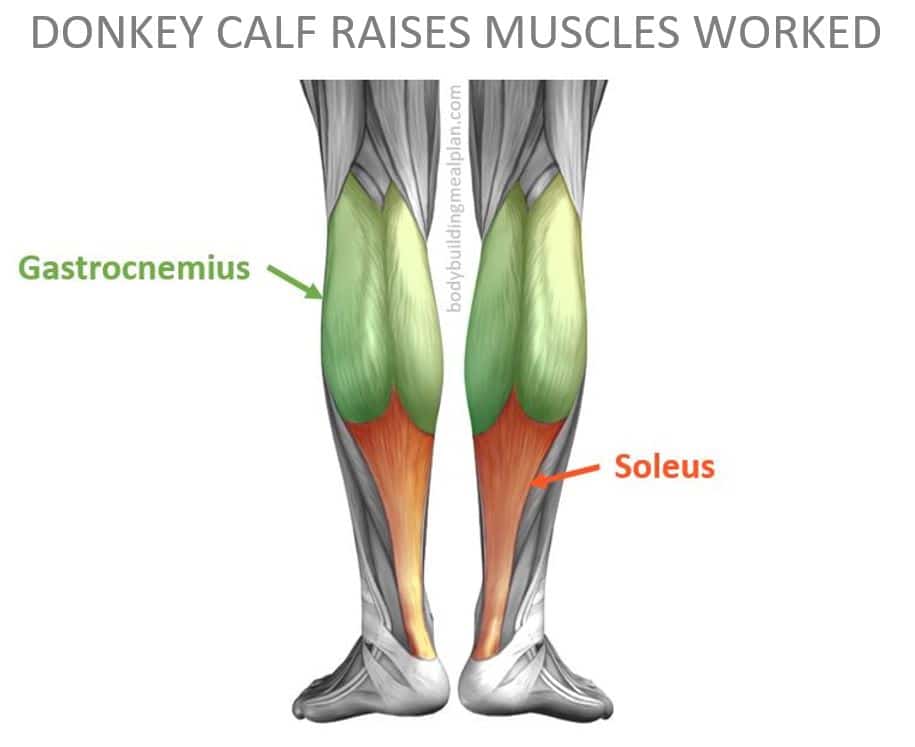
The Muscles Involved in Calf Raises
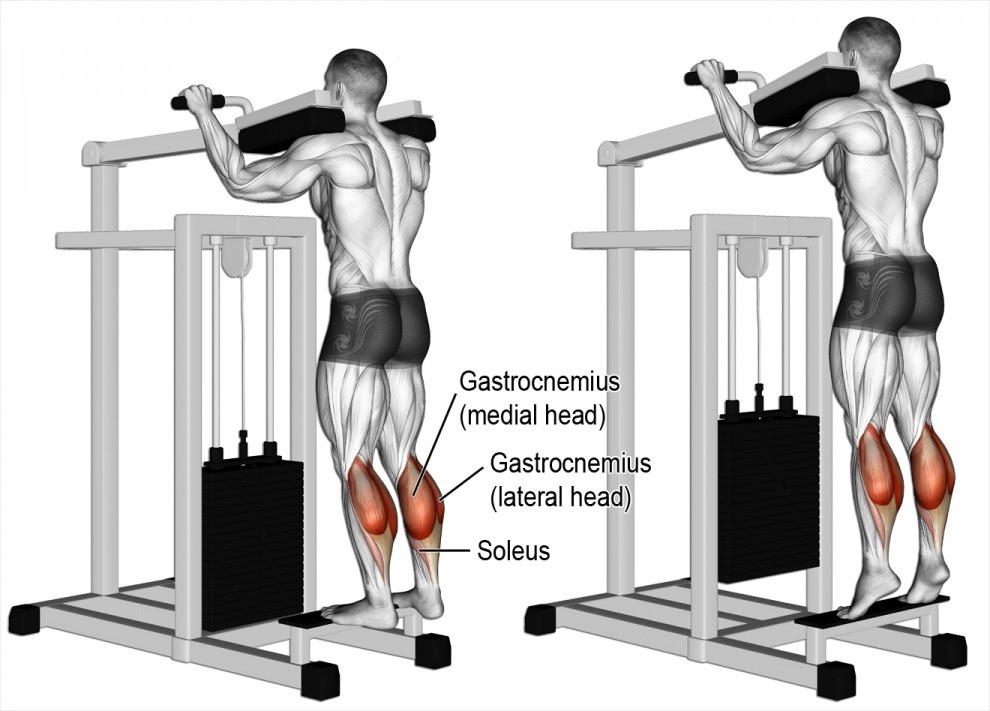
Calf raises primarily target the gastrocnemius and soleus muscles in the calf. The gastrocnemius muscle is the largest muscle in the calf and is responsible for giving the calf its distinctive diamond shape. The soleus muscle is located deeper in the calf and is responsible for providing stability and balance during movement.
Both of these muscles work together when performing calf raises. When you lift your heels off the ground, the gastrocnemius muscle contracts to pull the heel upwards, while the soleus muscle stabilizes the ankle joint and helps to maintain balance.
Other Muscles Involved in Calf Raises
In addition to the gastrocnemius and soleus muscles, calf raises also work other muscles in the lower body. These include:
- The quadriceps
- The hamstrings
- The glutes
The quadriceps and hamstrings are located in the thigh and work to stabilize the knee joint during calf raises. The glutes are located in the buttocks and provide additional stability to the body during the exercise.
How to Perform Calf Raises
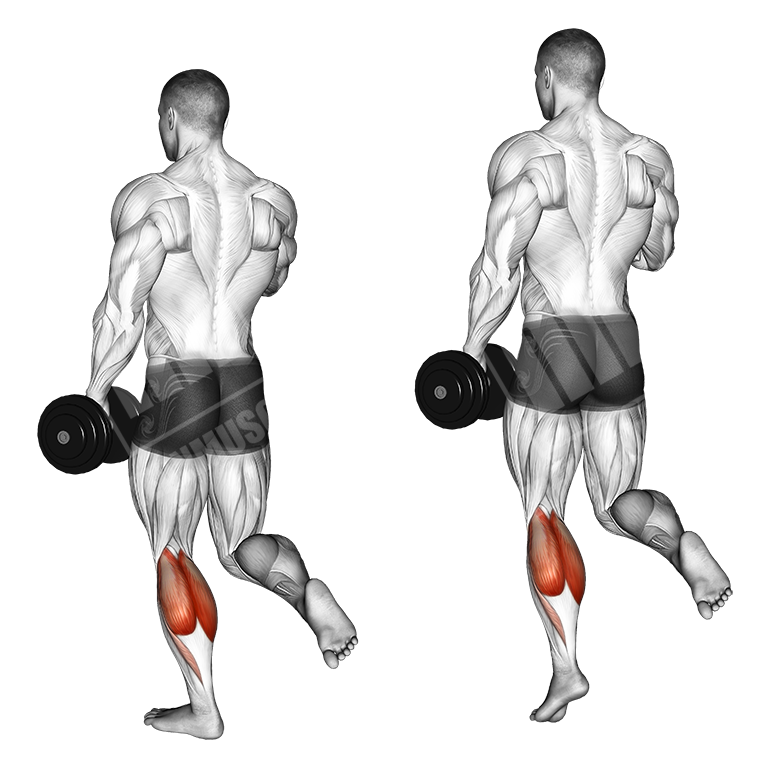
To perform calf raises, follow these steps:
- Stand with your feet shoulder-width apart and your hands on your hips or holding dumbbells at your sides.
- Raise your heels off the ground as high as you can, keeping your knees straight.
- Pause for a few seconds at the top of the movement.
- Lower your heels back down to the ground.
- Repeat for several repetitions.
It's important to keep your balance and maintain a slow and controlled movement throughout the exercise. You can also perform calf raises with one leg at a time for an added challenge.
Benefits of Calf Raises

Calf raises offer numerous benefits for those looking to improve their lower body strength and overall fitness. Some of these benefits include:
- Toning and strengthening the calf muscles
- Improving balance and stability
- Reducing the risk of ankle injuries
- Increasing overall lower body strength
- Improving athletic performance in activities such as running, jumping, and dancing
Conclusion
Overall, calf raises are an effective exercise for targeting the calf muscles and improving lower body strength. By following proper form and performing the exercise regularly, you can achieve toned and strong calves, as well as improve your overall fitness and athletic performance.
Related video of What Muscles Does Calf Raises Work
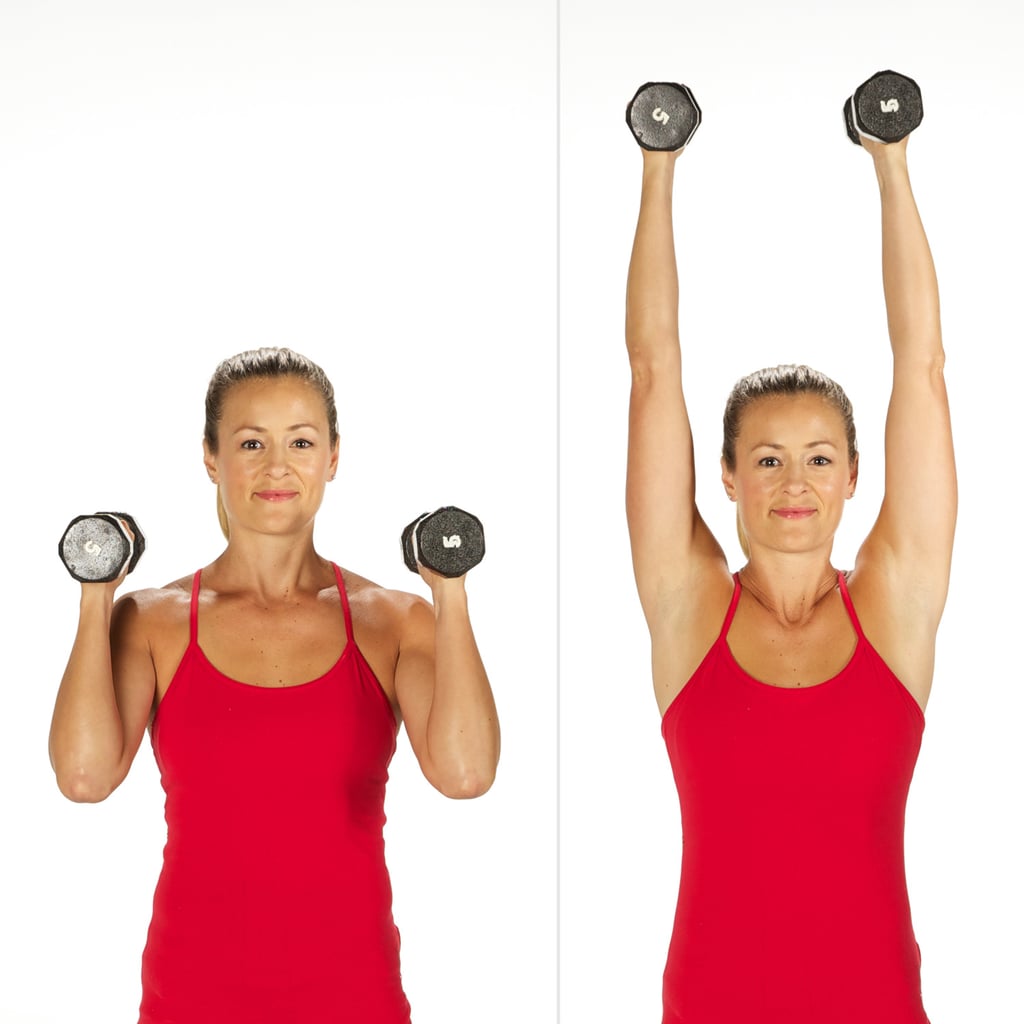
Shoulder press is an effective exercise for building strong and defined shoulders. It involves lifting weights above your head while standing or sitting. One of the most popular variations of this exercise is the shoulder press dumbbell weight. In this article, we will explore everything you need to know about this exercise, including its benefits, proper form, and variations.
Benefits of Shoulder Press Dumbbell Weight
Shoulder press dumbbell weight is a compound exercise that works multiple muscles in your upper body, including your shoulders, triceps, and upper back. Here are some of the benefits of including this exercise in your workout routine:
- Increases shoulder strength and mobility
- Improves posture and upper body aesthetics
- Enhances overall upper body stability
- Boosts athletic performance in sports that require overhead movements
Proper Form for Shoulder Press Dumbbell Weight
Proper form is crucial when performing shoulder press dumbbell weight to avoid injury and maximize the benefits of the exercise. Follow these steps to perform the exercise with proper form:
- Stand or sit with a straight back and feet shoulder-width apart
- Hold a dumbbell in each hand with your palms facing forward and elbows bent at a 90-degree angle
- Slowly lift the weights above your head, fully extending your arms
- Pause briefly at the top of the movement, then slowly lower the weights back down to the starting position
- Repeat for the desired number of repetitions
Remember to keep your core engaged throughout the exercise and avoid arching your back or jerking the weights.
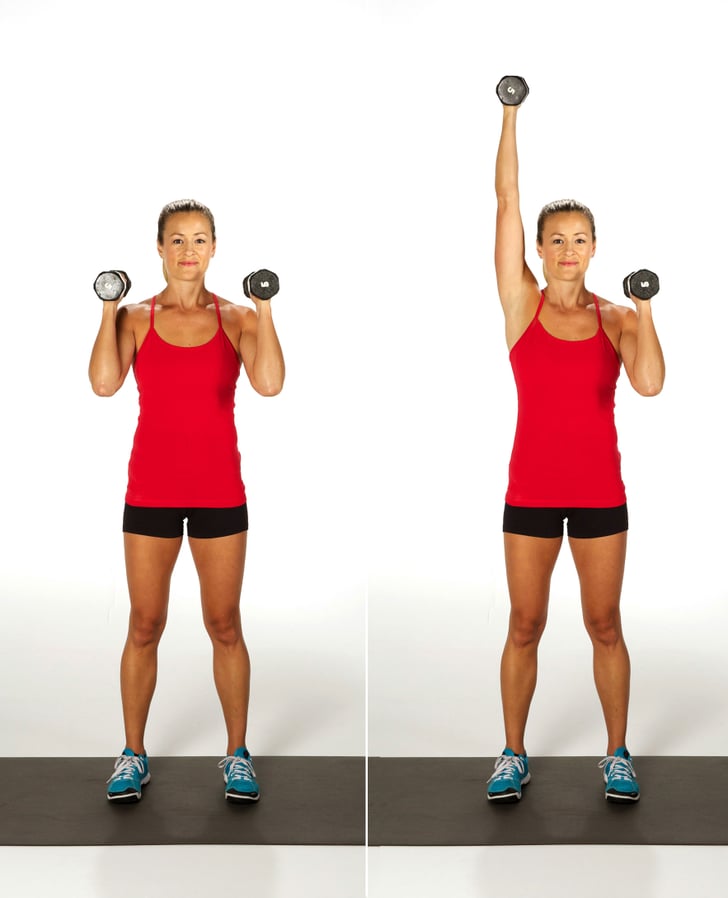
Variations of Shoulder Press Dumbbell Weight

There are several variations of the shoulder press dumbbell weight that you can incorporate into your workout routine to keep your muscles challenged and prevent boredom. Here are some of the most popular variations:
- Arnold press: This variation involves rotating your palms as you lift the weights, starting with your palms facing your body and ending with your palms facing forward.
- Seated shoulder press: This variation is performed while sitting on a bench or chair, which reduces the involvement of your lower body and increases the focus on your upper body.
- Single-arm shoulder press: This variation involves holding one dumbbell in one hand and performing the exercise one arm at a time, which increases the stabilization challenge and can correct muscle imbalances.
Tips for Performing Shoulder Press Dumbbell Weight

Here are some tips to help you perform shoulder press dumbbell weight with proper form and get the most out of the exercise:
- Choose a weight that challenges you but allows you to perform the exercise with proper form
- Breathe in as you lower the weights and breathe out as you lift the weights
- Don't lock your elbows at the top of the movement to avoid joint strain
- Perform the exercise in a slow and controlled manner to maximize muscle activation
- Incorporate shoulder press dumbbell weight into a full-body workout routine for balanced muscle development
Conclusion
Shoulder press dumbbell weight is an effective exercise for building strong and defined shoulders. By following proper form and incorporating variations into your workout routine, you can enjoy the benefits of this exercise while minimizing the risk of injury. Remember to always listen to your body and adjust the weight or number of repetitions as needed.
