
Push ups are an essential exercise that helps in building strength and endurance. While traditional push ups are effective, hands elevated push ups take the exercise to the next level by targeting specific muscle groups. In this article, we will discuss everything you need to know about hands elevated push ups, including their benefits, variations, and how to perform them correctly.
What are Hands Elevated Push Ups?

Hands elevated push ups are a variation of traditional push ups that involve elevating your hands on a stable surface, such as a bench or a box. This exercise targets the upper pecs, shoulders, and triceps more effectively than traditional push ups. Hands elevated push ups are also a great way to progress towards more challenging exercises, such as dips or handstand push ups.
Benefits of Hands Elevated Push Ups

Hands elevated push ups offer numerous benefits, including:
- Increased upper body strength and endurance
- Better activation of the upper pecs, shoulders, and triceps
- Improved core stability and balance
- Progression towards more challenging exercises
If you want to build a stronger upper body, hands elevated push ups are an excellent exercise to add to your routine.
How to Perform Hands Elevated Push Ups

Here's a step-by-step guide on how to perform hands elevated push ups:
- Choose a stable surface, such as a bench or a box, and place your hands on it shoulder-width apart.
- Position your feet hip-width apart and extend your legs behind you.
- Engage your core and maintain a straight line from your head to your heels.
- Lower your body until your chest touches the surface.
- Push yourself back up to the starting position.
Make sure to keep your elbows close to your body and your wrists in line with your shoulders throughout the exercise. You can also vary the width of your hand placement to target different muscle groups.
Variations of Hands Elevated Push Ups

There are several variations of hands elevated push ups that you can try to add variety to your workout:
- Decline hands elevated push ups: Elevate your feet on a stable surface to target your upper chest and shoulders.
- Close grip hands elevated push ups: Place your hands close together to target your triceps.
- Wide grip hands elevated push ups: Place your hands wider than shoulder-width apart to target your chest.
- One-arm hands elevated push ups: Place one hand on the surface and the other behind your back to target each arm individually.
Experiment with different variations to challenge your muscles in new ways.
Conclusion

Hands elevated push ups are a great exercise for building upper body strength and endurance. By elevating your hands on a stable surface, you can target specific muscle groups more effectively. Try incorporating hands elevated push ups into your workout routine and experiment with different variations to challenge your muscles in new ways.
Related video of Hands Elevated Push Ups: The Ultimate Guide
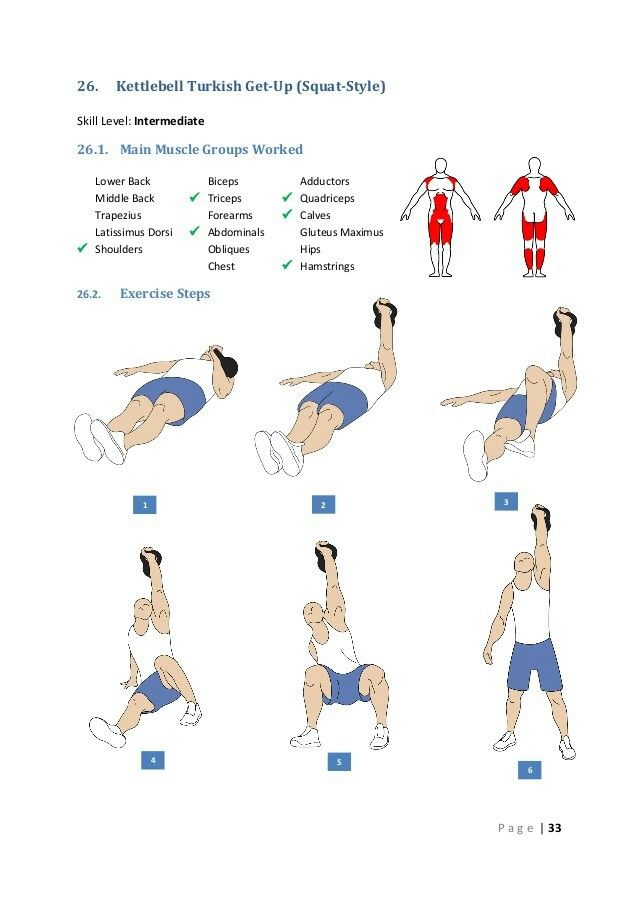
The Turkish Get Up is a full-body exercise that is designed to challenge your core stability, mobility, and strength. It is a compound exercise that requires the coordination of multiple muscle groups to perform correctly. The Turkish Get Up is a great exercise for people who want to improve their functional strength and overall fitness.
Muscles Worked During the Turkish Get Up

The Turkish Get Up works a variety of muscle groups throughout the body. Here are some of the muscles that are worked during the exercise:
Shoulders
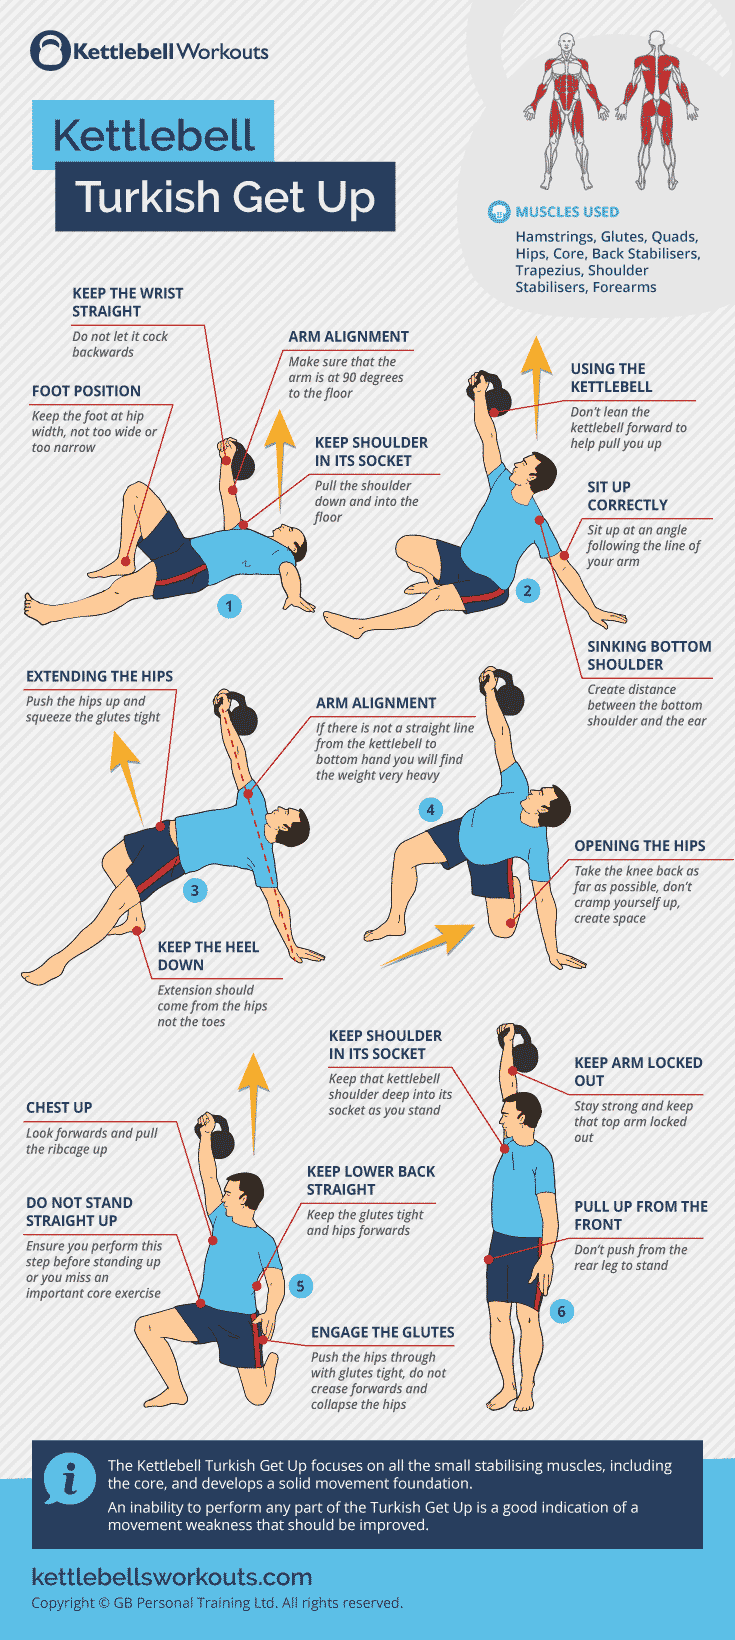
The shoulders are heavily involved in the Turkish Get Up. The exercise requires you to hold a weight overhead, which means that your shoulders must work hard to stabilize the weight as you move through the exercise.
Core
The Turkish Get Up is an excellent exercise for the core muscles. The exercise requires you to stabilize your trunk as you move through a series of movements. This means that your core muscles must work hard to keep your torso stable throughout the exercise.
Glutes

The glutes are heavily involved in the Turkish Get Up. The exercise requires you to perform a lunge position, which means that your glutes must work hard to stabilize your hips as you move through the exercise.
Legs

The Turkish Get Up works the legs in a variety of ways. The exercise requires you to perform a lunge position, which means that your quads, hamstrings, and glutes must work hard to stabilize your hips as you move through the exercise.
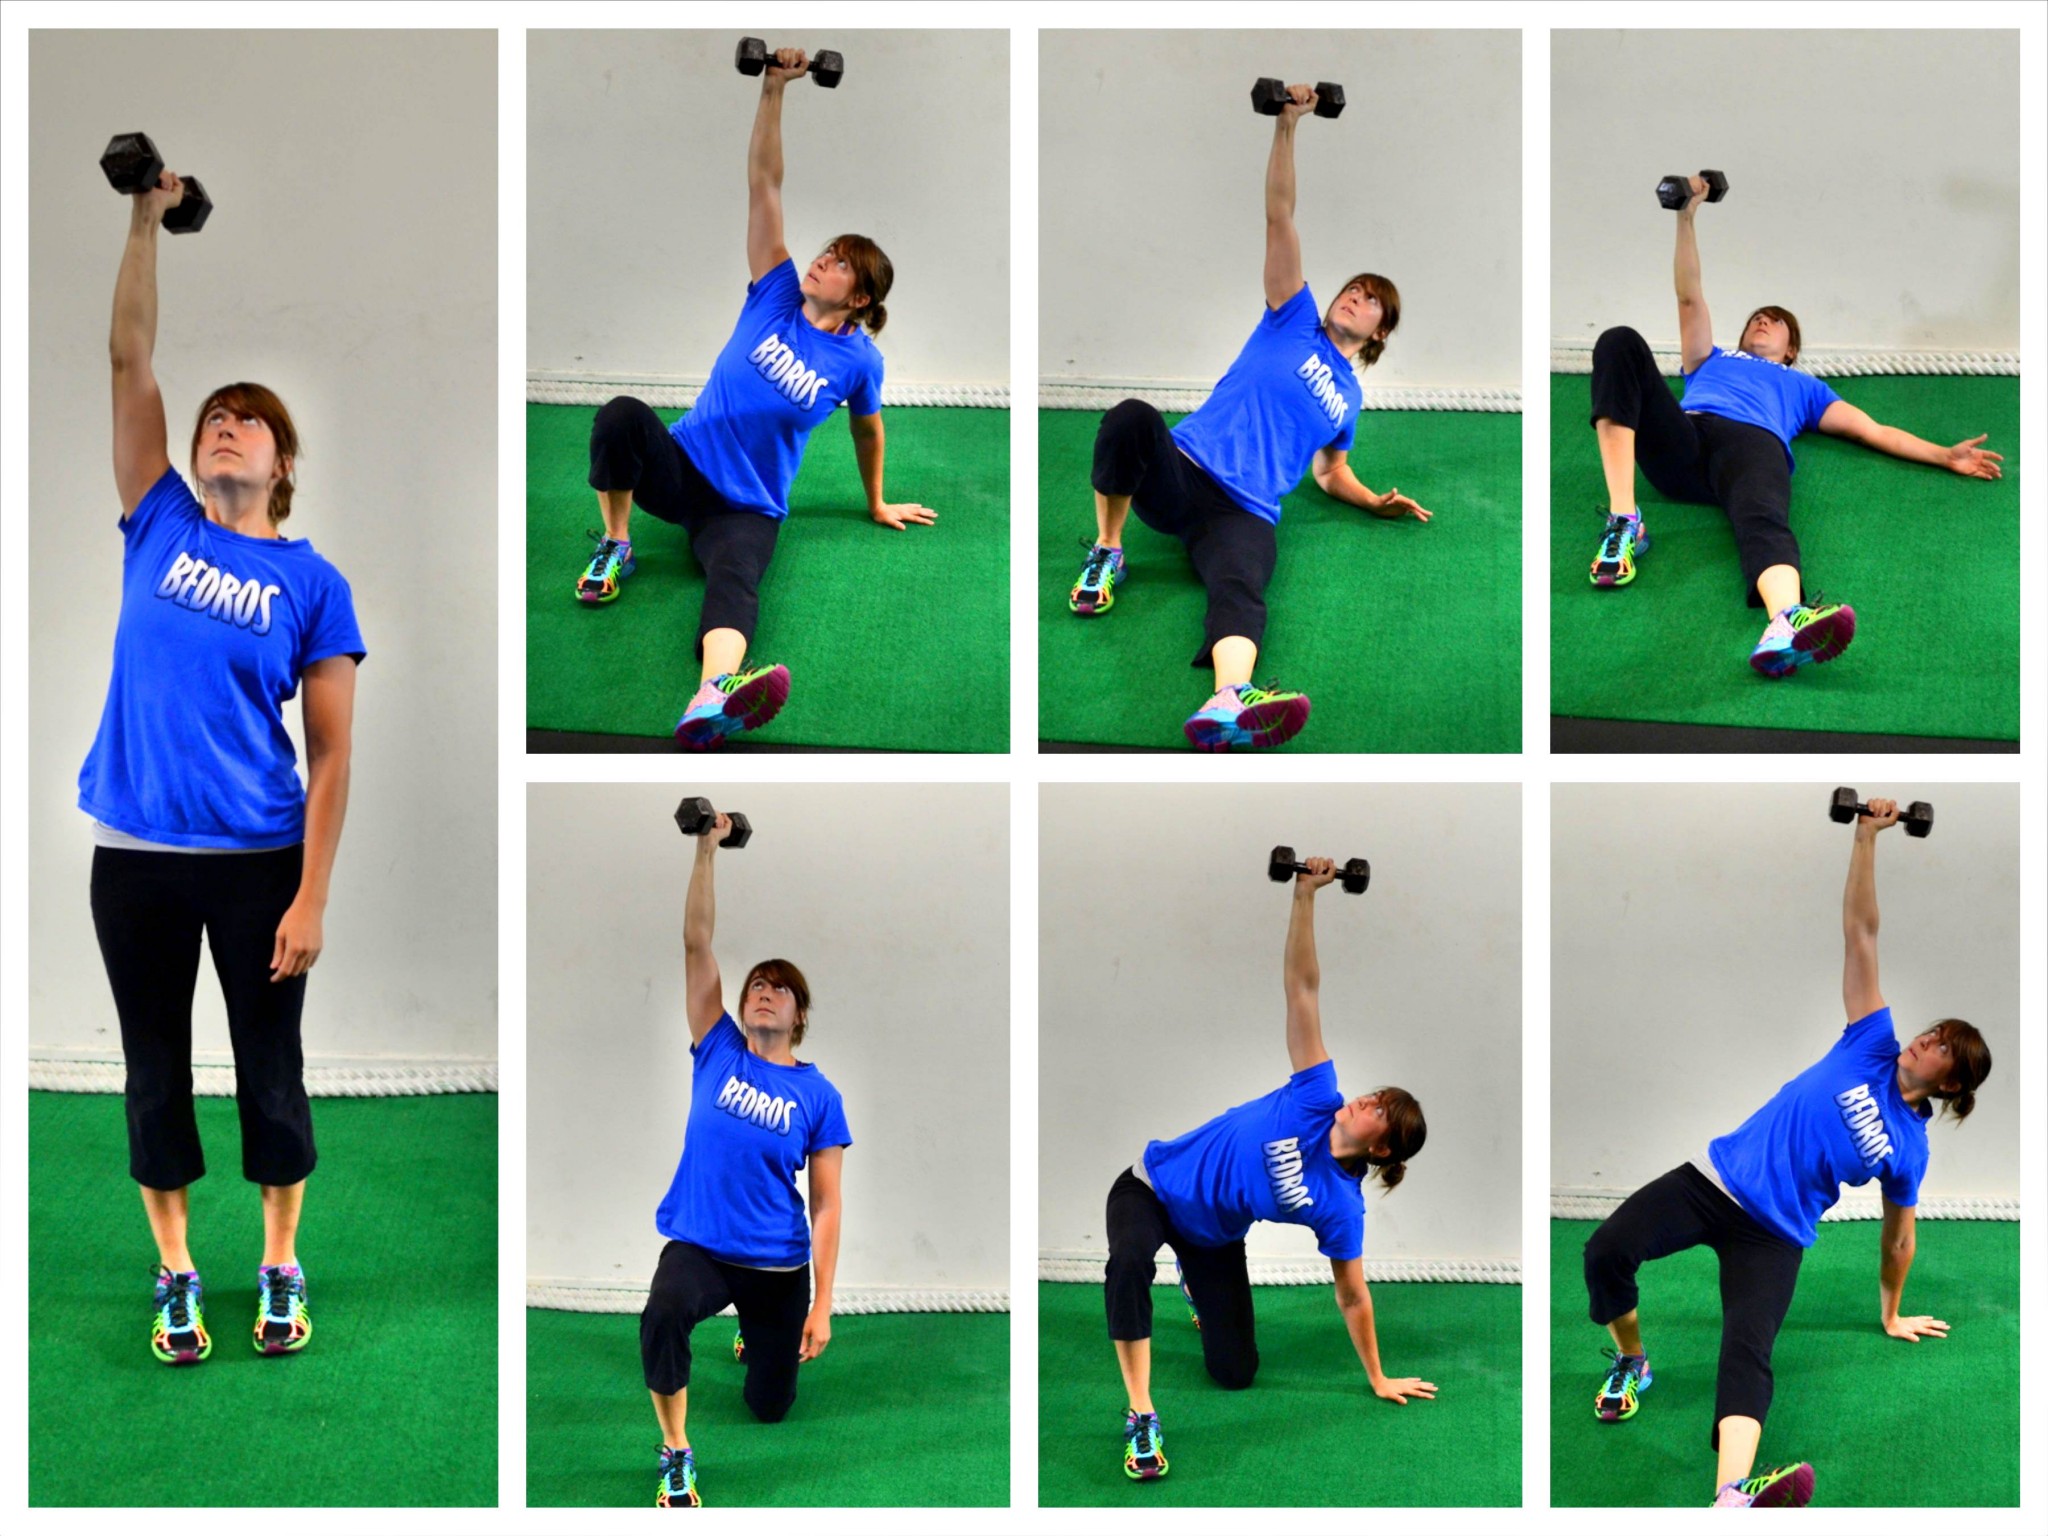
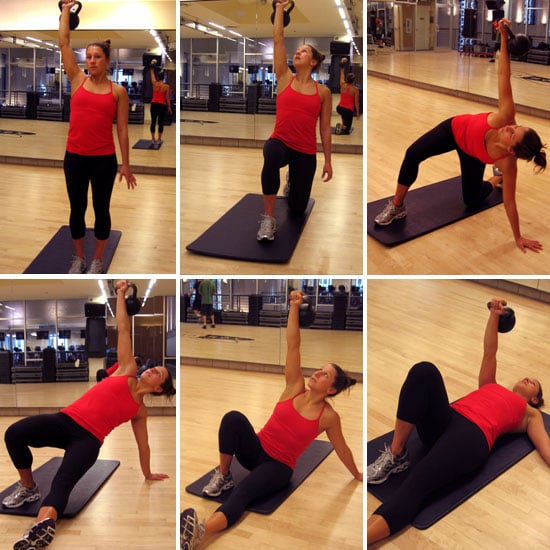
How to Perform the Turkish Get Up

The Turkish Get Up is a complex exercise that requires proper technique to perform correctly. Here is a step-by-step guide on how to perform the Turkish Get Up:
Step 1: Starting Position
Lie on your back with your knees bent and your feet flat on the ground. Hold a weight in your right hand and extend your right arm towards the ceiling. Your left arm should be extended out to the side at a 45-degree angle.
Step 2: Roll to Your Side
Roll onto your right side while keeping the weight extended towards the ceiling. Your left arm should remain on the ground at a 45-degree angle.
Step 3: Lunge Position
Push yourself up into a lunge position while keeping the weight extended towards the ceiling. Your left hand should be on the ground, and your right foot should be positioned in front of your body.
Step 4: Stand Up
Stand up while keeping the weight extended towards the ceiling. Your left hand should remain on the ground, and your right arm should be fully extended towards the ceiling.
Step 5: Reverse the Movement
Reverse the movement by slowly lowering yourself back down into the lunge position, then down to your side, and finally back onto your back.
Step 6: Repeat on the Other Side
Repeat the exercise on the other side by switching the weight to your left hand and performing the exercise in the opposite direction.
Tips for Performing the Turkish Get Up
Here are some tips to help you perform the Turkish Get Up correctly:
Start with a Light Weight
The Turkish Get Up is a challenging exercise that requires proper technique to perform correctly. Start with a light weight and focus on performing the exercise with proper technique before increasing the weight.
Keep Your Eyes on the Weight
Keep your eyes on the weight throughout the exercise to help maintain proper form and technique.
Engage Your Core
Engage your core throughout the exercise to help stabilize your trunk and maintain proper form.
Practice Proper Breathing
Practice proper breathing throughout the exercise to help maintain proper form and technique.
Conclusion
The Turkish Get Up is a challenging exercise that can help improve your functional strength and overall fitness. The exercise works a variety of muscle groups throughout the body and requires proper technique to perform correctly. Start with a light weight and focus on performing the exercise with proper technique before increasing the weight.
Related video of Turkish Get Up Muscles Worked

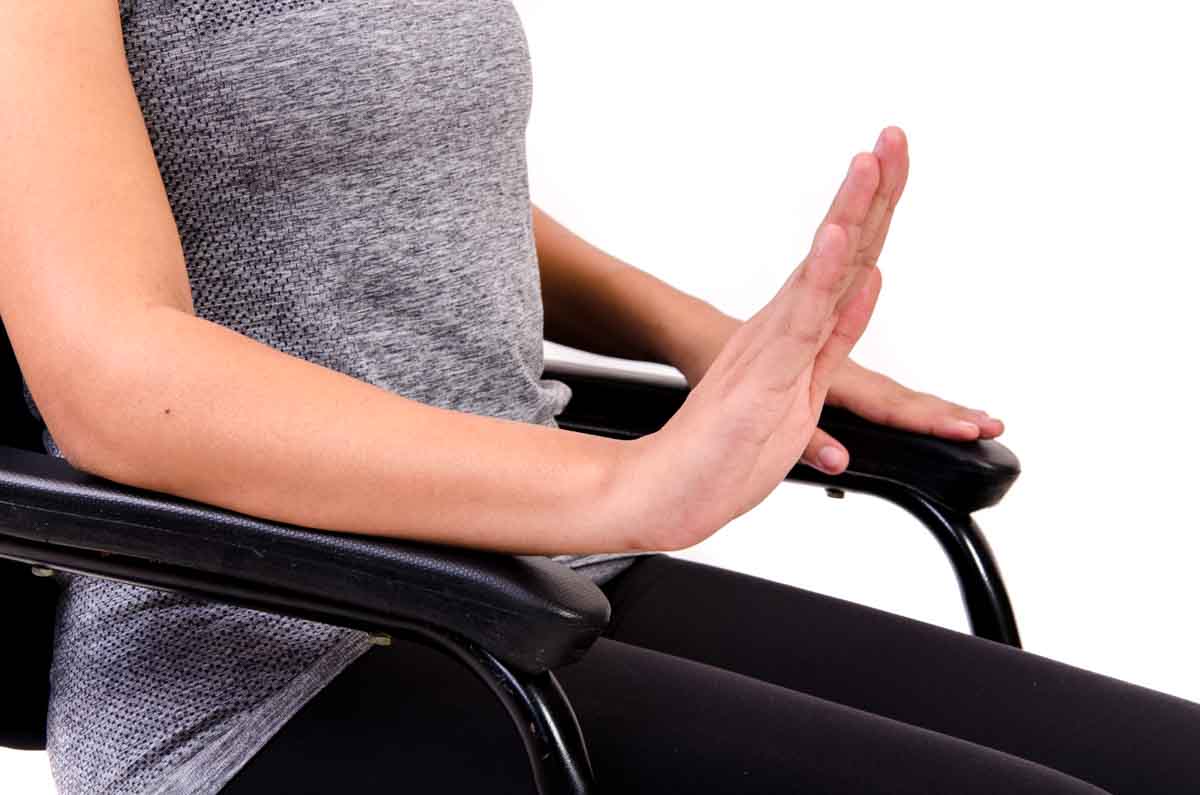
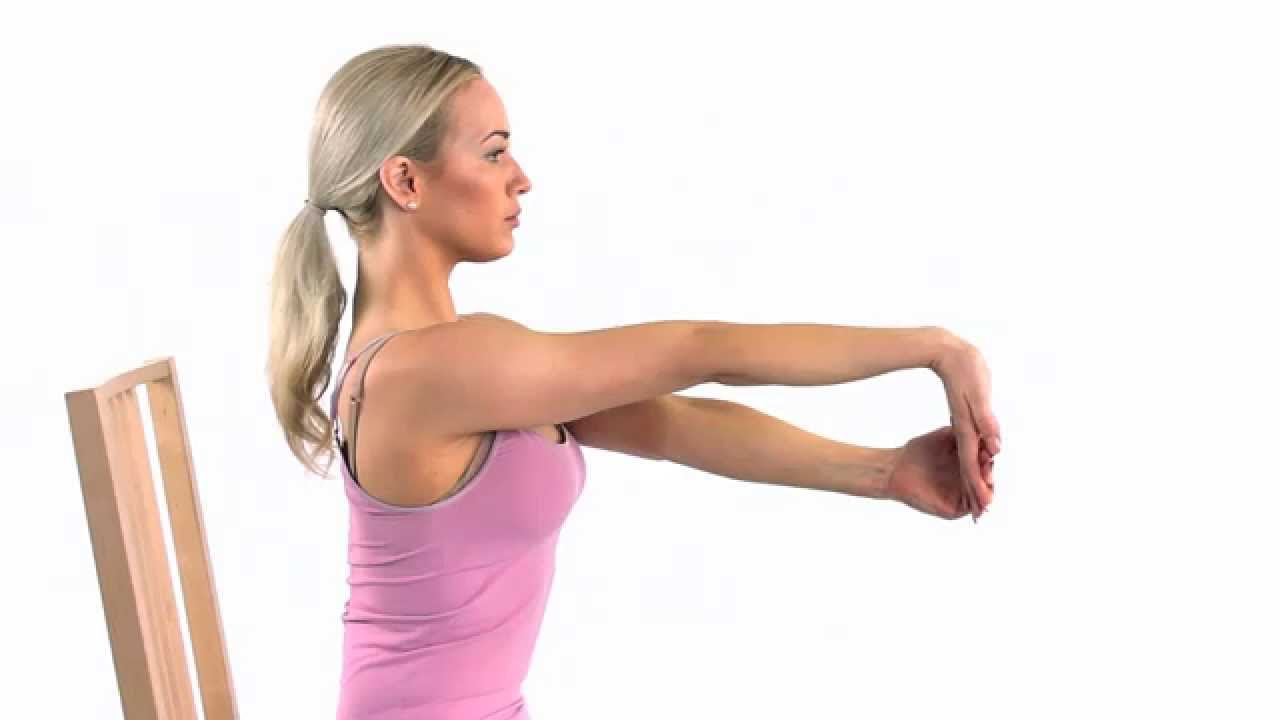
Wrist extension is the ability to bend your wrist back towards your forearm. This movement is important for many daily activities, such as typing, cooking, and sports. However, wrist extension can become limited or painful due to injury, overuse, or poor posture. Fortunately, there are exercises you can do to improve your wrist extension and reduce discomfort. Here are some effective exercises for wrist extension:
1. Wrist Extension Stretch

To perform this stretch, extend your arm in front of you with your palm facing down. Use your other hand to gently press your fingers back towards your forearm until you feel a stretch in your wrist. Hold this position for 15-30 seconds, then release and repeat on the other arm. You can do this stretch several times a day.
2. Wrist Extension with Weights

This exercise involves using light weights to strengthen your wrist extensor muscles. Hold a weight in each hand with your palms facing down. Slowly raise your hands towards the ceiling, bending your wrists back as far as you comfortably can. Hold this position for a few seconds, then lower your hands back down. Repeat for 10-15 repetitions, then rest and repeat for another set.
3. Wrist Roller

A wrist roller is a simple device that can help improve your wrist extension and grip strength. To use a wrist roller, hold the handle with both hands and roll the weight up and down the rope by rotating your wrists. Start with a light weight and gradually increase as you get stronger. Do 2-3 sets of 10-15 repetitions, resting between sets.
4. Wrist Extension with Elastic Band
You can also use an elastic band to work on your wrist extension. Anchor the band to a stable object at waist height. Hold the other end of the band with your hand, palm facing down. Slowly extend your wrist back as far as you can, keeping your elbow straight. Hold for a few seconds, then release and repeat for 10-15 repetitions. Switch sides and repeat.
5. Reverse Wrist Curls

Reverse wrist curls target the wrist extensor muscles and can help improve wrist extension. Hold a weight in each hand with your palms facing up. Bend your wrists down towards the floor, then slowly raise them back up as far as you can. Do 2-3 sets of 10-15 repetitions, resting between sets.
6. Wrist Extension in Tabletop Position
To perform this exercise, start in a tabletop position with your hands and knees on the floor. Place your hands on the floor with your fingertips facing towards your knees. Slowly lift your palms off the floor, keeping your fingertips in contact with the ground. Hold for a few seconds, then lower your palms back down. Repeat for 10-15 repetitions.
7. Prayer Stretch

The prayer stretch is a yoga pose that can help improve wrist extension and flexibility. Start in a tabletop position with your hands and knees on the floor. Place your palms together in front of your chest, fingers pointing towards the ceiling. Slowly lower your hands towards the floor, keeping your palms together. Hold for a few seconds, then raise your hands back up. Repeat for 10-15 repetitions.
These exercises can help improve your wrist extension and reduce discomfort. However, if you have a wrist injury or chronic pain, it's important to consult with a healthcare professional before starting any exercise program. Remember to start with light weights and gradually increase as you get stronger. Be consistent with your exercise routine and listen to your body. With time and practice, you can improve your wrist extension and enjoy better mobility and function.
Related video of Exercises for Wrist Extension

The neutral grip dumbbell press is a popular exercise that targets the chest, shoulders, and triceps. This exercise is similar to the traditional dumbbell press, but instead of using a pronated or supinated grip, the palms face each other in a neutral grip. This exercise provides a unique range of motion, which can help activate different muscle fibers and improve overall upper body strength.
How to Perform Neutral Grip Db Press

To perform the neutral grip dumbbell press, follow these steps:
- Lie flat on a bench with a dumbbell in each hand, palms facing each other.
- Keep your elbows close to your body and your shoulders down and back.
- Slowly lower the dumbbells towards your chest, keeping your elbows at a 45-degree angle.
- Pause at the bottom of the movement, then push the dumbbells back up to the starting position.
- Repeat for the desired number of reps.
It's important to keep your core engaged and your back flat on the bench throughout the exercise. Focus on using your chest muscles to lift the weights, rather than relying on your shoulders or triceps.
Benefits of Neutral Grip Db Press

The neutral grip dumbbell press offers several benefits, including:
- Improved chest activation: The neutral grip allows for a wider range of motion, which can help activate different areas of the chest muscles.
- Reduced shoulder strain: The neutral grip places less stress on the shoulders compared to a pronated or supinated grip.
- Increased triceps engagement: The triceps are also recruited during the press, helping to improve overall upper body strength.
- Improved grip strength: The neutral grip can help improve grip strength, which can be beneficial for other exercises such as pull-ups and deadlifts.
Incorporating neutral grip dumbbell presses into your workout routine can help improve overall upper body strength and muscle activation.
Variations of Neutral Grip Db Press

There are several variations of the neutral grip dumbbell press that can help add variety to your workouts and target different areas of the chest and triceps. Some variations include:
- Incline neutral grip dumbbell press: Perform the press on an incline bench to target the upper chest muscles.
- Decline neutral grip dumbbell press: Perform the press on a decline bench to target the lower chest muscles.
- Alternating neutral grip dumbbell press: Alternate pressing one arm at a time to increase core stability and unilateral strength.
- Close-grip neutral grip dumbbell press: Bring the dumbbells closer together to target the triceps muscles.
Incorporating these variations into your workout routine can help improve overall upper body strength and muscle activation.
Conclusion
The neutral grip dumbbell press is a versatile exercise that can help improve chest, shoulder, and triceps strength. By incorporating this exercise into your workout routine and experimenting with different variations, you can target different areas of the chest and triceps and improve overall upper body strength.
Related video ofThe Benefits of Neutral Grip Db Press: How to Perform It
Introduction:
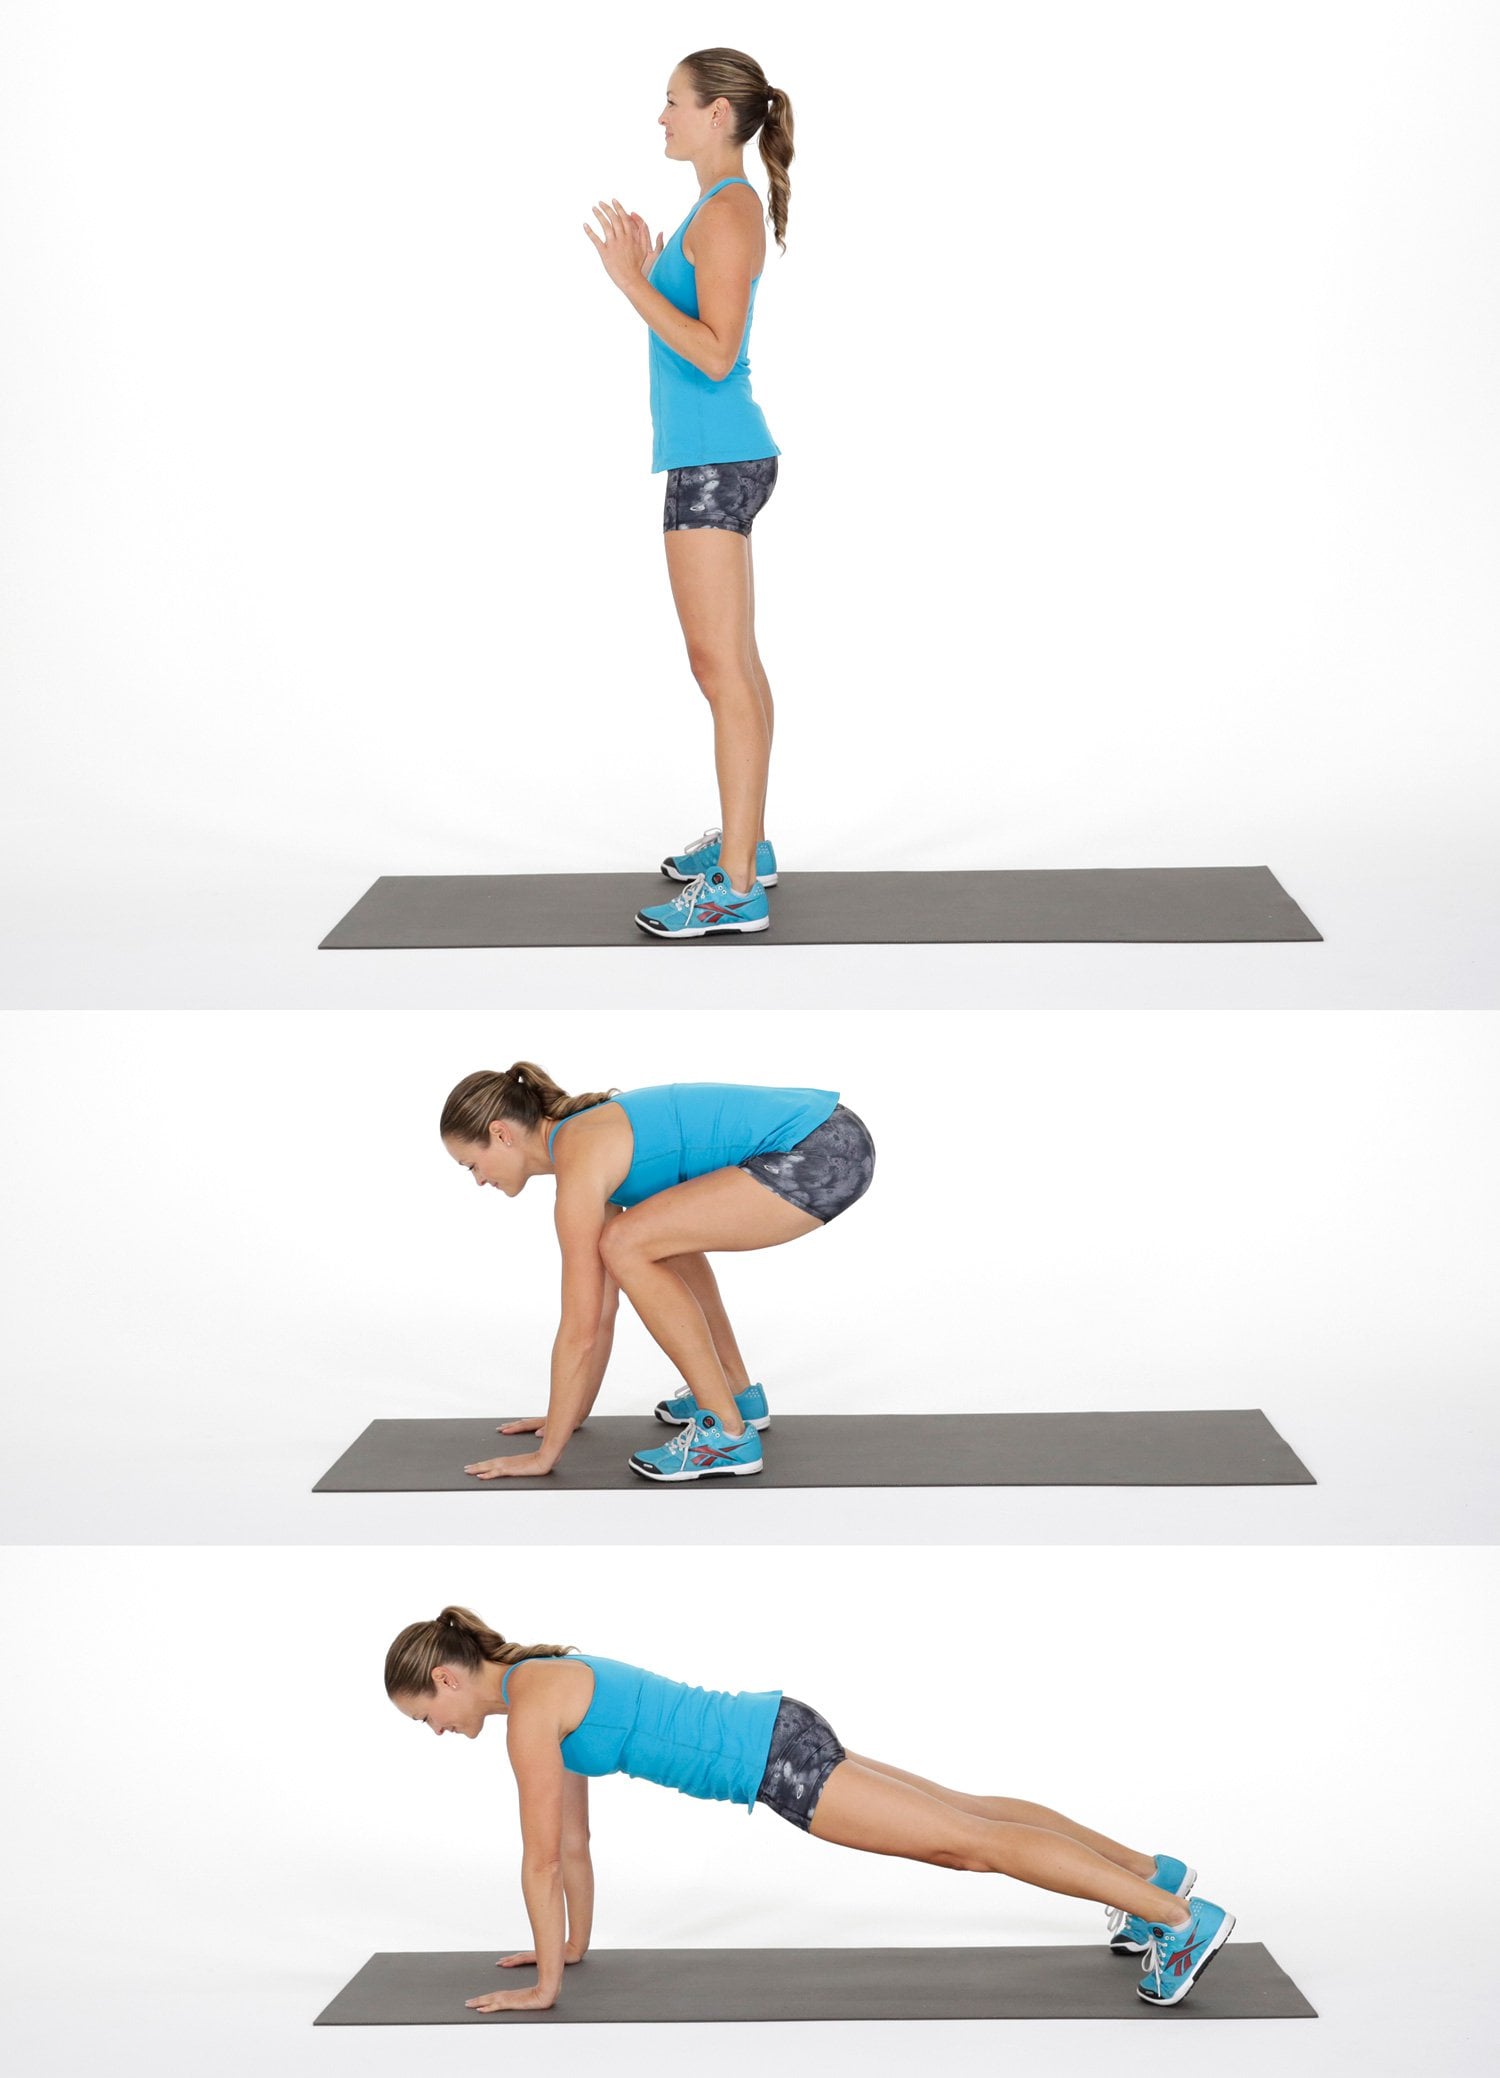
Squat thrust is a compound exercise that involves multiple muscle groups, including the legs, glutes, core, and arms. It is a full-body exercise that can be done with or without weights. Squat thrust is a popular exercise for improving overall fitness, building strength, and burning calories.How To Do A Squat Thrust:
To perform a squat thrust, start in a standing position with your feet hip-width apart. Then, squat down and place your hands on the floor in front of you. Next, jump your feet back into a plank position, keeping your core tight and your body in a straight line. Then, jump your feet back to your hands and stand up.Variations Of Squat Thrust:
There are several variations of squat thrust that you can try to make the exercise more challenging or to target specific muscle groups. Some of the popular variations include:1. Jump Squat Thrust:
This variation adds a jump at the end of the squat thrust, making it a plyometric exercise that improves explosive power and cardiovascular endurance.
2. Burpee:
Burpee is a more advanced variation of squat thrust that involves a push-up and a jump at the end. It is a high-intensity exercise that targets the chest, shoulders, triceps, and legs.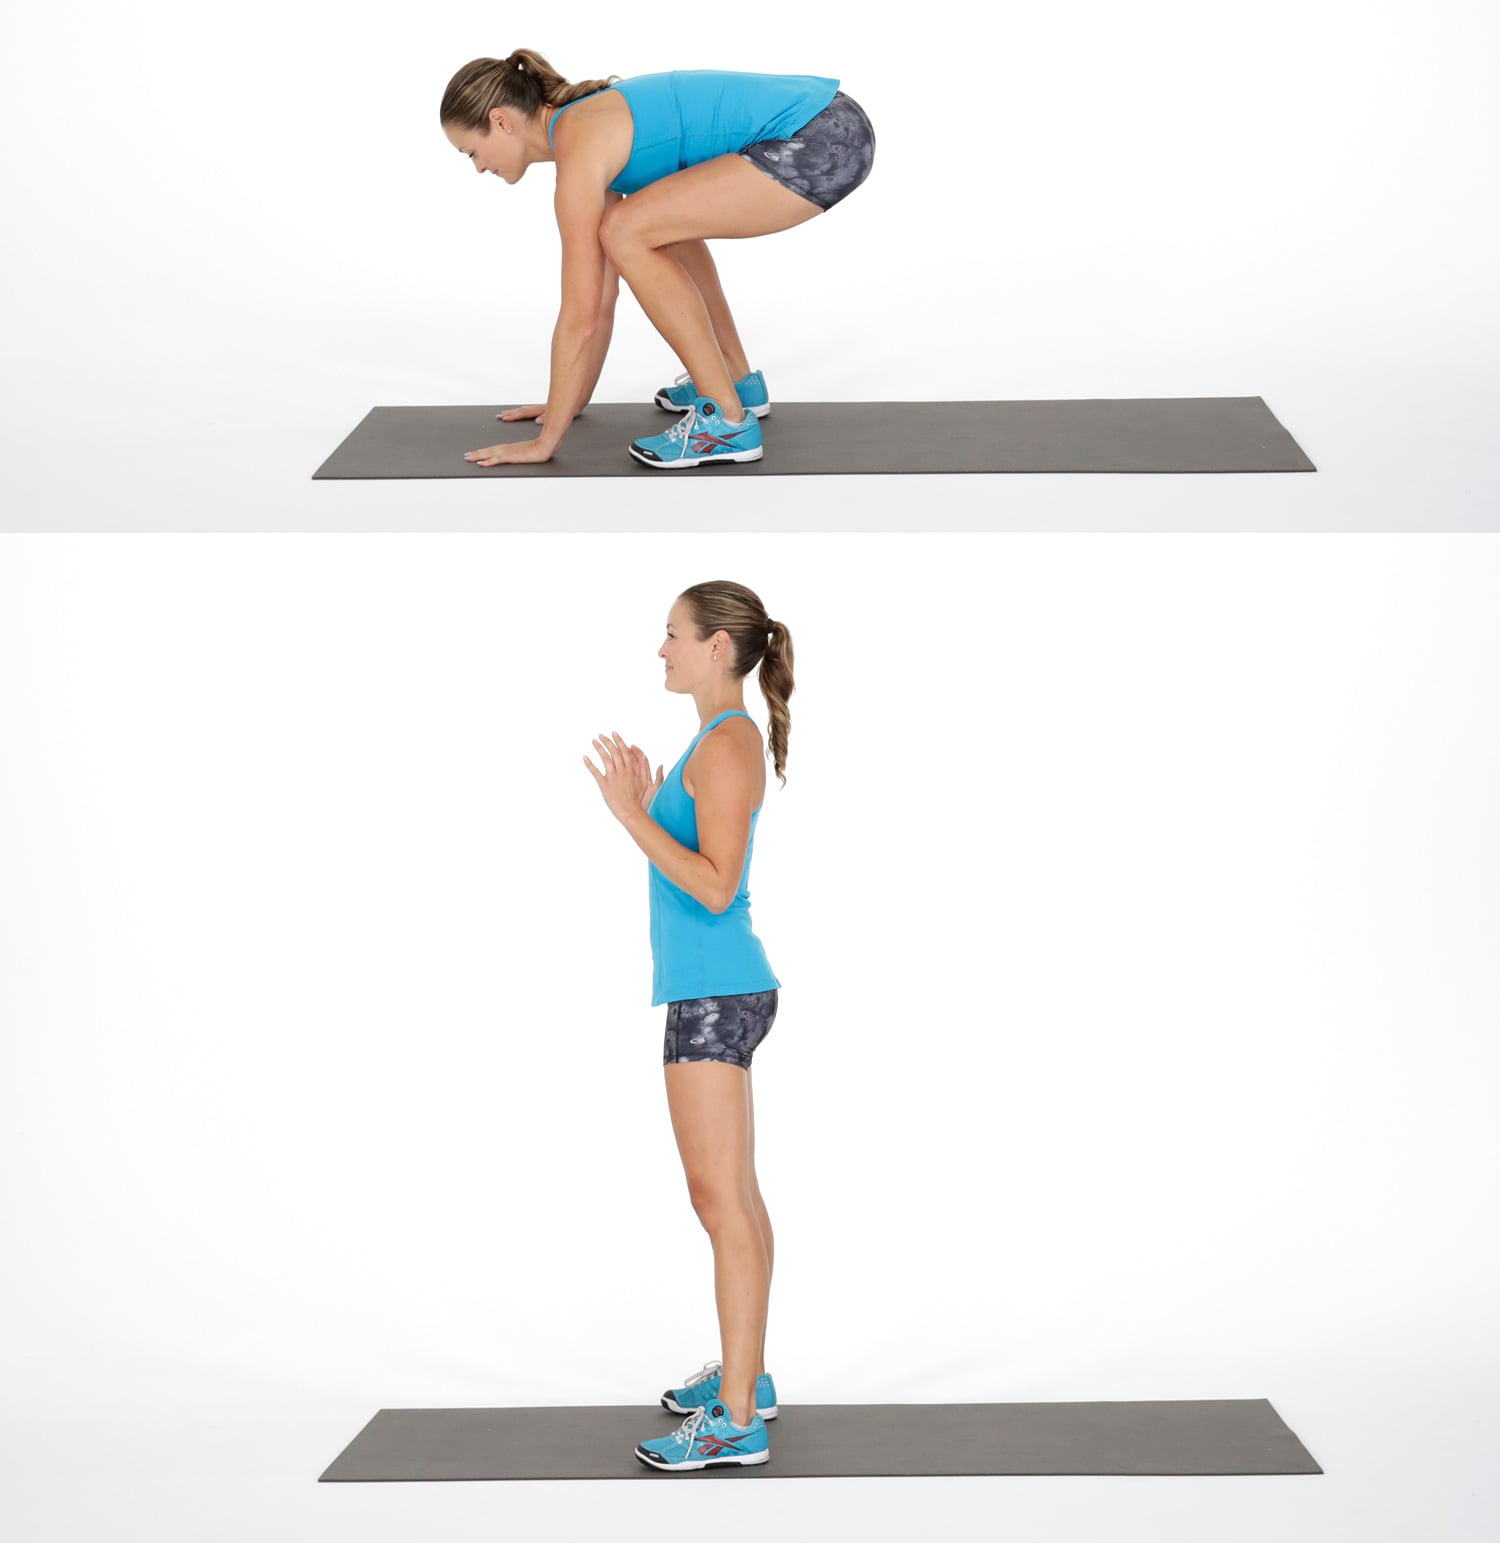
3. Weighted Squat Thrust:
This variation involves holding a pair of dumbbells or a kettlebell while performing the squat thrust. It adds resistance to the exercise, making it more challenging and effective for building strength and muscle.
Benefits Of Squat Thrust:
Squat thrust offers several benefits for your body and health. Some of the key benefits include:1. Full-Body Workout:
Squat thrust is a full-body exercise that engages multiple muscle groups, including the legs, glutes, core, and arms. It helps to improve overall fitness, strength, and endurance.2. Burn Calories:
Squat thrust is a high-intensity exercise that burns a lot of calories in a short amount of time. It is an effective exercise for weight loss and improving cardiovascular health.3. Improve Mobility:
Squat thrust can help to improve your mobility and flexibility, especially in the hips and ankles. It can also improve your posture and reduce the risk of injury.4. Easy To Do:
Squat thrust is a simple exercise that can be done anywhere, without any equipment. It is a great exercise for beginners and advanced fitness enthusiasts.Conclusion:
Squat thrust is a full-body exercise that offers several benefits for your body and health. It is a simple and effective exercise that can be done anywhere, without any equipment. Whether you are a beginner or an advanced fitness enthusiast, adding squat thrust to your workout routine can help you to achieve your fitness goals faster.Related video of What Is A Squat Thrust?
Are you looking for an effective exercise to strengthen your back muscles? If so, the reverse grip seated cable row may be just what you need. This exercise targets the muscles in your upper back, shoulders, and arms, helping you to develop a stronger, more defined physique.
What is the Reverse Grip Seated Cable Row?

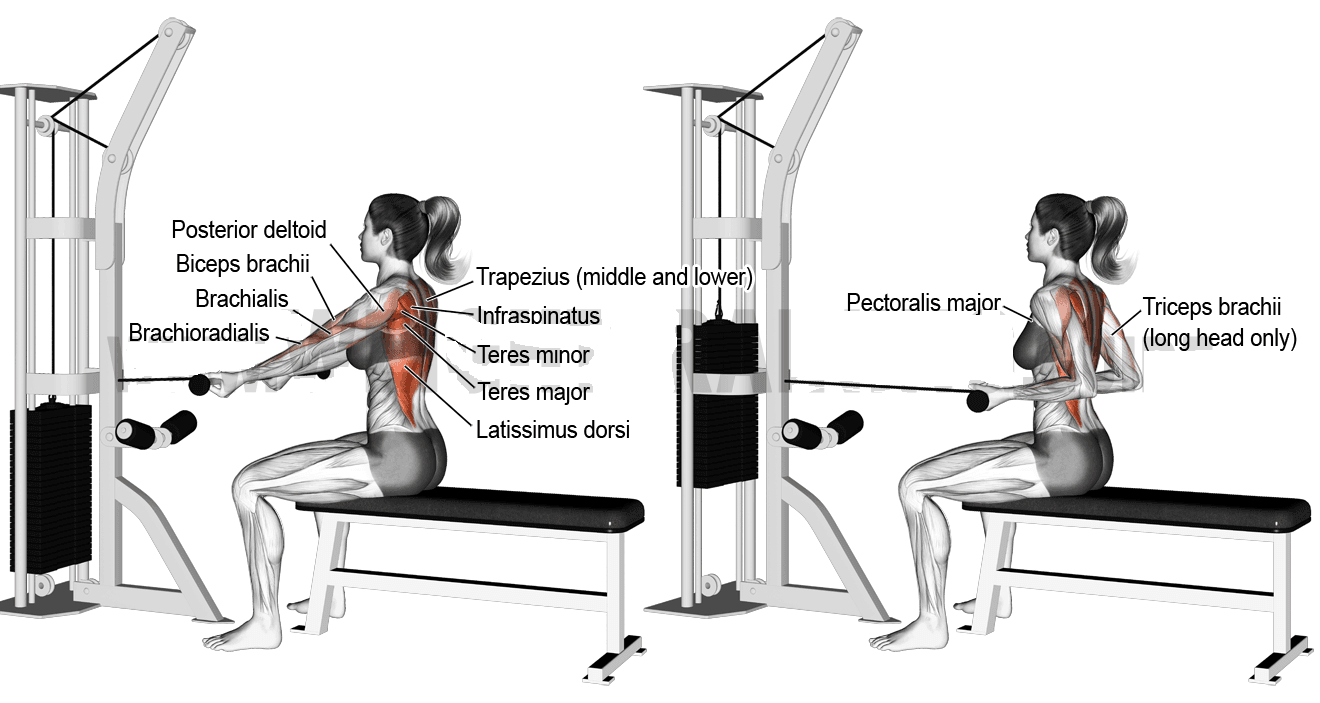
The reverse grip seated cable row is a weight training exercise that involves pulling a cable towards your body while seated on a bench. Unlike traditional cable rows, which are performed with a neutral grip, the reverse grip row involves gripping the bar with an underhand grip. This changes the angle of the exercise, placing more emphasis on the muscles in the upper back and biceps.
Benefits of the Reverse Grip Seated Cable Row

The reverse grip seated cable row offers a number of benefits for anyone looking to build a stronger back and improve their overall fitness:
- Targets multiple muscle groups: In addition to working the muscles in your upper back, the reverse grip row also targets your biceps, shoulders, and forearms.
- Improves posture: By strengthening the muscles in your upper back, the reverse grip row can help improve your posture and reduce the risk of back pain.
- Increases upper body strength: As a compound exercise, the reverse grip row is an effective way to build overall upper body strength.
- Variation from traditional rows: If you've been doing traditional cable rows for a while, incorporating the reverse grip row into your workout routine can help keep things interesting and challenge your muscles in new ways.
How to Perform the Reverse Grip Seated Cable Row

If you're new to the reverse grip seated cable row, it's important to start with a light weight and focus on proper form. Here's how to perform the exercise:
- Attach a straight bar to the low pulley of a cable machine.
- Sit on the bench with your feet flat on the floor and your knees bent.
- Grab the bar with an underhand grip.
- Lean forward slightly and keep your back straight.
- Exhale and pull the bar towards your lower chest, keeping your elbows close to your sides.
- Squeeze your shoulder blades together at the top of the movement.
- Inhale and slowly release the bar back to the starting position.
- Repeat for the desired number of reps.
Common Mistakes to Avoid

Like any exercise, the reverse grip seated cable row can be performed incorrectly if you're not careful. Here are some common mistakes to avoid:
- Using too much weight: It's important to start with a weight you can handle and gradually increase as you get stronger.
- Slouching your shoulders: Keep your shoulders back and down throughout the exercise to avoid straining your neck and upper back.
- Swinging your body: Avoid using momentum to move the weight. Focus on using your back muscles to pull the bar towards your chest.
- Not using a full range of motion: Make sure you're pulling the bar all the way towards your chest and fully extending your arms at the bottom of the movement.
Variations of the Reverse Grip Seated Cable Row

If you're looking to mix up your workout routine, there are a few variations of the reverse grip seated cable row you can try:
- Single-arm reverse grip row: Perform the exercise with one arm at a time, alternating between sides.
- Wide-grip reverse grip row: Use a wider grip on the bar to target your lats more effectively.
- One-and-a-half reverse grip row: Perform a full rep followed by a half rep, pulling the bar halfway towards your chest before returning to the starting position.
Conclusion
The reverse grip seated cable row is a highly effective exercise for building a stronger, more defined back. By incorporating this exercise into your workout routine, you can target multiple muscle groups and improve your overall upper body strength. Remember to start with a light weight and focus on proper form to avoid injury and get the most out of this exercise.
Related video of Reverse Grip Seated Cable Row: Build a Stronger Back with This Exercise

Bulgarian split squats are a great exercise that targets your glutes, quads, and hamstrings. It's a unilateral exercise, which means it works one leg at a time. Adding a dumbbell makes it even more challenging and effective. In this article, we will discuss how to do Bulgarian split squats with one dumbbell.
Benefits of Bulgarian Split Squats With One Dumbbell

Bulgarian split squats with one dumbbell have several benefits:
- It targets your glutes, quads, and hamstrings
- It improves your balance and stability
- It increases your lower body strength
- It burns more calories compared to traditional squats
- It reduces muscle imbalances between your legs
How to Do Bulgarian Split Squats With One Dumbbell

Here's how to do Bulgarian split squats with one dumbbell:
- Stand with your back facing a bench or a sturdy chair
- Hold a dumbbell in your left hand
- Place the top of your right foot on the bench behind you
- Step forward with your left foot, keeping your torso upright
- Bend your left knee and lower your body until your left thigh is parallel to the ground
- Pause for a second and then push yourself back up to the starting position
- Do 10-12 reps and then switch sides
Tips for Doing Bulgarian Split Squats With One Dumbbell

Here are some tips that will help you do Bulgarian split squats with one dumbbell correctly:
- Keep your torso upright throughout the exercise
- Make sure your front knee is directly above your ankle
- Keep your core tight to maintain balance and stability
- Start with a lighter dumbbell and gradually increase the weight
- Don't let your front knee cave inwards
- Don't let your back knee touch the ground
Variations of Bulgarian Split Squats With One Dumbbell

Here are some variations of Bulgarian split squats with one dumbbell:
- Bulgarian split squats with two dumbbells
- Bulgarian split squats with a barbell
- Bulgarian split squats with a kettlebell
- Bulgarian split squats with a resistance band
- Bulgarian split squats with a TRX suspension trainer
Conclusion
Bulgarian split squats with one dumbbell are a challenging and effective exercise that can help you build lower body strength, improve balance and stability, and reduce muscle imbalances. Follow the tips and variations mentioned in this article to get the most out of this exercise.
Related video of Bulgarian Split Squats With One Dumbbell
/manusingaBOSU-58c7091c3df78c353cd8acbc.jpg)
Bosu exercises are great for improving balance and stability. The Bosu ball is a versatile piece of equipment that can be used for a variety of exercises. This article will discuss some of the best Bosu exercises for improving balance.
Bosu Squats
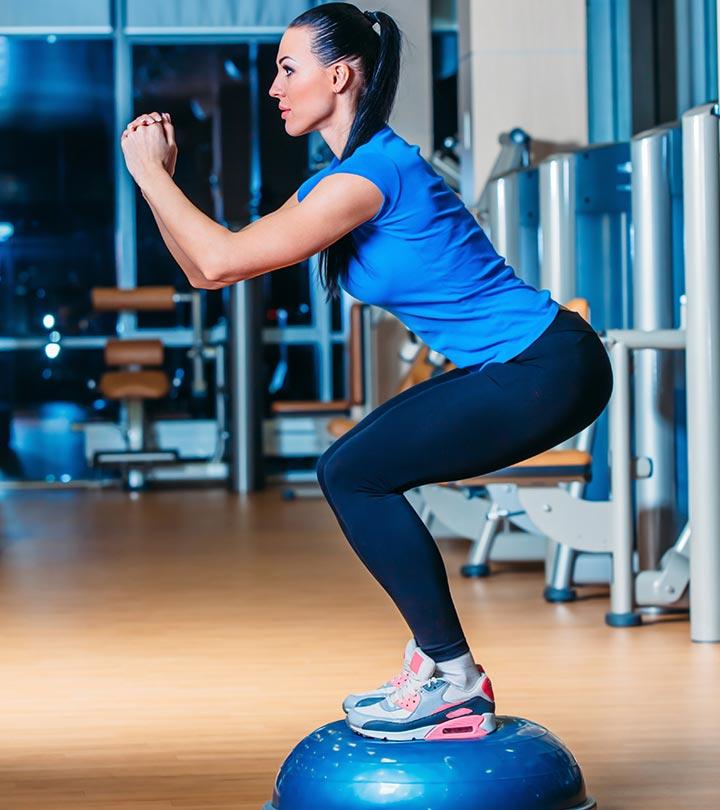
Bosu squats are a great exercise for improving balance and stability. Start by standing on the Bosu ball with your feet shoulder-width apart. Slowly lower yourself into a squat, keeping your knees in line with your toes. Hold the squat for a few seconds before standing back up.
Bosu Lunges

Bosu lunges are another great exercise for improving balance. Start by standing on the Bosu ball with one foot, and take a step forward with the other foot. Lower yourself into a lunge, keeping your front knee in line with your toes. Hold the lunge for a few seconds before standing back up and repeating on the other side.
Bosu Planks

Bosu planks are an excellent exercise for improving core strength and balance. Start by placing your forearms on the Bosu ball and extending your legs behind you. Hold the plank for as long as you can, keeping your body in a straight line.
Bosu Push-Ups

Bosu push-ups are a great exercise for improving upper body strength and balance. Start by placing your hands on the Bosu ball and extending your legs behind you. Lower yourself into a push-up, keeping your body in a straight line. Push yourself back up and repeat.
Bosu Single-Leg Deadlifts

Bosu single-leg deadlifts are an excellent exercise for improving balance and working your hamstrings and glutes. Start by standing on the Bosu ball with one foot and lifting the other leg behind you. Hinge forward at the hips, lowering your upper body towards the ground. Keep your back straight and your lifted leg in line with your body. Return to standing and repeat on the other side.
Bosu Side Planks

Bosu side planks are a great exercise for improving core strength and balance. Start by placing one forearm on the Bosu ball and extending your legs out to the side. Lift your hips up, keeping your body in a straight line. Hold the side plank for as long as you can before switching sides.
Bosu Mountain Climbers

Bosu mountain climbers are a great exercise for improving balance and working your core and lower body. Start by placing your hands on the Bosu ball and extending your legs behind you. Bring one knee up towards your chest, then switch legs. Alternate legs as quickly as you can.
Bosu Superman

Bosu superman is an excellent exercise for improving back strength and balance. Start by lying face down on the Bosu ball with your arms and legs extended out. Lift your arms and legs up as high as you can, keeping your head and neck in line with your spine.
Bosu Russian Twists

Bosu Russian twists are a great exercise for improving core strength and balance. Start by sitting on the Bosu ball with your feet off the ground. Hold a weight or medicine ball in your hands and twist your torso to one side, then the other.
Bosu Burpees

Bosu burpees are a great exercise for improving overall fitness and balance. Start by standing on the Bosu ball, then jump down into a plank position. Do a push-up, then jump your feet back in towards the ball and stand up. Jump up onto the Bosu ball and repeat.
Bosu Balance Trainer

The Bosu balance trainer can be used for a variety of exercises beyond just those listed above. Experiment with different exercises and see what works best for you.
Bosu Exercises For All Fitness Levels

Bosu exercises are great for all fitness levels, from beginners to advanced athletes. Start with simple exercises like Bosu squats and lunges and work your way up to more challenging exercises as you improve your balance and stability.
Conclusion
Bosu exercises are an excellent way to improve your balance and stability. Incorporate some of the exercises listed above into your workout routine and see the benefits for yourself.
