
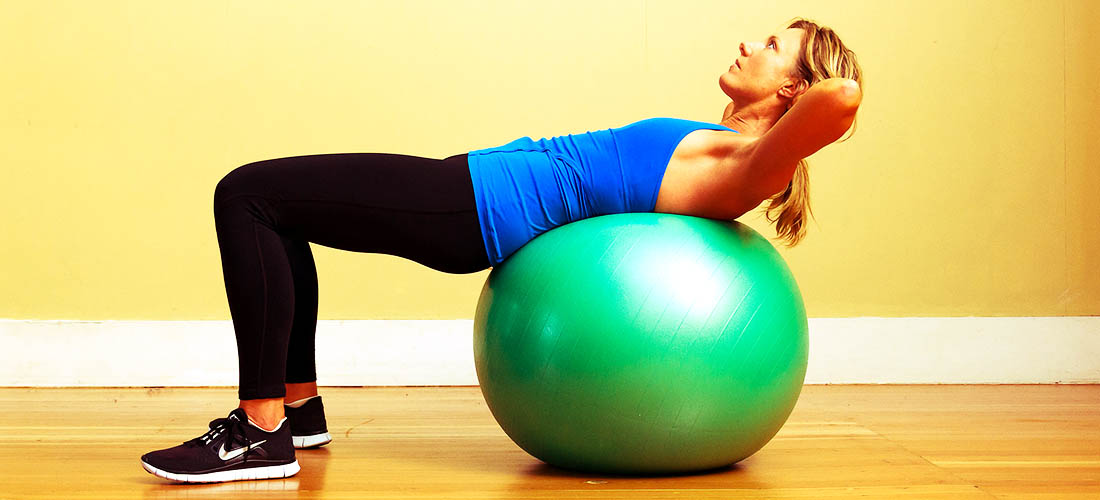
Swiss ball crunches are one of the most effective exercises for building a strong core. They target the rectus abdominis, transverse abdominis, and obliques. When you add weights to this exercise, you increase the resistance and make it more challenging. This is where the weighted Swiss ball crunch comes in.
What is a Weighted Swiss Ball Crunch?

A weighted Swiss ball crunch is a variation of the traditional Swiss ball crunch. Instead of using your body weight, you add weight to your chest or hold a dumbbell or plate. This added weight makes the exercise more intense and helps to build strength and definition in your abs.
How to Perform a Weighted Swiss Ball Crunch
Here's how to perform a weighted Swiss ball crunch:
- Start by sitting on a Swiss ball with your feet flat on the floor.
- Hold a weight plate or dumbbell close to your chest.
- Slowly roll your body down the ball until your lower back is supported by it.
- Engage your abs and lift your shoulders off the ball.
- Pause at the top of the movement, then slowly lower back down.
- Repeat for the desired number of reps.
Tips for Performing Weighted Swiss Ball Crunches
Here are some tips to help you perform weighted Swiss ball crunches correctly:
- Choose a weight that challenges you but doesn't compromise your form.
- Keep your feet flat on the floor and your knees bent at a 90-degree angle.
- Don't pull on your neck or head. Keep your hands behind your head for support, but don't use them to pull yourself up.
- Exhale as you lift your shoulders off the ball and inhale as you lower back down.
- Keep your abs engaged throughout the movement.
Variations of Weighted Swiss Ball Crunches

There are several variations of the weighted Swiss ball crunch that you can try to keep your workouts challenging and interesting:
- Side-to-side weighted Swiss ball crunch: Hold a weight in one hand and do a regular Swiss ball crunch while twisting your torso to the side. Alternate sides for each rep.
- Weighted Swiss ball Russian twist: Sit on the ball and hold a weight close to your chest. Twist your torso to the side, then back to center, and then to the other side. Repeat for the desired number of reps.
- Weighted Swiss ball leg lift: Hold a weight in one hand and lift the opposite leg off the floor as you crunch up. Alternate sides for each rep.
Benefits of Weighted Swiss Ball Crunches

Here are some of the benefits of doing weighted Swiss ball crunches:
- Increased core strength and stability
- Improved posture and balance
- Stronger abs and obliques
- Challenging workout for your entire core
Precautions
While weighted Swiss ball crunches are generally safe for most people, there are some precautions you should take:
- Consult with your doctor before starting a new exercise routine.
- Choose a weight that challenges you but doesn't compromise your form.
- If you have any back or neck pain, skip this exercise or talk to your doctor or physical therapist before trying it.
Conclusion
If you're looking for a challenging and effective core exercise, try adding weighted Swiss ball crunches to your routine. They're versatile, fun, and effective, and they'll help you build a strong and stable core. Just remember to start with a weight that's appropriate for your fitness level, and always prioritize proper form over the number of reps you can do.
Related video of Weighted Swiss Ball Crunch: A Complete Guide
Looking for an effective exercise to strengthen your back and build muscle? The reverse grip row is a great option that targets a variety of muscles. In this article, we'll explore the muscles worked during the reverse grip row and how to properly perform the exercise.

What is the Reverse Grip Row?
The reverse grip row is an exercise that primarily targets the muscles of the upper back. It is performed with a barbell or dumbbells and involves pulling the weight towards your chest while keeping your elbows close to your body.
While the reverse grip row is often used to target the upper back muscles, it also works the biceps, forearms, and shoulders. Additionally, it can help to improve posture and strengthen the muscles that support the spine.
How to Perform the Reverse Grip Row
To perform the reverse grip row:
- Stand with your feet shoulder-width apart and grasp a barbell or dumbbells with an underhand grip.
- Bend forward at the hips, keeping your back straight and your core engaged.
- Pull the weight towards your chest, keeping your elbows close to your body and squeezing your shoulder blades together.
- Lower the weight back down to the starting position and repeat for your desired number of reps.

Muscles Worked in the Reverse Grip Row
The reverse grip row primarily targets the following muscles:
- Trapezius: The trapezius is a large muscle that runs from the base of the skull to the middle of the back. It is responsible for shoulder movement and helps to stabilize the scapula.
- Rhomboids: The rhomboids are a group of muscles that attach the scapula to the spine. They help to retract the scapula and improve posture.
- Biceps: The biceps are a muscle group located in the front of the upper arm. They help to flex the elbow and rotate the forearm.
- Forearms: The forearms are made up of several muscles that help to control wrist and finger movement.
- Shoulders: The shoulders are a complex joint made up of several muscles that help to stabilize and move the arm.
Variations on the Reverse Grip Row
There are several variations on the reverse grip row that can help to target different muscles or add variety to your workout routine:
- Cable reverse grip row: This variation is performed using a cable machine and can help to provide a constant resistance throughout the movement.
- Single-arm dumbbell reverse grip row: This variation is performed using a single dumbbell and can help to target each side of the back separately.
- Underhand grip barbell row: This variation is similar to the reverse grip row but is performed with a wider grip and targets the lats more directly.

Tips for Proper Form
To get the most out of your reverse grip rows, it's important to use proper form:
- Keep your back straight and your core engaged throughout the movement.
- Keep your elbows close to your body and avoid letting them flare out.
- Squeeze your shoulder blades together at the top of the movement.
- Avoid using momentum to lift the weight and focus on using your back muscles.
Incorporating the Reverse Grip Row into Your Workout Routine
The reverse grip row can be incorporated into your back or upper body workout routine. It's important to start with a weight that allows you to perform the exercise with proper form and gradually increase the weight as you become stronger.
Aim to perform 3-4 sets of 8-12 reps of the reverse grip row, with 1-2 minutes of rest between sets.
Conclusion
The reverse grip row is an effective exercise for targeting the muscles of the upper back, as well as the biceps, forearms, and shoulders. By incorporating this exercise into your workout routine and using proper form, you can strengthen your back and improve your overall posture and spinal health.
Related video of Reverse Grip Row Muscles Worked: Strengthening Your Back and More

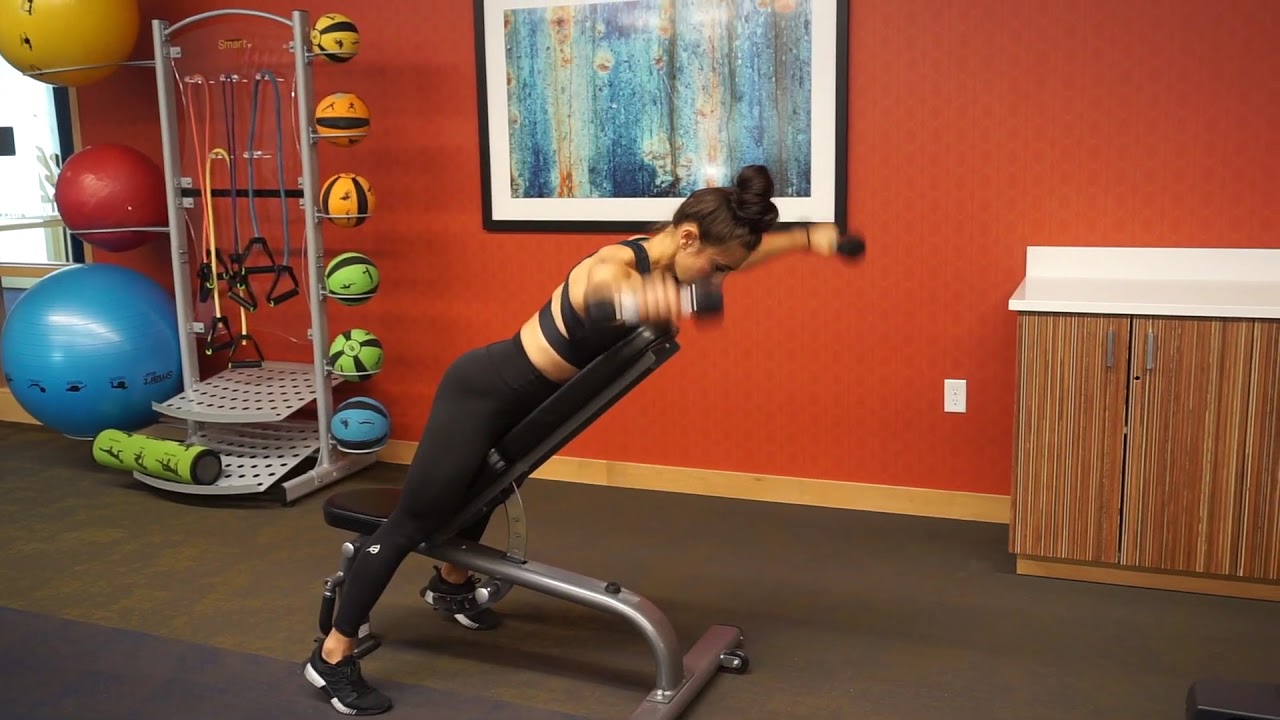
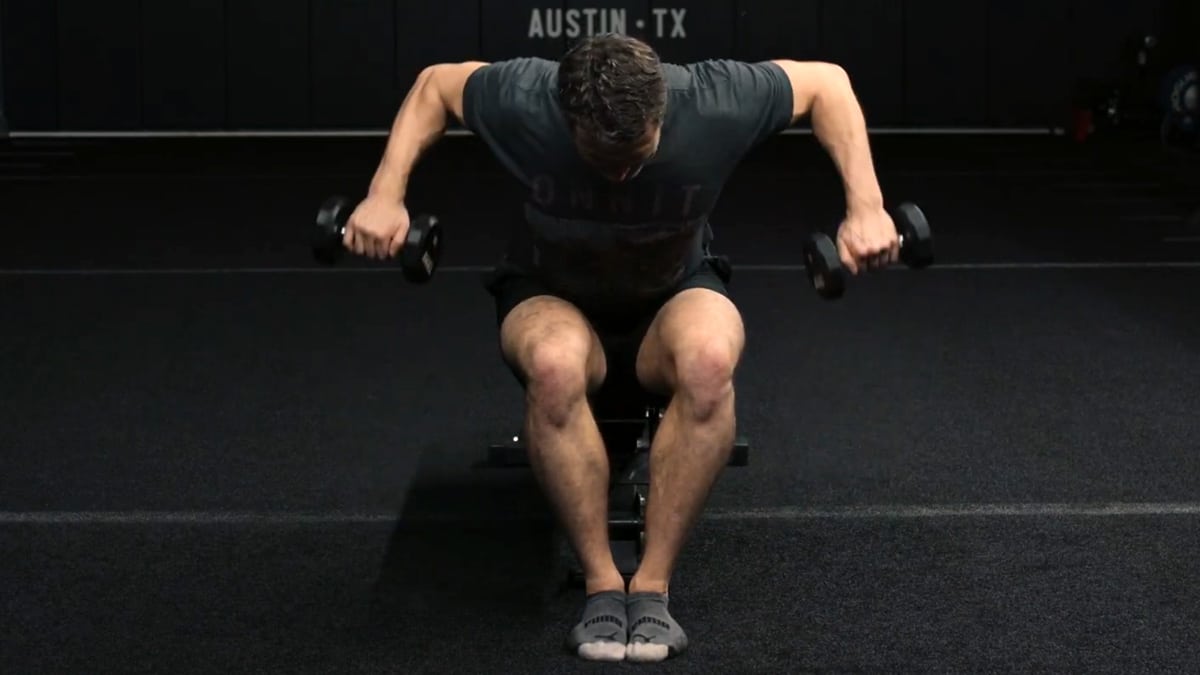
The Bent Over Rear Delt Row is an exercise that targets the rear deltoids, upper back, and trapezius muscles. It is an isolation exercise that is often used to improve posture, upper body strength, and shoulder mobility. In this article, we will discuss the proper form, benefits, and variations of the Bent Over Rear Delt Row.
Proper Form

To perform the Bent Over Rear Delt Row, follow these steps:
- Stand with your feet shoulder-width apart and hold a dumbbell in each hand.
- Bend forward at the waist until your torso is parallel to the floor.
- Keep your back straight and your head up.
- Extend your arms fully, with the dumbbells hanging directly below your shoulders.
- Engage your shoulder blades and pull the dumbbells up towards your chest.
- Pause for a moment at the top of the movement.
- Lower the dumbbells back down to the starting position.
Repeat for the desired number of reps.
Benefits

The Bent Over Rear Delt Row offers several benefits, including:
- Improved posture: The exercise targets the upper back muscles, which can help to improve posture and reduce the risk of back pain.
- Increased upper body strength: The exercise targets the rear deltoids, which are often neglected in traditional upper body exercises.
- Better shoulder mobility: The exercise can help to improve shoulder mobility and reduce the risk of injury.
Variations

There are several variations of the Bent Over Rear Delt Row, including:
- Cable Rear Delt Row: Use a cable machine instead of dumbbells.
- Single Arm Rear Delt Row: Perform the exercise with one arm at a time.
- Standing Rear Delt Row: Perform the exercise while standing upright.
Tips

Here are some tips to help you get the most out of the Bent Over Rear Delt Row:
- Use proper form: Keep your back straight and your head up throughout the exercise.
- Engage your shoulder blades: Focus on squeezing your shoulder blades together at the top of the movement.
- Start with light weights: Begin with a light weight and gradually increase as you become more comfortable with the exercise.
- Breathe properly: Exhale as you pull the dumbbells up and inhale as you lower them back down.
Conclusion
The Bent Over Rear Delt Row is a great exercise to add to your upper body workout routine. It can help to improve posture, upper body strength, and shoulder mobility. Remember to use proper form, start with light weights, and engage your shoulder blades for the best results.
Related video of Bent Over Rear Delt Row

Do you want to strengthen your glutes and improve your overall lower body strength? Look no further than the hip thrust workout. This exercise has gained popularity among fitness enthusiasts and athletes alike, and for good reason. It targets the glutes, hamstrings, and lower back muscles, improving posture and athletic performance.
What is a Hip Thrust?

A hip thrust involves lying on your back with your knees bent and feet flat on the ground. You then lift your hips up towards the ceiling, squeezing your glutes at the top of the movement. The exercise can be performed with just bodyweight, or with added resistance using a barbell, dumbbell or resistance band for a more challenging workout.
Benefits of Hip Thrust

The hip thrust is an effective exercise for improving lower body strength and power. Here are some benefits of the hip thrust:
- Builds glute strength: The hip thrust targets the glutes more effectively than other exercises, helping to build a strong, toned butt.
- Improves posture: Strengthening the glutes and lower back muscles can improve posture and reduce the risk of lower back pain.
- Increases athletic performance: Strong glutes are important for many sports, including running, jumping, and lifting.
How to Do Hip Thrusts at Home

You don't need a gym membership to do hip thrusts. Here's how to do them at home:
- Find a sturdy bench, chair, or elevated surface to rest your upper back against.
- Place your feet flat on the ground and bend your knees to about 90 degrees.
- Place a resistance band around your thighs, just above your knees for added resistance (optional).
- Place a cushion or yoga mat on your hips for comfort (optional).
- Engage your core and glutes and lift your hips up towards the ceiling.
- Squeeze your glutes at the top of the movement, then slowly lower your hips back down to the starting position.
- Repeat the movement for 3-4 sets of 10-12 reps.
Variations of Hip Thrusts

Once you've mastered the basic hip thrust, try these variations to keep your workouts interesting and challenging:
- Single-leg hip thrusts: Perform the hip thrust with one leg raised off the ground for added challenge.
- Banded hip thrusts: Place a resistance band around your knees for added resistance and to engage your glutes and hip abductors.
- Weighted hip thrusts: Hold a dumbbell or barbell across your hips for added resistance.
Tips for a Successful Hip Thrust

Follow these tips to get the most out of your hip thrust workout:
- Engage your core and glutes throughout the movement.
- Don't arch your back or let your knees cave in towards each other.
- Use a cushion or yoga mat to protect your hips and make the exercise more comfortable.
- Start with bodyweight hip thrusts and gradually add resistance as you get stronger.
- Do hip thrusts as part of a well-rounded lower body workout that includes exercises such as squats, lunges, and deadlifts.
Conclusion
The hip thrust is a simple yet effective exercise for building glute and lower body strength. With just a bench or chair and a resistance band, you can perform this exercise at home or anywhere you have a flat surface to lie on. Add hip thrusts to your workout routine and feel the burn in your glutes!
Related video of Hip Thrust Workout At Home

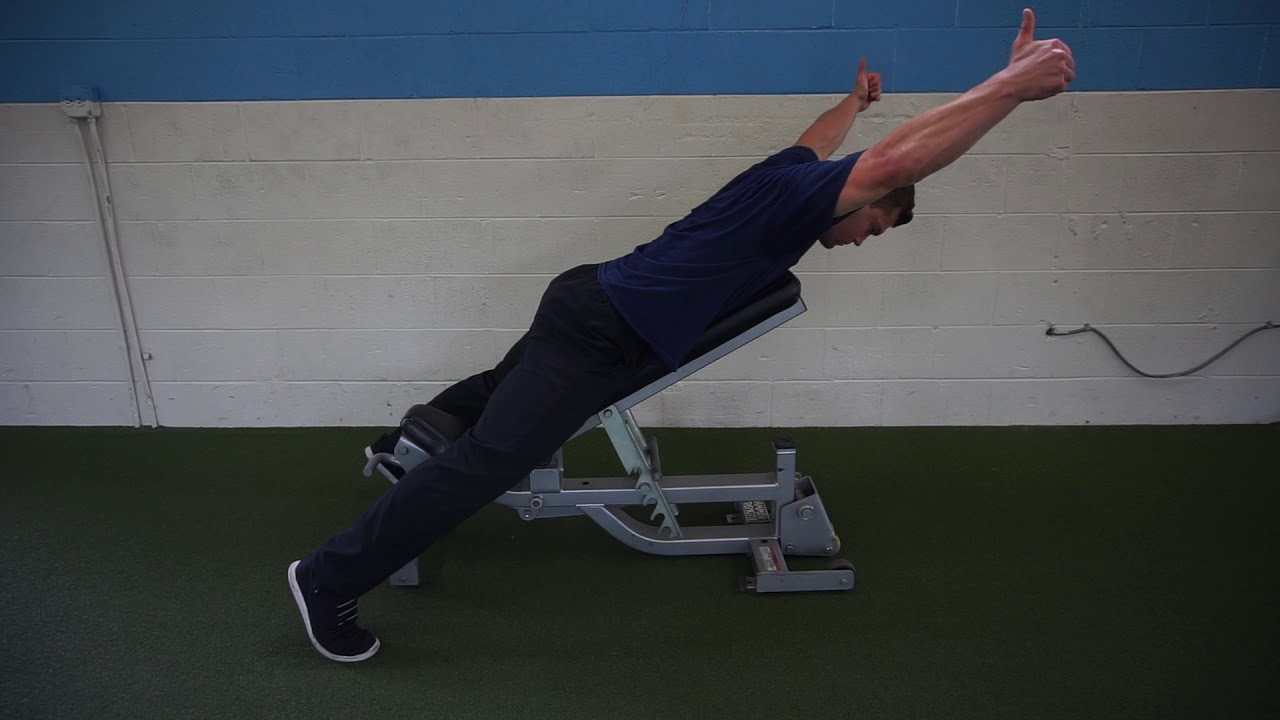
When it comes to building a strong and defined upper back, the incline bench Y raise is an exercise that should not be overlooked. This exercise targets the upper traps and rear deltoids, helping you develop a V-shaped upper body.
How to Perform Incline Bench Y Raises
To perform incline bench Y raises, follow these steps:
- Set up an incline bench at a 45-degree angle.
- Lie face down on the bench with your chest and stomach positioned on the bench.
- Hold a pair of dumbbells with your arms hanging straight down towards the floor.
- Slowly raise your arms up and out to the sides, forming a Y shape with your body.
- Pause for a second at the top of the movement, then slowly lower the weights back down to the starting position.
- Repeat for the desired number of repetitions.
When performing incline bench Y raises, it’s important to keep your arms straight and your elbows locked throughout the movement. Focus on squeezing your shoulder blades together at the top of the exercise to fully engage your upper back muscles.
Variations of Incline Bench Y Raises
If you’re looking to switch up your incline bench Y raise routine, here are a few variations to try:
- Single Arm Incline Bench Y Raise: Instead of using both arms, hold a dumbbell in one hand and perform the exercise on one side at a time.
- Reverse Incline Bench Y Raise: Set up the bench so that it’s facing the opposite direction and perform the exercise with your chest facing the ground.
- Banded Incline Bench Y Raise: Add resistance to the exercise by using a resistance band.
Incline Bench Y Raises Benefits

Incline bench Y raises offer a range of benefits, including:
- Strengthening the upper back muscles, including the upper trapezius and rear deltoids.
- Improving posture and reducing the risk of shoulder injuries.
- Helping to develop a V-shaped upper body.
- Engaging the core muscles for added stability.
Conclusion
When it comes to building a strong and defined upper back, incline bench Y raises are an excellent exercise to add to your routine. By targeting the upper traps and rear deltoids, this exercise helps you develop a V-shaped upper body and improve your posture. Give it a try and see the benefits for yourself!
Related video of Incline Bench Y Raises: A Full Guide
Shoulder workouts are an essential part of any fitness routine. They not only help in building upper body strength but also aid in achieving a toned and sculpted look. Cable machines are a great way to work out your shoulders, and they offer a versatile range of exercises that can be performed with ease. In this article, we will discuss some effective cable machine shoulder workouts that can help you achieve your fitness goals.
The Benefits of Cable Machine Shoulder Workouts
Cable machine shoulder workouts are a great way to work out your shoulders as they offer a range of benefits. Firstly, they allow you to target specific muscles in your shoulders, which can be difficult to do with other exercises. Secondly, they offer a range of resistance levels, which can be increased or decreased depending on your fitness level. Lastly, cable machines are easy to use, and you can perform a variety of exercises with them, making them a versatile piece of gym equipment.

The Best Cable Machine Shoulder Workouts
Here are some of the best cable machine shoulder workouts that you can incorporate into your fitness routine:
1. Cable Front Raise
The cable front raise is an effective exercise that targets the front deltoids. To perform this exercise, stand facing the cable machine with your feet shoulder-width apart. Grab the cable with an overhand grip and lift your arms straight in front of your body until they reach shoulder height. Lower your arms back down and repeat for several reps.

2. Cable Lateral Raise
The cable lateral raise is another effective exercise that targets the side deltoids. To perform this exercise, stand sideways to the cable machine with your feet shoulder-width apart. Grab the cable with an overhand grip and lift your arm straight out to the side until it reaches shoulder height. Lower your arm back down and repeat for several reps before switching sides.

3. Cable Rear Delt Fly
The cable rear delt fly targets the rear deltoids and helps in improving posture. To perform this exercise, stand facing away from the cable machine with your feet shoulder-width apart. Grab the cable with an underhand grip and lift your arms out to the side until they reach shoulder height. Lower your arms back down and repeat for several reps.

4. Cable Shoulder Press
The cable shoulder press is an effective exercise that targets all three heads of the deltoids. To perform this exercise, stand facing the cable machine with your feet shoulder-width apart. Grab the cable with an overhand grip and lift your arms straight up until they are fully extended. Lower your arms back down and repeat for several reps.

Tips for Effective Cable Machine Shoulder Workouts
Here are some tips for effective cable machine shoulder workouts:
1. Warm-Up
Before starting any exercise, make sure you warm up your shoulders properly to avoid injury.
2. Use Proper Form
Make sure you use proper form while performing each exercise to target the right muscles and avoid injury.
3. Increase Resistance Gradually
Start with a lower resistance level and gradually increase it as you become more comfortable with the exercise.
4. Incorporate Variety
Include a variety of cable machine shoulder workouts in your routine to target all three heads of the deltoids.
Conclusion
Cable machine shoulder workouts are an effective way to work out your shoulders and achieve a toned and sculpted look. With a range of exercises to choose from, cable machines offer a versatile and easy-to-use piece of gym equipment that can help you achieve your fitness goals. Make sure you warm up properly, use proper form, and incorporate a variety of exercises to get the most out of your shoulder workout.
Related video of Cable Machine Shoulder Workouts

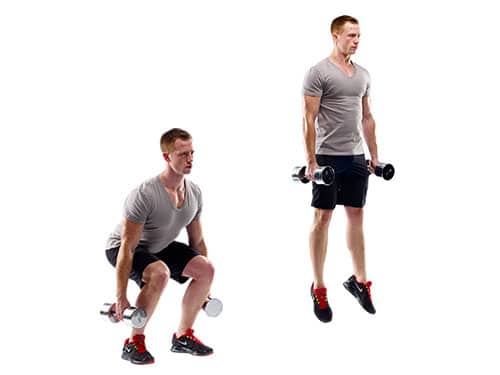
Jump squats with dumbbells are a great exercise for building explosive leg power and developing lower body strength. This exercise combines the benefits of traditional squatting with the added challenge of a plyometric jump. By using dumbbells, you can add resistance to your jump squats, making them even more challenging and effective.
How to Perform Jump Squats With Dumbbells
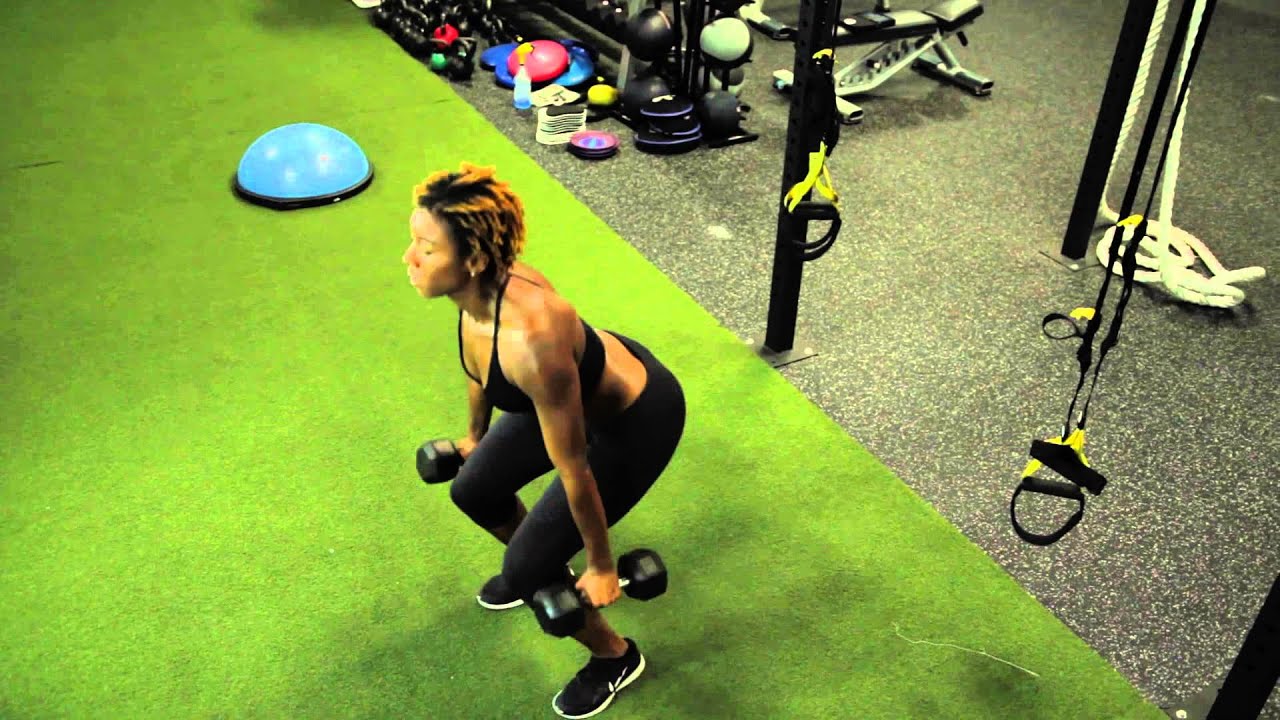
To perform jump squats with dumbbells, start by standing with your feet shoulder-width apart and holding a dumbbell in each hand. Hold the dumbbells at your sides with your palms facing inwards.
Bend your knees and lower your body into a squat position, keeping your back straight and your chest up. Make sure your thighs are parallel to the ground.
From this position, push off the ground explosively and jump upwards as high as you can, extending your arms above your head as you jump.
Land softly back in the squat position and immediately repeat the movement for the desired number of repetitions.
The Benefits of Jump Squats With Dumbbells

Jump squats with dumbbells are a great way to build lower body strength and power. The exercise targets the quads, hamstrings, glutes, and calves, making it an effective full-body workout.
By adding dumbbells to the exercise, you increase the resistance and make the movement even more challenging. This helps to build muscular endurance and improve your overall fitness.
Jump squats with dumbbells are also a great way to improve your athletic performance. The explosive movement of the jump helps to develop power and speed, which can be beneficial for sports such as basketball, football, and track and field.
Variations of Jump Squats With Dumbbells

There are several variations of jump squats with dumbbells that you can try to add variety to your workout routine. Here are a few ideas:
- Single-leg jump squats: Hold a dumbbell in each hand and perform a jump squat on one leg, then switch to the other leg.
- Dumbbell squat jumps with a twist: Hold a dumbbell in each hand and perform a jump squat while twisting your torso to one side. Repeat on the other side.
- Single-arm dumbbell squat jumps: Hold one dumbbell in one hand and perform a jump squat. Repeat on the other side.
Tips for Performing Jump Squats With Dumbbells
Here are a few tips to help you perform jump squats with dumbbells safely and effectively:
- Start with a light weight and gradually increase the weight as you get stronger.
- Keep your back straight and your chest up throughout the movement.
- Land softly on the balls of your feet to avoid putting too much stress on your knees.
- Make sure your knees are in line with your toes throughout the movement.
- Keep your abdominals tight to help stabilize your spine during the exercise.
Conclusion
Jump squats with dumbbells are a challenging and effective exercise for building lower body strength and power. By adding resistance to the movement, you can make it even more challenging and improve your overall fitness. Try incorporating jump squats with dumbbells into your workout routine and see how they can help you reach your fitness goals!
Related video of Jump Squats With Dumbbells

When it comes to strengthening your core, there are a variety of exercises you can do. One effective exercise is the knees to chest abs. This exercise targets your lower abs and can help you achieve a stronger and more toned midsection.
How To Do Knees To Chest Abs
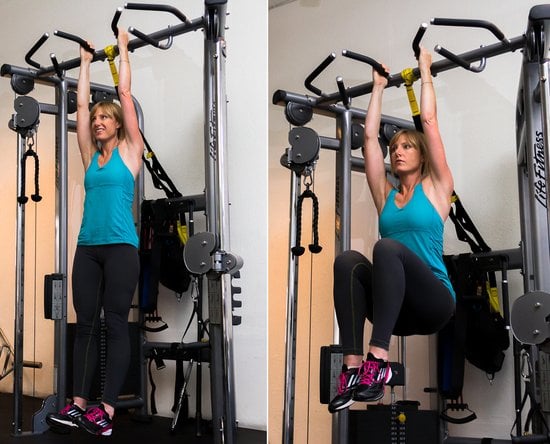
To do knees to chest abs, start by lying on your back with your legs extended. Place your hands behind your head or to your sides for support. Next, exhale and bring your knees up toward your chest. As you bring your knees up, lift your head, neck, and shoulders off the ground. Hold this position for a few seconds before lowering your legs and head back down to the starting position. Repeat for several reps.
Benefits Of Knees To Chest Abs

Knees to chest abs can provide a variety of benefits for your body. One of the main benefits is that it targets your lower abs, which can be difficult to tone. By doing this exercise, you can strengthen and tone your lower abdominal muscles, which can improve your overall core strength. Additionally, knees to chest abs can help improve your posture and balance.
Variations Of Knees To Chest Abs

If you're looking to switch up your workout routine, there are several variations of knees to chest abs you can try. One variation is the double knees to chest, where you bring both knees up at the same time instead of one at a time. Another variation is the straight leg knees to chest, where you keep your legs straight as you bring them up to your chest. These variations can provide an extra challenge and work different muscles in your core.
Tips For Doing Knees To Chest Abs

When doing knees to chest abs, it's important to maintain proper form to avoid injury and maximize effectiveness. Here are some tips to keep in mind:
- Engage your abs throughout the entire exercise
- Keep your neck and shoulders relaxed
- Exhale as you bring your knees up
- Avoid using momentum to lift your legs up
- Start with a few reps and gradually increase as you get stronger
Incorporating Knees To Chest Abs Into Your Workout

If you're looking to add knees to chest abs to your workout routine, there are a few ways you can incorporate them. You can do them as part of a full-body workout or add them to your ab routine. They can also be done as a warm-up exercise before a cardio or strength training session.
Conclusion
Knees to chest abs are a great exercise for targeting your lower abs and improving your core strength. By following proper form and incorporating variations, you can challenge yourself and work different muscles in your midsection. Adding knees to chest abs to your workout routine can help you achieve a stronger and more toned core.
Related video of Knees To Chest Abs

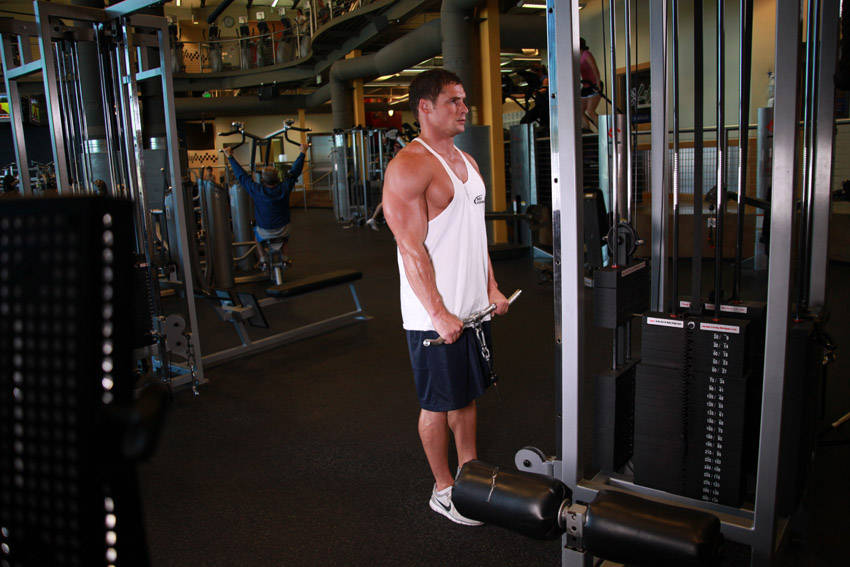
If you are a fitness enthusiast or someone who wants to stay fit and healthy, you know how important it is to have the right gym equipment. One of the must-have equipment is the reverse cable straight bar. This equipment is perfect for those who want to target their back muscles and strengthen their upper body.
What is Reverse Cable Straight Bar?

The reverse cable straight bar is a piece of gym equipment that is used for various exercises such as back rows, bicep curls, and tricep extensions. It is also known as a V-bar or a neutral grip bar. The bar has a unique design that allows you to grip it from the center, which is perfect for targeting your back muscles.
Benefits of Using Reverse Cable Straight Bar

Using the reverse cable straight bar has numerous benefits. One of the biggest benefits is that it helps to target your back muscles and strengthen your upper body. This is important for maintaining good posture and preventing back pain.
Another benefit of using the reverse cable straight bar is that it helps to improve your grip strength. This is because the bar is thicker than a regular straight bar, which makes it more challenging to hold on to. As a result, you will develop stronger grip strength over time.
Additionally, the reverse cable straight bar is a versatile piece of equipment that can be used for various exercises. You can use it for back rows, bicep curls, tricep extensions, and many more. This makes it a great investment for your home gym.
How to Use Reverse Cable Straight Bar

Using the reverse cable straight bar is easy. Here are the steps:
- Attach the bar to the cable machine.
- Adjust the weight to your desired level.
- Stand facing the machine and grab the bar from the center with an overhand grip.
- Step back until you feel tension on the cable.
- Keep your back straight and your shoulders down.
- Pull the bar towards your chest while squeezing your shoulder blades together.
- Hold for a second and then slowly release.
- Repeat for the desired number of reps.
Things to Consider When Buying Reverse Cable Straight Bar
When buying a reverse cable straight bar, there are a few things that you should consider:
- Quality: Make sure that the bar is made of high-quality materials that can withstand heavy use.
- Grip: Look for a bar with a comfortable grip that is easy to hold on to.
- Weight Capacity: Make sure that the bar can handle your weight and the weight of the plates you will be using.
- Size: Choose a bar that is the right size for you and your workout space.
Conclusion
The reverse cable straight bar is a must-have gym equipment for anyone who wants to strengthen their upper body and target their back muscles. It is versatile, easy to use, and has numerous benefits. When buying a reverse cable straight bar, make sure to consider the quality, grip, weight capacity, and size. With the right equipment and dedication, you can achieve your fitness goals and stay healthy.
Related video of Reverse Cable Straight Bar: A Must-Have Gym Equipment for Your Workout

Having well-defined shoulders is not only visually appealing but also crucial for overall upper body strength. One exercise that can help you achieve this goal is the dumbbell rear delt row. This compound exercise targets the rear delts, upper back, and traps, which are often neglected in regular workouts.
How to Perform a Dumbbell Rear Delt Row
To perform a dumbbell rear delt row, follow these steps:
- Stand with your feet shoulder-width apart and hold a dumbbell in each hand with your palms facing your body.
- Bend your knees slightly and hinge forward at the hips, keeping your back straight.
- Extend your arms fully towards the ground.
- Lift the dumbbells towards your chest, keeping your elbows close to your body.
- Squeeze your shoulder blades together at the top of the movement.
- Lower the dumbbells back to the starting position with control.
- Repeat for your desired number of repetitions.
It's important to maintain proper form throughout the exercise to avoid injury and maximize results. Keep your core engaged, shoulders relaxed, and avoid swinging the weights.
Variations of Dumbbell Rear Delt Row

There are several variations of the dumbbell rear delt row that you can try to keep your workouts challenging and effective. Here are a few examples:
- Single-arm dumbbell rear delt row
- Bent-over dumbbell reverse fly
- Cable face pull
- Dumbbell shrug
Consult with a certified personal trainer to determine which variation is best for your fitness level and goals.
Benefits of Dumbbell Rear Delt Row

Incorporating the dumbbell rear delt row into your workout routine offers several benefits:
- Targets the rear delts, upper back, and traps for well-rounded shoulder development
- Improves posture and reduces the risk of shoulder injuries
- Increases upper body strength and muscle mass
- Can be performed with minimal equipment and space
Tips for Dumbbell Rear Delt Row
Here are some tips to keep in mind when performing the dumbbell rear delt row:
- Start with a lighter weight to master proper form before progressing to heavier weights
- Breathe in as you lower the weights and exhale as you lift them
- Include the dumbbell rear delt row in your upper body workout routine once or twice a week
- Gradually increase the weight and number of repetitions as you get stronger
Conclusion
The dumbbell rear delt row is a simple yet effective exercise for building strong and defined shoulders. With proper form and consistency, you can reap the benefits of this compound exercise and achieve your fitness goals.
Related video of Dumbbell Rear Delt Row: How to Build Strong and Defined Shoulders
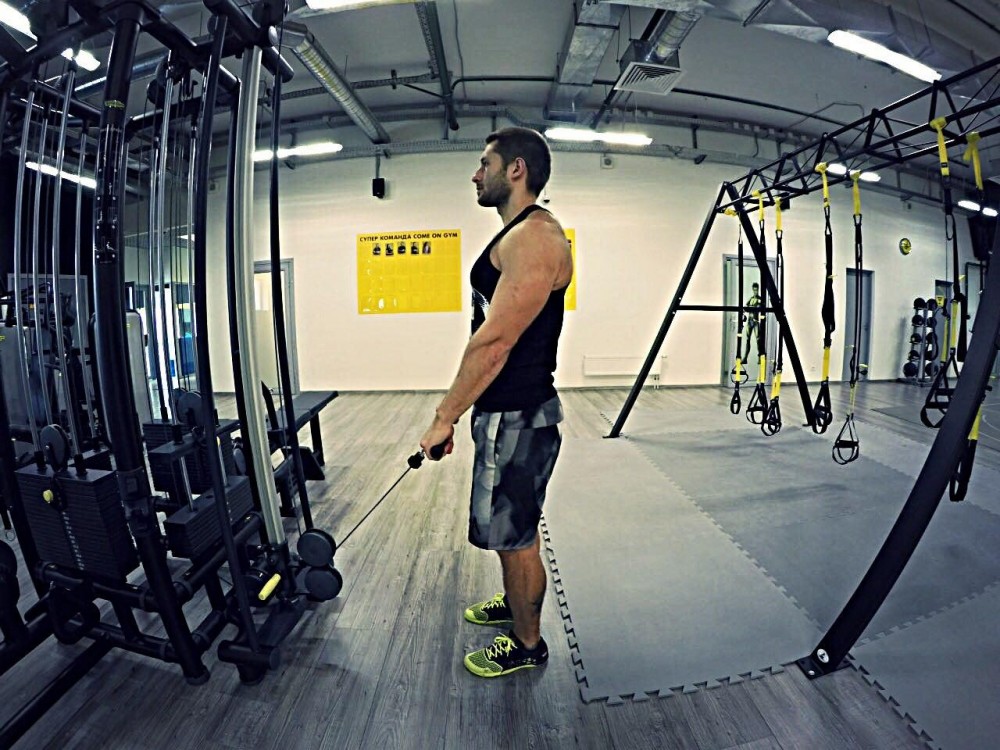
The pronated grip lat pulldown is a popular exercise that targets the upper back muscles. It is a variation of the traditional lat pulldown, where the palms are facing down or away from the body. The exercise involves pulling a cable or bar down towards the chest while keeping the elbows close to the body. The pronated grip lat pulldown is an effective way to strengthen the lats, traps, and rhomboids, which are essential for good posture and upper body strength.

The Benefits of Pronated Grip Lat Pulldown
The pronated grip lat pulldown provides several benefits, including:
- Improved upper body strength: The exercise targets the upper back muscles, which are crucial for good posture and upper body strength.
- Better grip strength: The pronated grip lat pulldown can help improve grip strength, which is essential for many other exercises that require a strong grip.
- Increased muscle mass: The exercise can help increase muscle mass in the upper back, making it a great addition to any bodybuilding or fitness program.
- Reduced risk of injury: Strengthening the upper back muscles can help reduce the risk of injury, especially in the shoulders and neck.
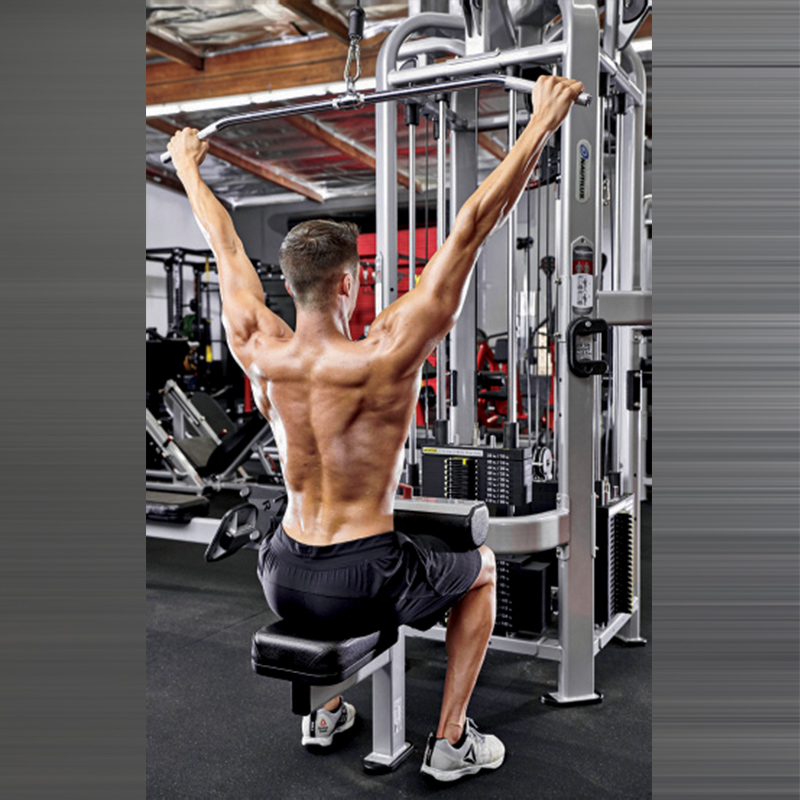
Technique for Pronated Grip Lat Pulldown
Here are the steps to perform the exercise:
- Select a weight that you can comfortably lift for 8-12 repetitions. Adjust the weight as needed.
- Sit on the lat pulldown machine with your feet flat on the floor and your knees bent at 90 degrees.
- Grasp the bar or handle with your palms facing down and your hands shoulder-width apart.
- Lean back slightly and bring your chest forward while keeping your shoulders down and back.
- Exhale and pull the bar or handle down towards your chest, keeping your elbows close to your body.
- Pause for a second and squeeze your shoulder blades together at the bottom of the movement.
- Inhale and slowly release the bar or handle back to the starting position.
- Repeat for 8-12 repetitions.

Variations of Pronated Grip Lat Pulldown
Here are some variations of the pronated grip lat pulldown:
- Wide-grip lat pulldown: This variation involves gripping the bar or handle wider than shoulder-width apart to target the outer lats.
- Narrow-grip lat pulldown: This variation involves gripping the bar or handle closer than shoulder-width apart to target the inner lats.
- Underhand grip lat pulldown: This variation involves gripping the bar or handle with your palms facing up or towards your body to target the biceps and upper back muscles.

Common Mistakes to Avoid
Here are some common mistakes to avoid when performing the pronated grip lat pulldown:
- Using too much weight: It is important to use a weight that you can comfortably lift for 8-12 repetitions. Using too much weight can lead to poor form and increase the risk of injury.
- Leaning too far back: Leaning too far back can put unnecessary strain on the lower back and reduce the effectiveness of the exercise.
- Not keeping the elbows close to the body: Letting the elbows flare out can shift the focus away from the upper back muscles and increase the risk of injury.
- Rushing the movement: It is important to perform the exercise slowly and with control to maximize muscle activation and prevent injury.

Conclusion
The pronated grip lat pulldown is a great exercise for strengthening the upper back muscles and improving posture. By following the proper technique and avoiding common mistakes, you can maximize the benefits of the exercise and reduce the risk of injury. Whether you are a bodybuilder, fitness enthusiast, or just looking to improve your upper body strength, the pronated grip lat pulldown is a must-try exercise.
