
If you're looking to build a strong back, the single hand cable row is a great exercise to add to your routine. In this article, we'll discuss the benefits of the single hand cable row and how to perform it correctly.
Benefits of the Single Hand Cable Row

The single hand cable row is an excellent exercise for targeting the upper back muscles, including the rhomboids, trapezius, and rear deltoids. By performing this exercise, you can improve your posture, increase upper back strength, and reduce the risk of back pain.
Additionally, the single hand cable row is a unilateral exercise, meaning it works each side of the body independently. This can help to correct any muscular imbalances and improve overall muscle development.
How to Perform the Single Hand Cable Row

To perform the single hand cable row, follow these steps:
- Begin by setting the cable machine to a low pulley position and attaching a single handle to the cable.
- Stand facing the cable machine with your feet shoulder-width apart and your knees slightly bent.
- Grasp the handle with your right hand and step back from the cable machine, extending your arm fully.
- Engage your core and pull the handle towards your torso, keeping your elbow close to your body.
- Pause briefly at the top of the movement, then slowly lower the handle back to the starting position.
- Repeat for the desired number of repetitions, then switch sides and repeat with your left hand.
Be sure to maintain good form throughout the exercise, keeping your back straight and your shoulders down and back. To increase the difficulty of the exercise, you can increase the weight on the cable machine or perform more repetitions.
Tips for Performing the Single Hand Cable Row

Here are some tips to keep in mind when performing the single hand cable row:
- Start with a lighter weight and focus on maintaining good form before increasing the weight.
- Keep your core engaged throughout the exercise to help stabilize your body.
- Focus on pulling with your back muscles, rather than using your arms to pull the weight.
- Don't let your shoulders shrug up towards your ears – keep them down and back throughout the exercise.
- Breathe out as you pull the handle towards your torso, and breathe in as you lower it back down.
Incorporating the Single Hand Cable Row into Your Workout

The single hand cable row can be incorporated into your back workout routine as a standalone exercise or as part of a superset or circuit. Try performing 3-4 sets of 8-12 repetitions on each side, resting for 30-60 seconds between sets.
Conclusion
The single hand cable row is a great exercise for improving upper back strength and reducing the risk of back pain. By incorporating this exercise into your routine and following proper form, you can achieve a stronger, more balanced back.
Related video of Single Hand Cable Row: Benefits and How to Perform It

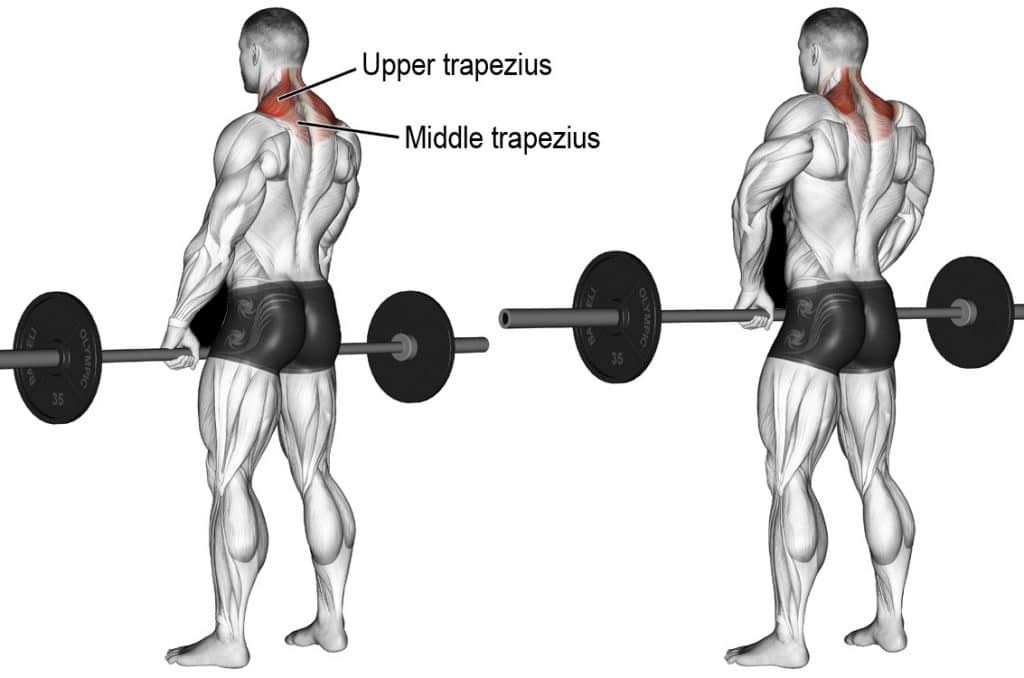
If you're looking to build stronger and bigger traps, you might want to incorporate shrugs into your workout routine. Shrugs are a simple yet effective exercise that primarily target the trapezius muscles, which are located at the back of your neck and shoulder. In this article, we'll discuss the muscles involved in shrugs and how to perform it correctly to maximize its benefits.
What Muscles Do Shrugs Work?
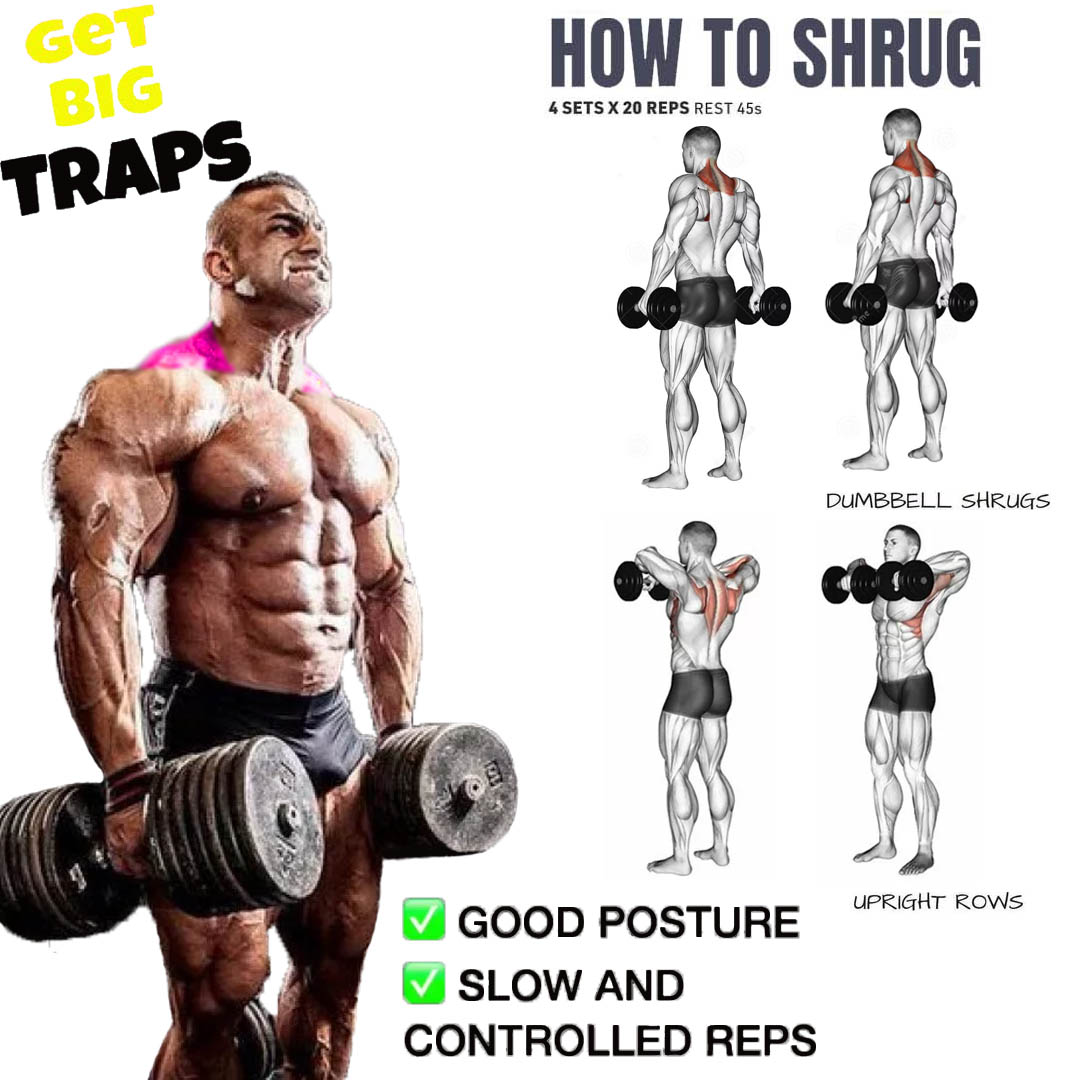
As mentioned earlier, shrugs primarily work the trapezius muscles, which are the large muscles that span across your upper back, neck, and shoulders. These muscles are responsible for various movements, such as shoulder elevation, scapular retraction, and neck extension.
When you perform shrugs, you target the upper portion of the trapezius muscles, which are responsible for shoulder elevation. However, shrugs also work other muscles in your upper body, such as:
- Levator scapulae: a muscle that connects your neck and shoulder blade and helps in neck movement and shoulder elevation.
- Rhomboids: two muscles located between your spine and shoulder blade that help in scapular retraction and stabilization of the shoulder blade.
- Serratus anterior: a muscle located on the side of your ribcage that assists in scapular protraction and rotation.
How to Do Shrugs Correctly?
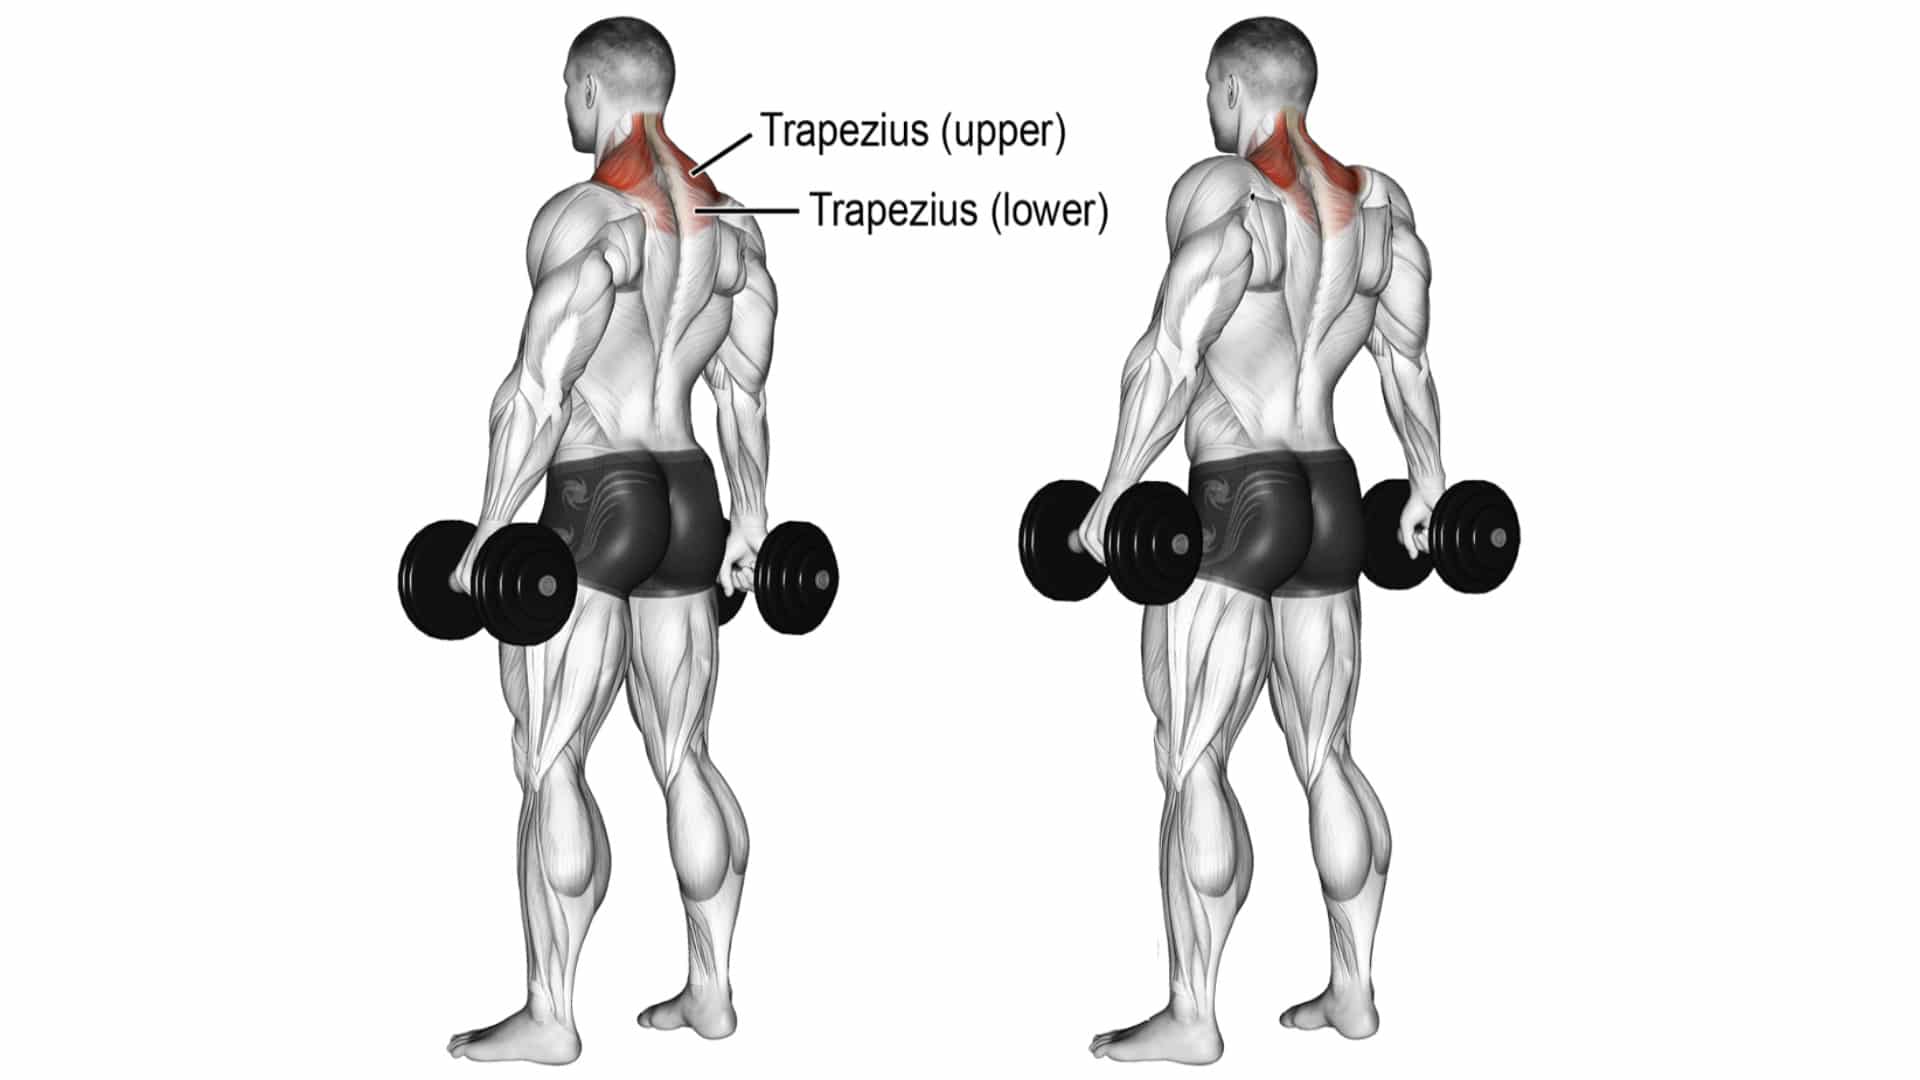
Shrugs are a simple exercise that you can do with dumbbells, barbells, or a Smith machine. Here's how to perform shrugs correctly:
- Stand straight with your feet shoulder-width apart and hold the weight with an overhand grip, palms facing your thighs.
- Lift the weight by raising your shoulders towards your ears, without bending your elbows or moving your head forward.
- Hold the contraction for a second or two, then lower your shoulders back down to the starting position.
- Repeat for the desired number of reps.
It's important to note that shrugs are not a complex movement, so you should avoid using momentum or bouncing the weight to lift it up. Instead, focus on squeezing your traps and lifting the weight with control.
How Many Sets and Reps Should You Do?
The number of sets and reps you should do depends on your goals and fitness level. If you're a beginner, start with 2-3 sets of 12-15 reps with a light weight to get the hang of the movement. As you progress, you can increase the weight and decrease the reps to 8-12 per set.
If you're looking to build mass, you can do 3-4 sets of 8-12 reps with a heavy weight, taking longer rest periods between sets. On the other hand, if you're looking to improve muscle endurance, you can do lighter weights for higher reps, such as 15-20 reps per set.
Other Tips for Shrugs Workout

Here are some additional tips to help you get the most out of your shrugs workout:
- Warm up your traps and shoulders before starting the exercise to prevent injury and improve performance.
- Vary your grip width and hand position to target different parts of the trapezius muscles.
- Avoid shrugging your shoulders up and forward, which can cause neck strain and reduce the effectiveness of the exercise.
- Incorporate other exercises that work the trapezius muscles, such as rows, pull-ups, and face pulls, to add variety to your workout routine.
Conclusion
Shrugs are a simple yet effective exercise that can help you build stronger and bigger traps. By incorporating shrugs into your workout routine, you target the trapezius muscles and other muscles in your upper body, such as the levator scapulae, rhomboids, and serratus anterior. Remember to perform shrugs correctly, vary your sets and reps, and follow other tips to get the most out of your workout.
Related video of Shrugs Workout: What Muscles Are Involved and How to Do It?

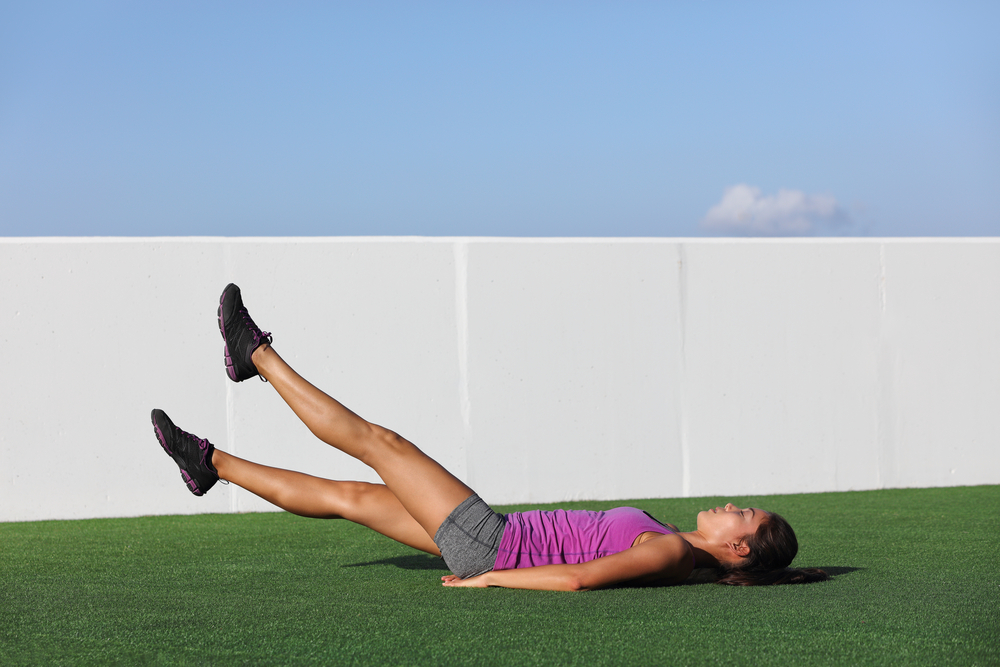
The scissor kick is a powerful and dynamic movement that can be used in a variety of sports, including soccer, swimming, and martial arts. This technique involves alternating between kicking your legs in opposite directions while in mid-air, creating a scissor-like motion. If you want to master this impressive move, read on for step-by-step instructions on how to do the scissor kick.
Step 1: Warm-Up
Before attempting any complex moves, it's important to properly warm up your body. Start with some light cardio, such as jogging or jumping jacks, to get your heart rate up and your blood flowing. Then, stretch your legs, hips, and lower back to prevent injury.
Step 2: Begin in a Standing Position

Stand with your feet shoulder-width apart, with your arms at your sides. Keep your knees slightly bent and your core engaged for stability.
Step 3: Jump Upward

Jump upward, pushing off with both feet simultaneously. Aim to jump as high as possible, while keeping your legs straight and your toes pointed.
Step 4: Cross Your Legs

As you're in mid-air, cross your legs, with one leg in front of the other. Keep your knees straight and your toes pointed throughout the movement.
Step 5: Uncross Your Legs
Immediately after crossing your legs, uncross them, bringing the opposite leg to the front. Keep your legs straight and your toes pointed throughout the movement.
Step 6: Land on the Ground

As you're descending, prepare to land on the ground. Keep your knees slightly bent to absorb the impact, and land on the balls of your feet.
Step 7: Repeat the Movement

Once you've landed, immediately jump back up and repeat the movement, crossing your legs in the opposite direction this time.
Tips for Success:

- Start with small jumps and gradually work your way up to higher jumps as you become more comfortable with the technique.
- Keep your core engaged throughout the movement to maintain balance and control.
- Practice regularly to build strength and improve your form.
- Remember to warm up and stretch before attempting any complex moves.
With practice and dedication, anyone can learn how to do the scissor kick. Whether you want to impress your friends or improve your performance in sports, this powerful move is sure to impress. So get out there and start practicing!
Related video of How to Do the Scissor Kick

Are you looking to build bigger biceps and arms? One of the best exercises for this is the barbell curl with an EZ bar. This exercise targets your biceps and forearms and is an essential part of any arm workout routine. In this article, we will go over everything you need to know about the barbell curl with an EZ bar.
What is an EZ Bar?

An EZ bar is a type of weightlifting bar that has a unique shape. It has a zigzag shape in the middle, which allows you to grip the bar with your palms facing inward, rather than facing down. This grip puts less stress on your wrists and elbows, making it a more comfortable option for many people.
How to Perform the Barbell Curl with an EZ Bar
To perform the barbell curl with an EZ bar, follow these steps:
- Stand with your feet shoulder-width apart and hold the EZ bar with an underhand grip, with your hands shoulder-width apart.
- Keep your elbows close to your body and curl the bar upwards towards your chest.
- Squeeze your biceps at the top of the movement and hold for a second.
- Slowly lower the bar back down to the starting position.
- Repeat for your desired number of repetitions.
Common Mistakes to Avoid

When performing the barbell curl with an EZ bar, it's important to avoid these common mistakes:
- Swinging the weight up: This takes the focus off your biceps and can lead to injury.
- Using too much weight: This can cause you to sacrifice form and put unnecessary stress on your joints.
- Not fully extending your arms: This reduces the range of motion and makes the exercise less effective.
- Not squeezing your biceps: This reduces the effectiveness of the exercise and reduces the muscle activation in your biceps.
Variations of the Barbell Curl with an EZ Bar

There are several variations of the barbell curl with an EZ bar that you can try, including:
- Close-grip barbell curl: This variation involves holding the EZ bar with your hands close together, which places more emphasis on your inner biceps and forearms.
- Reverse-grip barbell curl: This variation involves holding the EZ bar with an overhand grip, which places more emphasis on your forearms.
- Preacher curl: This variation involves using a preacher bench to perform the exercise, which provides support for your arms and isolates your biceps.
Benefits of the Barbell Curl with an EZ Bar

The barbell curl with an EZ bar has several benefits, including:
- Increased muscle activation: This exercise targets your biceps and forearms, which helps to build muscle in these areas.
- Improved grip strength: The unique shape of the EZ bar helps to improve your grip strength, which can benefit other exercises.
- Reduced risk of injury: The grip on the EZ bar places less stress on your wrists and elbows, reducing the risk of injury.
- Versatility: There are several variations of this exercise that you can try, allowing you to target different areas of your arms.
Conclusion
The barbell curl with an EZ bar is a fantastic exercise for building bigger biceps and arms. By following the correct form and avoiding common mistakes, you can get the most out of this exercise. Try adding this exercise to your arm workout routine and see the results for yourself!
Related video of Barbell Curl With Ez Bar: The Ultimate Guide

If you're looking to switch up your lower body workout routine, squats on weight plate might just be the perfect exercise for you. This variation of the classic squat targets your glutes, quads, and hamstrings while also improving your balance and stability. In this article, we'll dive into the benefits, techniques, and variations of squats on weight plate.
The Benefits of Squats On Weight Plate

Like any squat variation, squats on weight plate offer a variety of benefits for your lower body muscles. Here are some of the top advantages of this exercise:
- Engages more muscles: By standing on the weight plate, you're challenging your balance and stability, which engages more muscles throughout your legs and core.
- Improves range of motion: The extra height provided by the weight plate allows for a deeper squat, which can increase your range of motion and flexibility over time.
- Targets glutes: Squats on weight plate put more emphasis on your glutes than traditional squats, helping you build a stronger and firmer butt.
- Strengthens quads and hamstrings: Of course, squats on weight plate also work your quads and hamstrings, helping you build stronger and more toned legs.
How To Do Squats On Weight Plate

Now that you know the benefits of squats on weight plate, let's talk about how to do them properly:
- Place a weight plate on the ground and stand on top of it with your feet shoulder-width apart.
- Position your toes slightly outward and engage your core.
- Bend your knees and lower your hips down into a squat, keeping your chest up and your back straight.
- Push through your heels to stand back up to the starting position.
- Repeat for your desired number of reps.
Remember to keep your weight balanced over your heels and avoid letting your knees cave inward. You can also try holding a dumbbell or kettlebell in front of your chest to add extra resistance.
Squats On Weight Plate Variations

Looking to switch things up even more? Here are three variations of squats on weight plate to try:
- Single-leg squats on weight plate: Instead of standing on both feet, lift one foot off the ground and perform a squat on the weight plate with just one leg.
- Jump squats on weight plate: Add some plyometric power to your workout by performing a jump squat on the weight plate, exploding up into the air before landing back on the plate and sinking into a squat.
- Sumo squats on weight plate: Turn your toes out even further and take a wider stance to perform a sumo squat on the weight plate, targeting your inner thighs and glutes.
Conclusion
Squats on weight plate are a great way to switch up your leg day routine and challenge your muscles in new ways. By engaging more muscles, improving range of motion, and targeting your glutes, quads, and hamstrings, this exercise can help you build a stronger and more toned lower body. Give it a try and see the results for yourself!
Related video of Squats On Weight Plate: A Guide To Benefits, Techniques, and Variations

Push ups are one of the most popular bodyweight exercises. They are simple to do and require no equipment. Push ups are commonly associated with chest and triceps, but they also work several other muscles in the body, including the shoulders. In this article, we will answer the question, do push ups work the shoulders?
What Muscles Do Push Ups Work?

Push ups are a compound exercise that involves multiple muscle groups. The primary muscles worked during a push up are the chest (pectoralis major), triceps, and shoulders (deltoids). Push ups also engage the core muscles, including the rectus abdominis and obliques, as well as the lower back and glutes.
How Do Push Ups Work The Shoulders?

Push ups work the shoulders in several different ways. The anterior deltoid is the main muscle worked during a push up. This muscle is located on the front of the shoulder and is responsible for shoulder flexion (raising the arm forward). The lateral deltoid, located on the side of the shoulder, is also activated during a push up. This muscle is responsible for shoulder abduction (raising the arm to the side).
The posterior deltoid, located on the back of the shoulder, is also involved in stabilizing the shoulder during a push up. This muscle is responsible for shoulder extension (pulling the arm backward).
Benefits of Push Ups for Shoulders

Push ups offer several benefits for the shoulders. They help to strengthen and tone the shoulders, which can improve posture and reduce the risk of injury. Push ups also improve shoulder stability, which is essential for everyday activities such as lifting and carrying objects.
In addition, push ups can help to improve shoulder mobility. As the shoulders are worked through their full range of motion during a push up, this can help to increase flexibility and reduce stiffness.
Variations of Push Ups for Shoulders

There are several variations of push ups that can target the shoulders more specifically. These include:
- Wide-grip push ups: This variation involves placing the hands wider than shoulder-width apart. This targets the chest and shoulders more than the triceps.
- Pike push ups: This variation involves starting in a downward dog yoga pose and then lowering the head towards the ground. This targets the shoulders and upper back.
- Decline push ups: This variation involves elevating the feet on a bench or step. This targets the shoulders and upper chest more than the triceps.
Conclusion
In conclusion, push ups are an excellent exercise for working the shoulders. They target multiple muscles in the shoulders and can offer several benefits, including improved strength, stability, and mobility. Incorporating variations of push ups into your workout routine can help to target the shoulders more specifically and enhance your overall fitness.
Related video of Do Push Ups Work The Shoulders
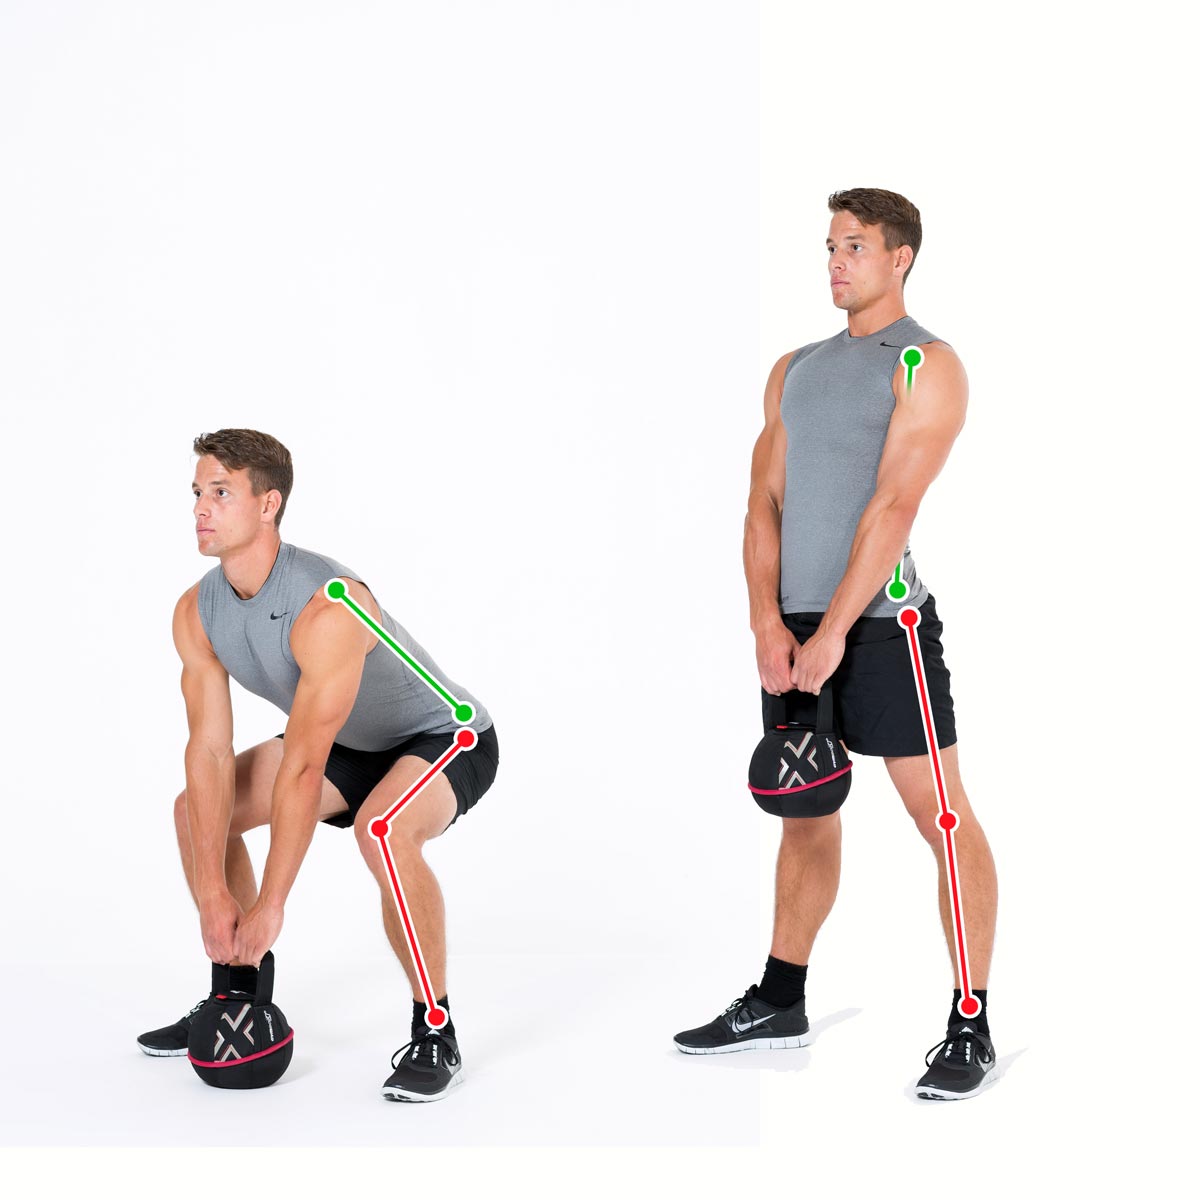
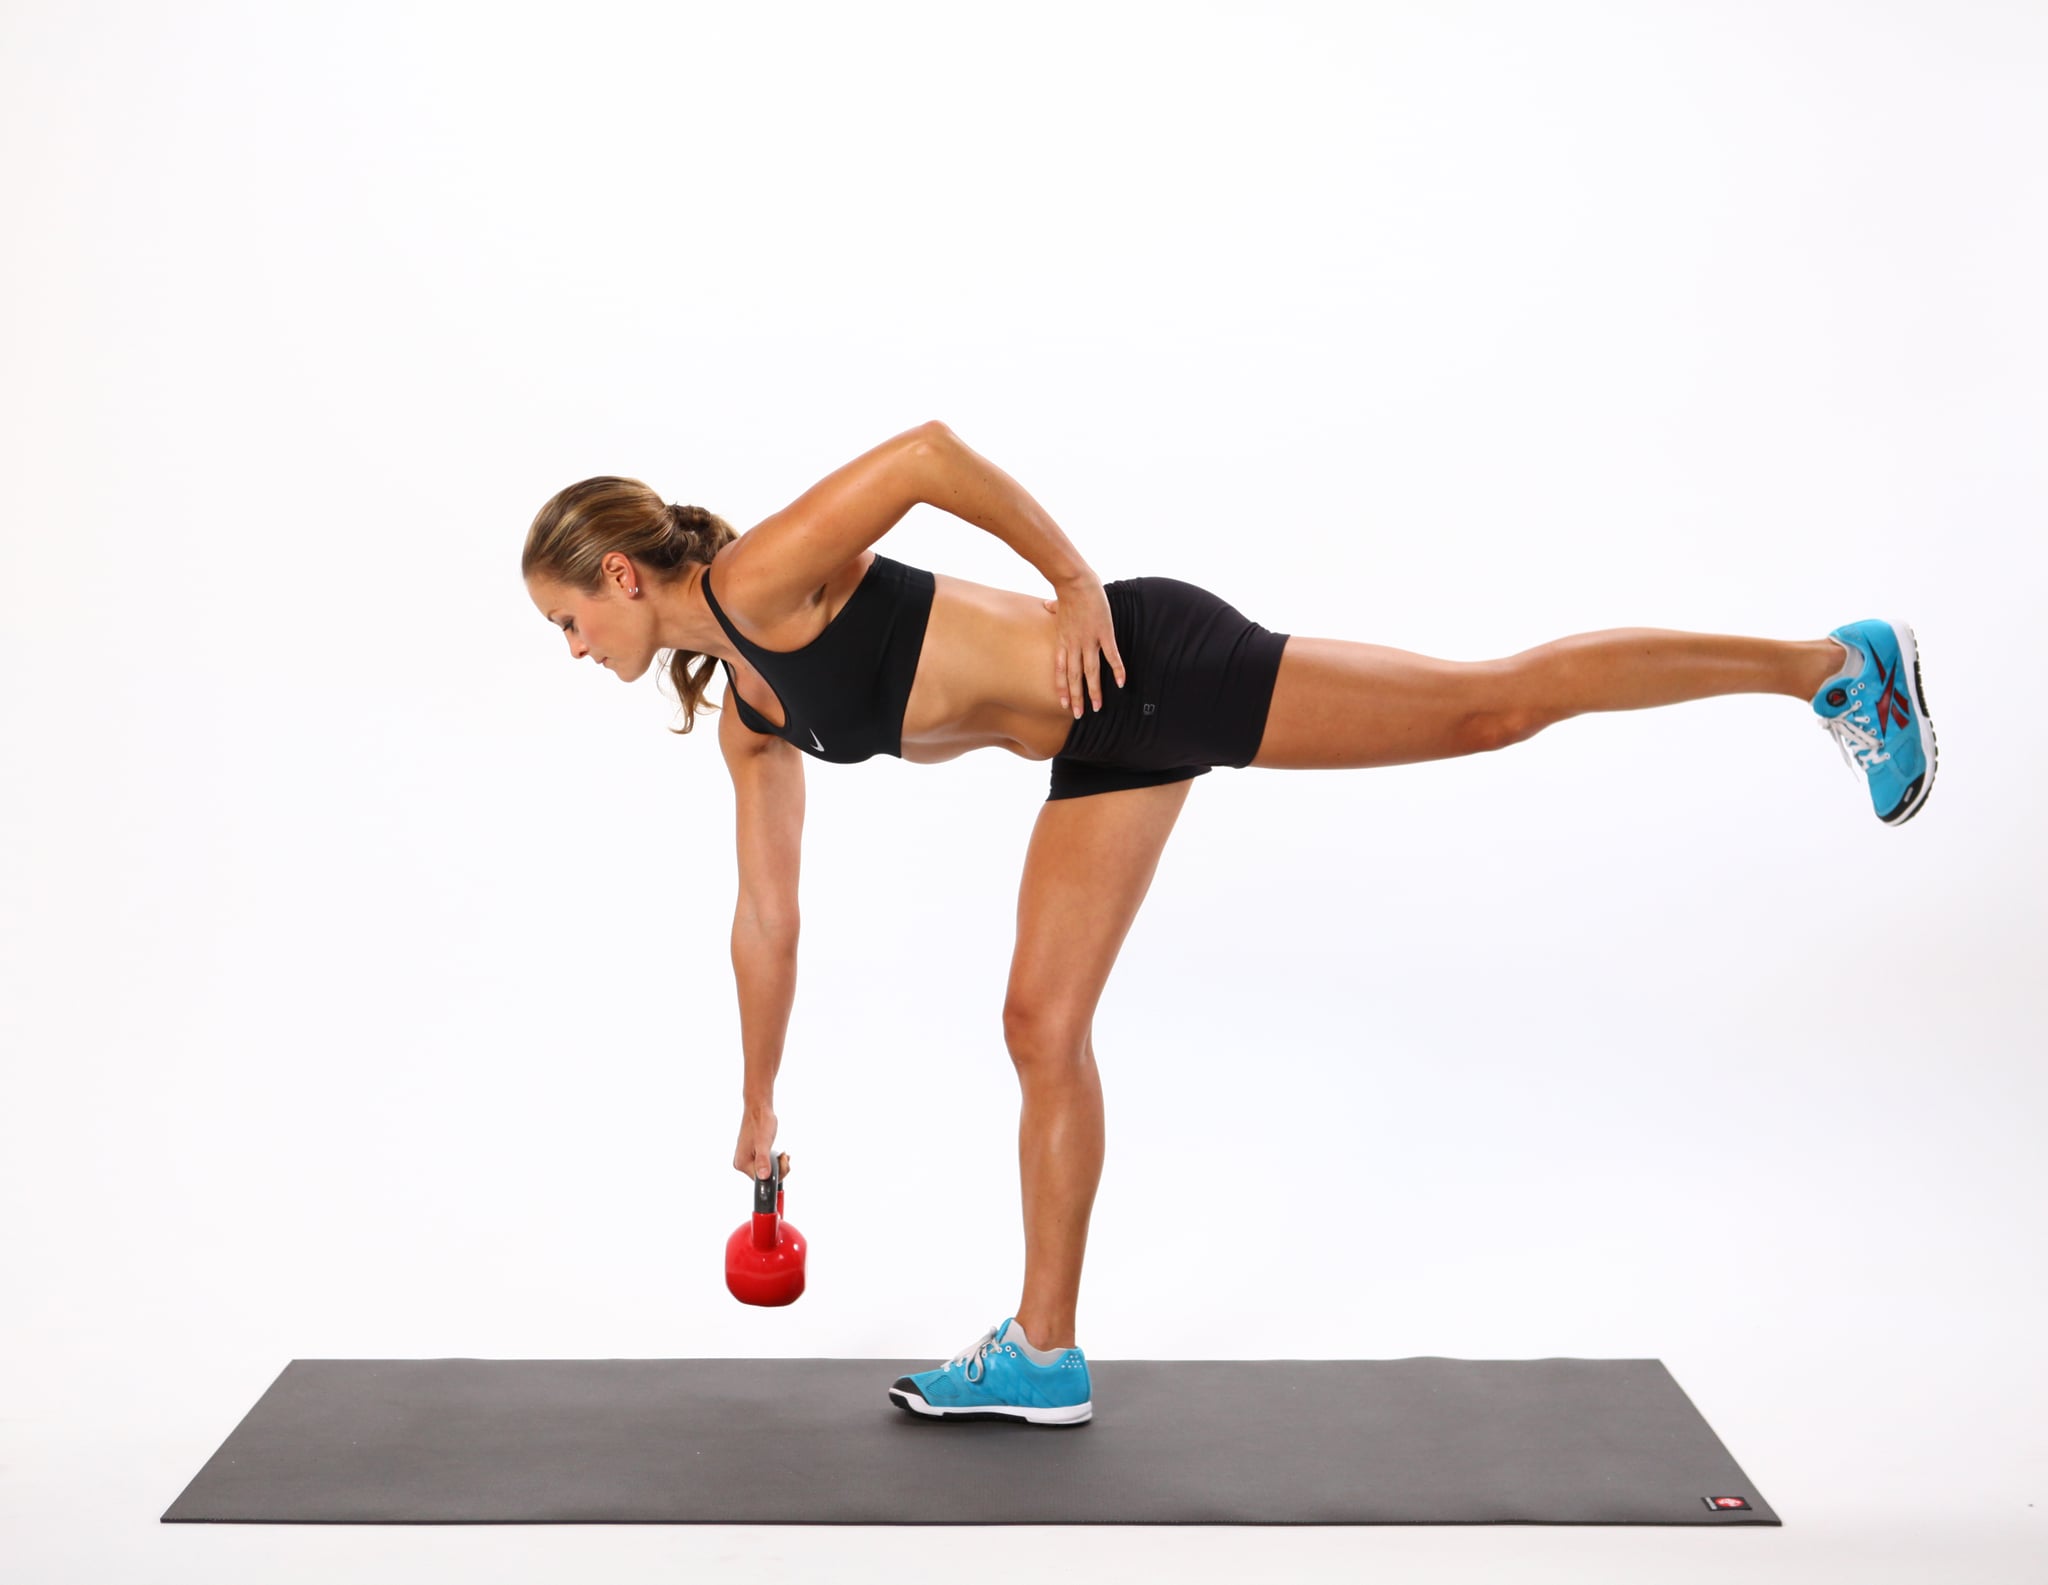
The kettlebell deadlift is one of the most effective exercises you can perform to strengthen your lower body. It targets your glutes, hamstrings, and quads, and can also help improve your core stability and posture. In this article, we'll guide you through the proper technique for performing the kettlebell deadlift, as well as some tips and tricks to help you get the most out of this exercise.
The Basics: How to Perform the Kettlebell Deadlift

To perform the kettlebell deadlift, start by standing with your feet shoulder-width apart and the kettlebell on the ground in front of you. Hinge at the hips and bend your knees, reaching down to grab the kettlebell with both hands. Make sure your back is straight and your chest is lifted throughout the movement.
Next, engage your glutes and hamstrings to lift the kettlebell off the ground, keeping your arms straight and your shoulders pulled back. Drive your hips forward and stand up straight, squeezing your glutes at the top of the movement.
Lower the kettlebell back down to the ground by reversing the movement, hinging at the hips and bending your knees as you lower the weight. Repeat for the desired number of reps.
Tips for Perfecting Your Kettlebell Deadlift

While the kettlebell deadlift is a relatively simple exercise, there are a few tips and tricks that can help you get the most out of the movement:
- Start with a light weight: If you're new to the kettlebell deadlift, start with a lighter weight to perfect your form before increasing the load.
- Engage your core: To maintain proper form throughout the movement, engage your core muscles by pulling your belly button in toward your spine.
- Keep your shoulders back: As you lift the kettlebell, focus on keeping your shoulders pulled back and down to avoid rounding your upper back.
- Drive through your heels: To maximize the activation of your glutes and hamstrings, focus on driving through your heels as you lift the kettlebell.
- Don't lock your knees: While you want to fully extend your hips at the top of the movement, make sure you don't lock your knees as this can put unnecessary stress on your joints.
Variations of the Kettlebell Deadlift
Once you've mastered the basic kettlebell deadlift, there are several variations you can try to add variety and challenge to your workouts:
- Single-leg kettlebell deadlift: Perform the kettlebell deadlift while standing on one leg, alternating legs for each rep.
- Kettlebell sumo deadlift: Take a wider stance with your feet and turn your toes out slightly to perform the sumo deadlift variation.
- Kettlebell Romanian deadlift: This variation emphasizes the hamstrings and glutes. Start with the kettlebell on the ground in front of you and hinge at the hips to reach down and grab the weight with both hands. Keep your back straight as you lift the weight back up, focusing on squeezing your glutes at the top of the movement.
Conclusion
The kettlebell deadlift is a simple but effective exercise that can help you build strength and improve your overall fitness. By focusing on proper form and gradually increasing the weight, you can challenge yourself and achieve your fitness goals. Give the kettlebell deadlift a try in your next workout and see how it can help take your training to the next level!
Related video of Kettle Bell Dead Lift: A Guide to Perfecting the Exercise

Reach, roll, and lift are three movements that are essential for our daily activities. These movements involve the use of our upper body, specifically our shoulders, arms, and hands. When we perform these movements efficiently, we can perform tasks with ease and without straining our muscles.
Reach

Reach involves extending our arms and hands to grab or touch something that is out of our normal reach. This movement is essential when we need to grab something from a high shelf or when we need to reach out to someone for a handshake.
When we reach, we should use our shoulder blades to stabilize our shoulders and prevent them from shrugging up towards our ears. This will help us avoid unnecessary tension in our neck and shoulders.
Roll

Roll involves rotating our shoulders in a circular motion. This movement is essential when we need to loosen up our shoulders after sitting at a desk for an extended period or when we need to prepare for a workout.
When we roll our shoulders, we should focus on moving them in a smooth and controlled motion. Avoid jerky movements that can cause strain and tension in our shoulders and neck.
Lift

Lift involves using our arms and hands to pick up and move objects. This movement is essential when we need to carry groceries, lift weights at the gym, or move furniture.
When we lift, we should use our legs and core muscles to help support the weight. This will take some of the strain off our shoulders and arms and reduce the risk of injury.
Why are these movements important?

These movements are important because they help us maintain our physical abilities and independence. As we age, we may experience a decline in our upper body strength and flexibility, which can make it harder to perform daily tasks.
Regularly performing reach, roll, and lift exercises can help us maintain our upper body strength and flexibility, which can improve our quality of life and reduce the risk of falls and injuries.
How to improve your reach, roll, and lift?

Here are some exercises that can help improve your reach, roll, and lift:
- Shoulder rolls: Sit or stand with your arms at your sides. Slowly roll your shoulders forward and then backward in a circular motion.
- Shoulder blade squeezes: Sit or stand with your arms at your sides. Squeeze your shoulder blades together and hold for a few seconds before releasing.
- Wall push-ups: Stand facing a wall with your hands on the wall at shoulder height. Slowly lower your body towards the wall and then push back up.
- Dumbbell curls: Hold a dumbbell in each hand with your palms facing up. Slowly curl the weights towards your shoulders and then lower them back down.
- Overhead press: Hold a dumbbell in each hand with your palms facing forward. Slowly lift the weights overhead and then lower them back down.
Conclusion
Reach, roll, and lift are three essential movements that are important for our daily activities. By incorporating exercises that focus on these movements, we can improve our upper body strength and flexibility, which can improve our overall quality of life.
Related video of What is Reach, Roll, and Lift?
Lateral raises, also known as lateral deltoid raises or side raises, are a popular exercise among fitness enthusiasts. This exercise primarily targets the lateral deltoids, which are located on the side of the shoulders. However, lateral raises also engage several other muscles in the upper body. In this article, we will discuss the muscles used in lateral raises and how to perform this exercise correctly.
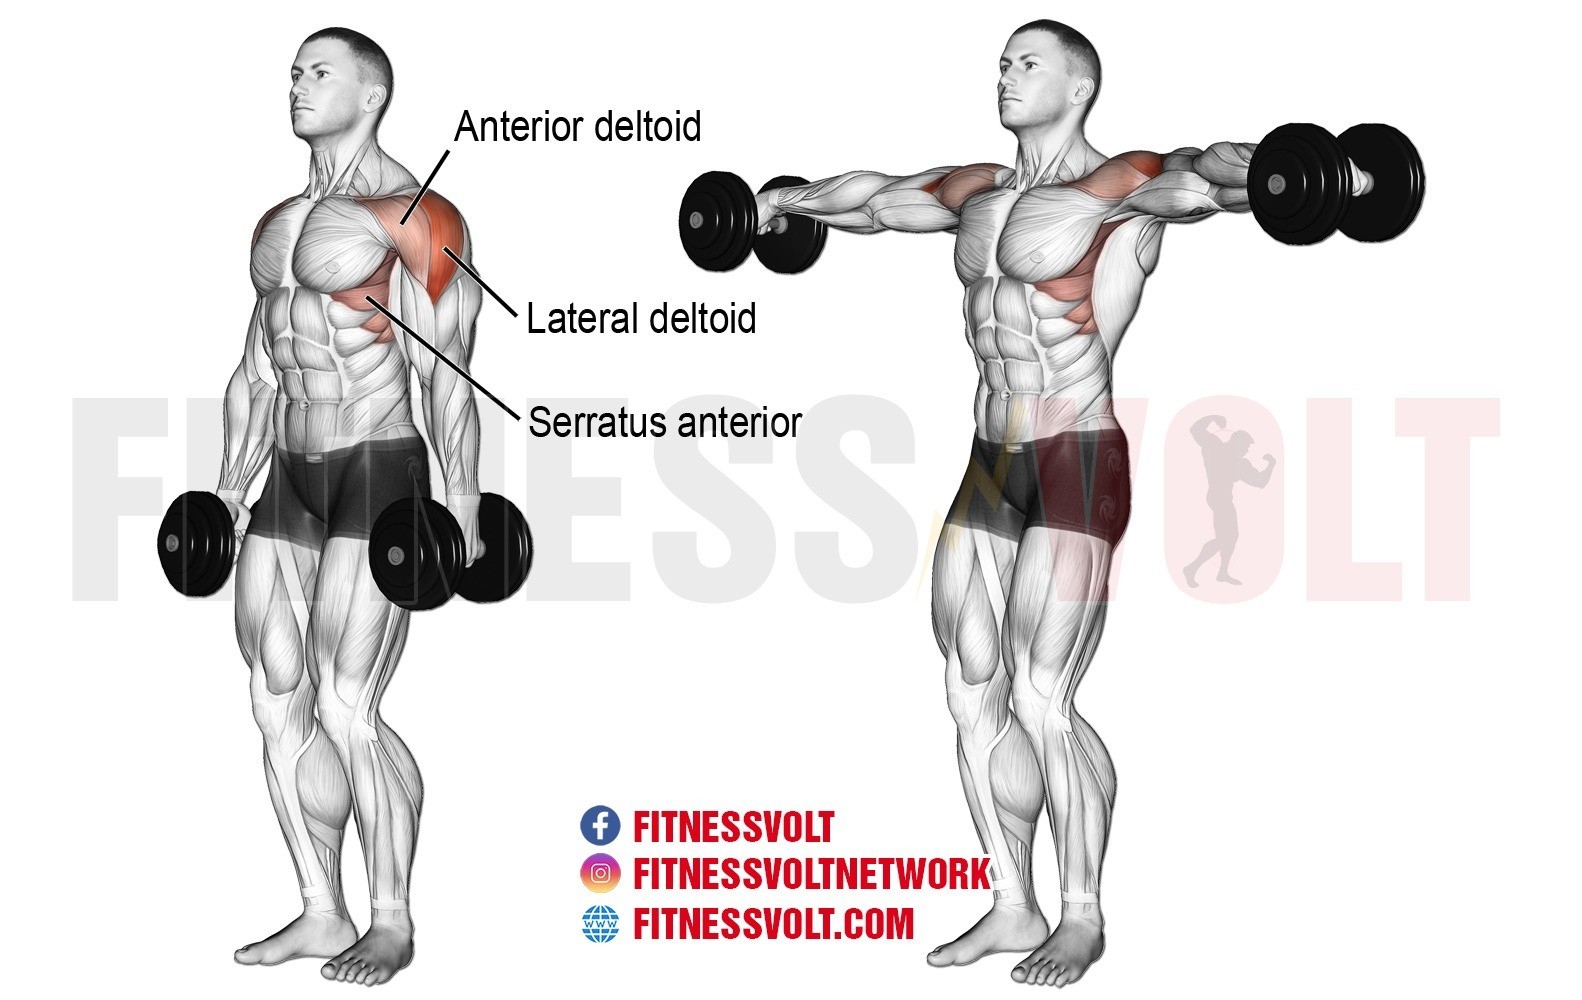
Muscles Engaged During Lateral Raises
As mentioned earlier, the primary muscle worked during lateral raises is the lateral deltoid. This muscle is responsible for lifting the arms out to the side and away from the body. However, lateral raises also involve the following muscles:
- Anterior deltoid: located in the front of the shoulders
- Posterior deltoid: located in the back of the shoulders
- Rotator cuff muscles: located in the shoulder joint and responsible for stabilizing the shoulder
- Trapezius: located in the upper back and neck area
- Supraspinatus: a small muscle located on the top of the shoulder blade
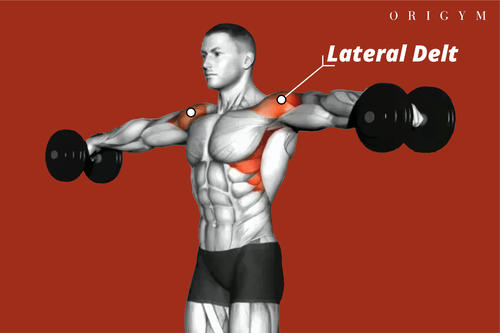
How To Do Lateral Raises
To perform lateral raises, follow these steps:
- Stand with your feet shoulder-width apart and hold a dumbbell in each hand
- Keep your arms straight and lift them out to the sides until they are parallel to the floor
- Pause for a moment and then slowly lower your arms back to your sides
- Repeat for the desired number of repetitions

Tips For Doing Lateral Raises Correctly
Here are some tips to ensure you perform lateral raises correctly:
- Keep your arms straight throughout the exercise
- Avoid swinging your arms or using momentum to lift the weights
- Keep your shoulders relaxed and down throughout the exercise
- Use light to moderate weights to avoid injury
- Breathe out as you lift the weights and breathe in as you lower them
Variations Of Lateral Raises
There are several variations of lateral raises that you can try to target different muscles in the shoulders:
- Front raises: lift the weights straight out in front of you instead of to the sides
- Bent-over raises: lean forward and lift the weights out to the sides with your palms facing down
- Seated raises: sit down and lift the weights out to the sides while keeping your back straight

Conclusion
Lateral raises are an excellent exercise for targeting the lateral deltoids and other muscles in the upper body. By following the correct form and technique, you can avoid injury and maximize the benefits of this exercise. Try incorporating lateral raises into your workout routine and feel the burn in your shoulders!
Related video of Muscles Used In Lateral Raises

Push ups are one of the most popular bodyweight exercises, and they are often used to build upper body strength. While push ups are primarily known for working the chest, triceps, and core muscles, many people wonder if they also work the shoulders. In this article, we will explore whether push ups work shoulders or not.
How Push Ups Work
Before we delve into whether push ups work shoulders, it is important to understand how push ups work. Push ups are a compound exercise that involve multiple muscle groups working together. The primary muscles used during push ups are the chest, triceps, and core muscles.
When you perform a push up, you lower your body towards the ground by bending your elbows. This movement works the chest and triceps muscles. As you push your body back up, you engage your core muscles to stabilize your body. This movement also works the chest and triceps muscles.
Do Push Ups Work Shoulders?
The short answer is yes, push ups do work shoulders. While the primary muscles worked during push ups are the chest, triceps, and core muscles, the shoulders also play a role in the exercise.
During a push up, the shoulders are used to stabilize the upper body and keep it in the proper position. This means that the shoulders are engaged throughout the exercise to some degree. While push ups may not be the most effective exercise for specifically targeting the shoulders, they can help to tone and strengthen the muscles in this area.
Variations of Push Ups to Target Shoulders
If you want to target your shoulders more during push ups, there are several variations that you can try. These variations involve modifying the placement of your hands and feet to shift more of the workload onto the shoulders.
One variation is the pike push up, which involves starting in a downward dog yoga pose and lowering your head towards the ground while keeping your legs straight. This variation puts more emphasis on the shoulders and can be an effective way to build shoulder strength.
Another variation is the wide push up, which involves placing your hands wider than shoulder-width apart. This variation targets the chest and shoulders more than a traditional push up.
Benefits of Push Ups for Shoulders

In addition to toning and strengthening the shoulders, push ups offer a range of other benefits for overall health and fitness. Some of the benefits of push ups include:
- Improved upper body strength
- Improved core strength
- Improved cardiovascular health
- Increased muscle endurance
- Improved posture
Conclusion
Push ups are a versatile exercise that can help to tone and strengthen multiple muscle groups, including the shoulders. While they may not be the most effective exercise for specifically targeting the shoulders, push ups can be a valuable addition to any workout routine. By incorporating variations of push ups that target the shoulders, you can further enhance the benefits of this exercise for overall upper body strength and fitness.
