Deadlifts are a popular exercise that work a variety of muscles in the body. However, there are different variations of deadlifts that target specific muscle groups. One of these variations is the straight leg deadlift, also known as the Romanian deadlift. In this article, we’ll discuss what straight leg deadlifts work and how to properly perform them.
What muscles do straight leg deadlifts work?
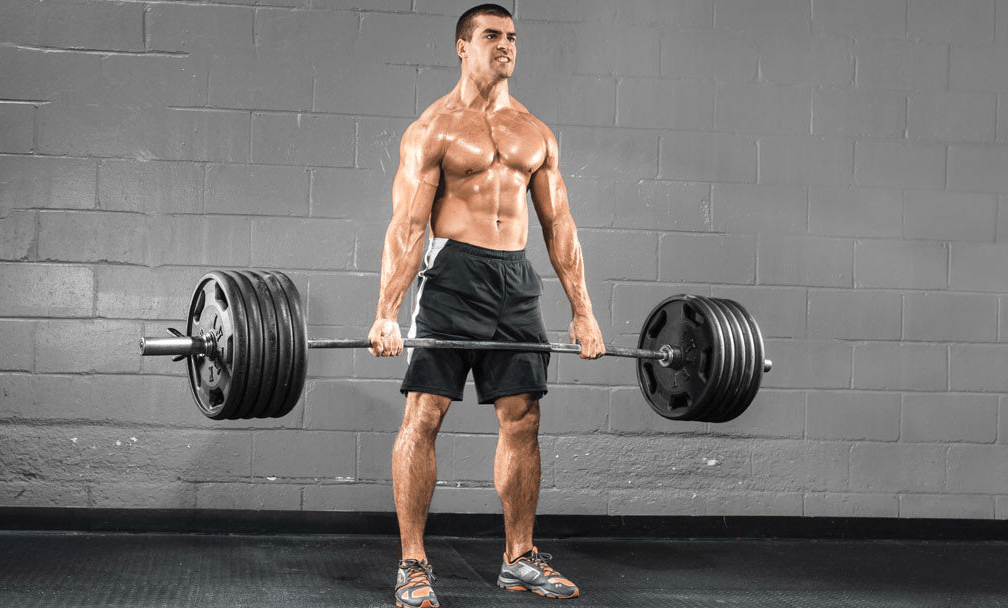
Before we dive into the specific muscles worked by straight leg deadlifts, it’s important to understand the basic movement of the exercise. Straight leg deadlifts involve hinging at the hips to lower a weight down towards the ground, then using the hamstrings and glutes to lift the weight back up to standing position. With this in mind, here are the primary muscles worked by straight leg deadlifts:

Hamstrings
The hamstrings are a group of three muscles that run down the back of the thigh. They are responsible for bending the knee and extending the hip, which makes them a key muscle group for movements like running, jumping, and squatting. Straight leg deadlifts are an effective way to strengthen the hamstrings, as they require a significant amount of hip extension.

Glutes
The glutes, or the muscles in the buttocks, are also heavily involved in the movement of straight leg deadlifts. Specifically, the gluteus maximus muscle is responsible for hip extension, which is a key part of the exercise. Strengthening the glutes can improve overall hip and lower back stability, as well as enhance athletic performance.
Lower back
The lower back muscles, including the erector spinae, are also worked during straight leg deadlifts. This is because the movement requires keeping the back straight and engaged throughout the exercise. Strengthening the lower back can improve posture, reduce the risk of injury, and improve overall core stability.
How to perform straight leg deadlifts
Now that we know what straight leg deadlifts work, let’s go over the proper form for performing the exercise:
- Begin by standing with your feet hip-width apart and a slight bend in your knees.
- Hold a weight in front of your body with an overhand grip.
- Engage your core and hinge at the hips, lowering the weight down towards the ground while keeping your back straight.
- Once you feel a stretch in your hamstrings, use your glutes and hamstrings to lift the weight back up to standing position.
- Repeat for your desired number of reps.
It’s important to note that straight leg deadlifts should be performed with proper form to avoid injury. Keep your back straight throughout the exercise, and avoid rounding your spine or jerking the weight up. Additionally, start with a lighter weight until you feel comfortable with the movement.
Conclusion
Straight leg deadlifts are an effective exercise for strengthening the hamstrings, glutes, and lower back. By performing this exercise with proper form, you can improve overall athletic performance and reduce the risk of injury. Incorporate straight leg deadlifts into your workout routine to target these key muscle groups.
Related video of What Do Straight Leg Deadlifts Work

Shoulder pain and injuries are quite common, especially among athletes and active individuals. One exercise that can help strengthen the shoulder muscles and prevent injuries is the L Raise + External Rotation. In this article, we will discuss everything you need to know about this exercise, including its benefits, proper form, and variations.
What is the L Raise + External Rotation?
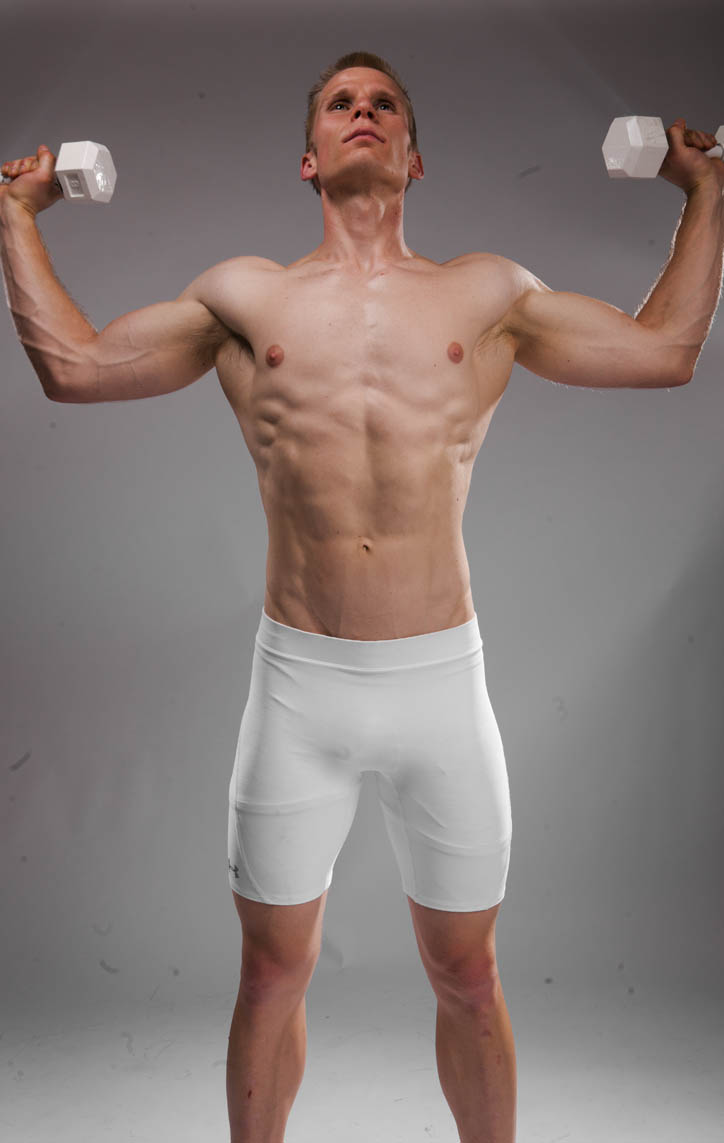
The L Raise + External Rotation is a combination exercise that targets the rotator cuff muscles and the deltoids. It involves raising the arms to form an L shape, then externally rotating the shoulders to bring the hands up to ear level. This exercise can be done with dumbbells or resistance bands.
Benefits of the L Raise + External Rotation

The L Raise + External Rotation offers several benefits, including:
- Strengthening the rotator cuff muscles, which can help prevent shoulder injuries
- Improving shoulder mobility and flexibility
- Targeting the deltoids, which can help improve shoulder aesthetics
- Engaging the core muscles, which can improve overall stability
How to do the L Raise + External Rotation

Here are the steps to perform the L Raise + External Rotation with dumbbells:
- Stand with your feet shoulder-width apart and hold a dumbbell in each hand
- Bring the dumbbells up to shoulder height, with your palms facing each other
- Raise your arms up to form an L shape, with your elbows at a 90-degree angle
- Externally rotate your shoulders to bring the dumbbells up to ear level
- Slowly lower the dumbbells back down to the starting position
- Repeat for the desired number of repetitions
Here are the steps to perform the L Raise + External Rotation with resistance bands:
- Attach a resistance band to a stable object at waist height
- Hold the other end of the band in your right hand and step back to create tension
- Bring your right arm up to shoulder height, with your palm facing down
- Raise your arm up to form an L shape, with your elbow at a 90-degree angle
- Externally rotate your shoulder to bring your hand up to ear level
- Slowly lower your arm back down to the starting position
- Repeat on the other side for the desired number of repetitions
Common Mistakes to Avoid

Here are some common mistakes to avoid when performing the L Raise + External Rotation:
- Using too much weight, which can lead to poor form and shoulder injuries
- Letting your elbows drop during the external rotation, which can put stress on the rotator cuff muscles
- Not engaging your core muscles, which can lead to poor stability and balance
- Speeding through the exercise, which can reduce its effectiveness
Variations of the L Raise + External Rotation

Here are some variations of the L Raise + External Rotation:
- Performing the exercise on an unstable surface, such as a balance ball or Bosu ball
- Using a cable machine or resistance band instead of dumbbells
- Adding a shoulder press at the end of the external rotation
- Doing the exercise in a standing or seated position
Conclusion
The L Raise + External Rotation is a simple yet effective exercise that can help strengthen the shoulder muscles and prevent injuries. By following the proper form and avoiding common mistakes, you can reap the benefits of this exercise and improve your shoulder health and aesthetics. Try incorporating the L Raise + External Rotation into your workout routine today!
Related video of L Raise + External Rotation: A Comprehensive Guide
Are you looking to strengthen your chest muscles and improve your upper body strength? If so, then the chest flyes cable machine is an excellent choice. This versatile piece of gym equipment can help you build your chest muscles and improve your overall fitness levels. In this article, we'll take a closer look at the chest flyes cable machine and how it can benefit your workout routine.
What is a Chest Flyes Cable Machine?

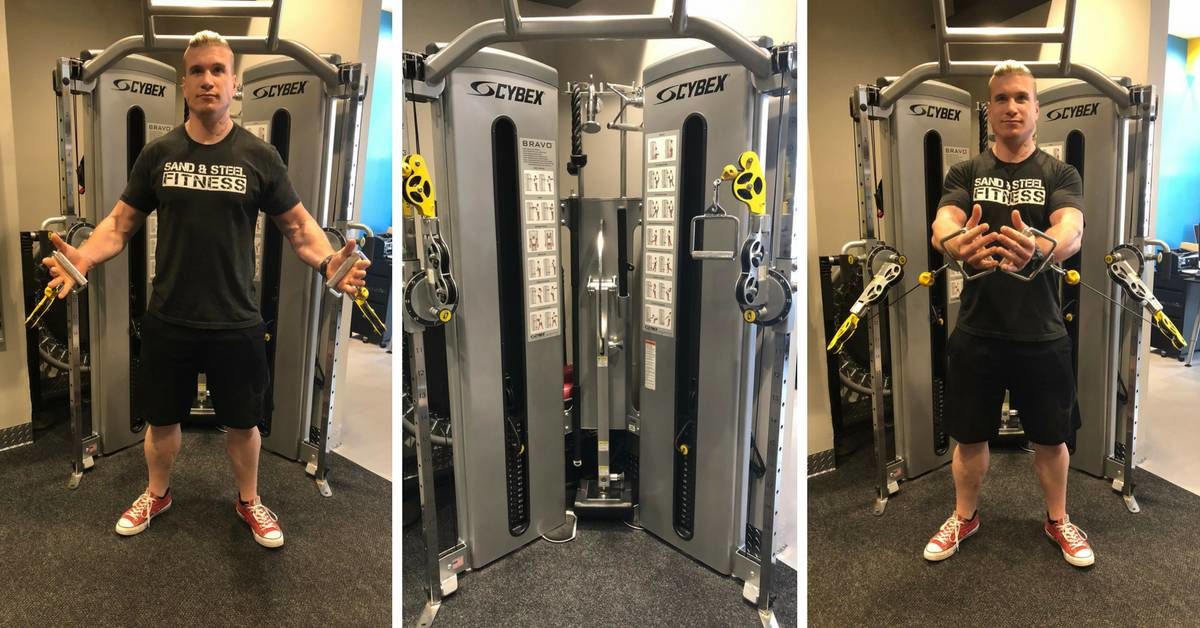
A chest flyes cable machine is a piece of gym equipment that is designed to work your chest muscles. The machine consists of two handles that are attached to cables, which are in turn attached to a weight stack. To use the machine, you'll need to sit on the bench and grab the handles. From there, you'll pull the handles together in front of your body, contracting your chest muscles in the process. The machine allows you to adjust the weight and resistance, making it suitable for beginners and advanced lifters alike.
Benefits of Using a Chest Flyes Cable Machine
There are many benefits to using a chest flyes cable machine in your workout routine. Here are just a few:
- Targeted Muscle Activation: The chest flyes cable machine is one of the best ways to isolate and activate your chest muscles, helping you to build strength and size.
- Versatility: The machine can be used to work a variety of different chest muscles, including the upper, middle, and lower chest.
- Adjustable Resistance: The weight stack on the machine can be adjusted, allowing you to increase the resistance as you get stronger.
- Reduced Risk of Injury: The chest flyes cable machine is a safer alternative to using free weights as it eliminates the risk of dropping the weights on yourself.
How to Perform Chest Flyes on a Cable Machine
Before you start using the chest flyes cable machine, it's important to learn the proper form. Here's how to perform chest flyes on a cable machine:
- Adjust the weight stack to your desired resistance level.
- Sit on the bench and grab the handles, palms facing each other.
- Extend your arms out to the side, keeping a slight bend in your elbows.
- Slowly bring the handles together in front of your body, contracting your chest muscles as you do so.
- Pause for a moment at the top of the movement, then slowly return to the starting position.
- Repeat for your desired number of repetitions.
Tips for Getting the Most Out of Your Chest Flyes Cable Machine Workout
If you want to get the most out of your chest flyes cable machine workout, here are some tips to keep in mind:
- Focus on Form: Proper form is essential when using the chest flyes cable machine. Make sure you're keeping your elbows slightly bent and your chest muscles contracted throughout the movement.
- Use a Full Range of Motion: To get the most out of the exercise, make sure you're using a full range of motion. This means bringing the handles all the way together in front of your body and extending your arms out to the side as far as possible.
- Gradually Increase the Resistance: As you get stronger, gradually increase the weight on the machine to continue challenging your muscles.
Chest Flyes Cable Machine Variations
If you're looking to mix up your chest flyes cable machine workout, here are some variations to try:
- Single-Arm Chest Flyes: Instead of using both handles at once, try doing single-arm chest flyes to work each side of your chest independently.
- Incline Chest Flyes: Adjust the bench on the machine to an incline position to target your upper chest muscles.
- Decline Chest Flyes: Adjust the bench on the machine to a decline position to target your lower chest muscles.
Conclusion
The chest flyes cable machine is an excellent piece of gym equipment that can help you build your chest muscles and improve your overall fitness levels. By using proper form and gradually increasing the resistance, you can see significant improvements in your chest strength and size. So why not give it a try and see the benefits for yourself?
Related video of Chest Flyes Cable Machine: The Ultimate Guide

For anyone looking to build a strong and defined back, incorporating the wide grip lat pulldown into your workout routine can be a gamechanger. This exercise targets the latissimus dorsi muscles, also known as the "lats." The lats are the large muscles that run down the sides of your back and are responsible for pulling your arms down and in towards your body.
But the benefits of the wide grip lat pulldown don't end there. Here's a closer look at what this exercise can do for your body:
Target Muscles

As mentioned, the primary muscle group targeted by the wide grip lat pulldown is the lats. However, this exercise also works the biceps, rear deltoids, and upper back muscles. By targeting these muscles, you can achieve a more defined and toned back, as well as improved posture and upper body strength.
Assist Other Exercises

The wide grip lat pulldown can also assist with other exercises that target the back muscles. For example, by strengthening your lats, you'll be able to perform pull-ups and chin-ups with greater ease. Additionally, a stronger upper back can help with bench pressing and other chest exercises.
Variations

One of the great things about the wide grip lat pulldown is that there are several variations that you can incorporate into your workout. For example, you can vary the grip width to target different muscles. A wider grip will target the lats more, while a narrower grip will put more emphasis on the biceps.
You can also vary the attachment you use for the exercise. A straight bar will work the muscles differently than a rope attachment, for example. Experimenting with different variations can help prevent boredom and keep your workouts fresh.
Form Tips

As with any exercise, proper form is key to getting the most out of the wide grip lat pulldown. Here are some tips to keep in mind:
- Start with a weight that you can comfortably lift for 10-12 reps.
- Grab the bar with a wide grip, hands slightly wider than shoulder-width apart.
- Lean back slightly, keeping your chest up and shoulders back.
- Pull the bar down towards your chest, keeping your elbows close to your sides.
- Squeeze your back muscles at the bottom of the movement.
- Slowly release the bar back up to the starting position.
- Repeat for your desired number of reps.
Conclusion
If you're looking to build a strong and defined back, incorporating the wide grip lat pulldown into your workout routine is a must. Not only does this exercise work the lats and other back muscles, but it can also assist with other exercises and be varied to prevent boredom. Just be sure to maintain proper form to get the most out of this exercise.
Related video of What Does Wide Grip Lat Pulldown Work

If you're looking for an exercise that targets your shoulders, cable shoulder external rotation is a great option. This exercise is easy to do and offers a range of benefits. In this article, we'll discuss the key benefits of cable shoulder external rotation and how to do it correctly.
What is Cable Shoulder External Rotation?
Cable shoulder external rotation is an exercise that strengthens the external rotators of the shoulder. These muscles are located at the back of the shoulder and play a crucial role in maintaining shoulder stability. By strengthening these muscles, you can improve your shoulder health and reduce the risk of injuries.
Key Benefits of Cable Shoulder External Rotation

Here are some of the key benefits of cable shoulder external rotation:
- Improves Shoulder Stability: As mentioned earlier, cable shoulder external rotation targets the external rotators of the shoulder. By strengthening these muscles, you can improve your shoulder stability and prevent injuries.
- Reduces the Risk of Shoulder Injuries: Shoulder injuries are common among athletes and people who engage in repetitive overhead activities. By strengthening the external rotators of the shoulder, you can reduce the risk of shoulder injuries.
- Improves Posture: Cable shoulder external rotation can also improve your posture. Strong external rotators help to pull your shoulders back, which can improve your overall posture.
- Enhances Upper Body Strength: Cable shoulder external rotation is an effective exercise that targets the shoulders. By doing this exercise regularly, you can enhance your upper body strength and improve your overall fitness.
How to Do Cable Shoulder External Rotation Correctly

Here are the steps to do cable shoulder external rotation correctly:
- Attach a handle to a low pulley cable machine.
- Stand with your side facing the cable machine and your feet shoulder-width apart.
- Grasp the handle with your hand closest to the machine.
- Tuck your elbow into your side and keep your forearm parallel to the ground.
- Keep your other hand on your hip or hold onto something for support.
- Rotate your arm away from your body, keeping your elbow tucked in and your forearm parallel to the ground.
- Slowly return to the starting position.
- Complete the desired number of reps and switch sides.
When doing cable shoulder external rotation, it's important to maintain proper form. Keep your elbow tucked in and your forearm parallel to the ground throughout the movement. Don't use momentum to swing the weight, as this can increase your risk of injury.
Conclusion
Cable shoulder external rotation is an effective exercise that targets the external rotators of the shoulder. By doing this exercise regularly, you can improve your shoulder stability, reduce the risk of injuries, and enhance your upper body strength. Follow the steps outlined above to do cable shoulder external rotation correctly and safely.
Related video of Cable Shoulder External Rotation: Key Benefits and How to Do It Correctly
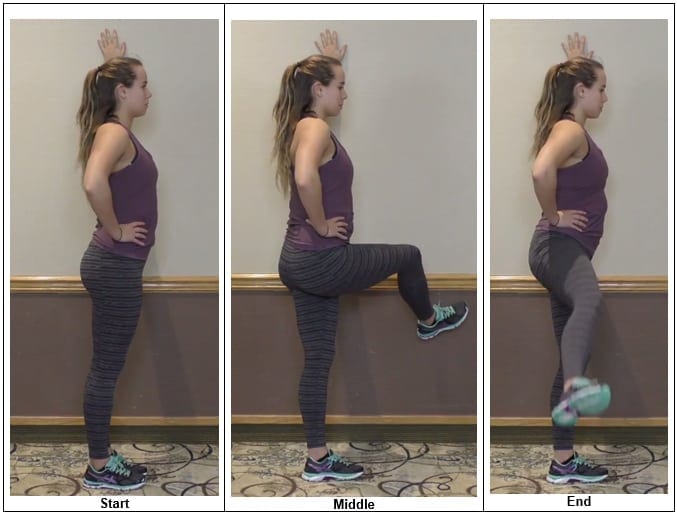
Side to side leg swings is a simple exercise that involves swinging your legs from side to side. This exercise is great for warming up your hips, improving your balance, and increasing your range of motion. In this article, we'll take a closer look at how to do side to side leg swings correctly and the benefits of doing this exercise.
How to do side to side leg swings

Side to side leg swings can be done anywhere and anytime, as long as you have enough space to swing your legs. Here's how to do it:
- Stand straight with your feet shoulder-width apart.
- Place your hands on your hips or hold onto a wall or chair for support.
- Swing your right leg to the side as far as you can, keeping your left leg straight.
- Swing your right leg back to the center, then swing it to the left side as far as you can.
- Repeat the movement for 10-20 swings on each side.
Benefits of side to side leg swings

Side to side leg swings offers several benefits for your body. Here are some of them:
Improved hip mobility

Side to side leg swings help to loosen up your hip joints and increase your range of motion. This exercise is particularly beneficial for people who sit for long periods or have tight hips.
Better balance

Side to side leg swings is a great exercise for improving your balance. By swinging your legs from side to side, you challenge your body's stability and coordination, which can help to enhance your balance and prevent falls.
Reduced risk of injury

Side to side leg swings can help to reduce your risk of injury, especially if you're an athlete or someone who engages in physical activities. This exercise helps to warm up your muscles and joints, which can prevent injuries such as sprains, strains, or tears.
Improved athletic performance

Side to side leg swings can also improve your athletic performance. By increasing your range of motion, hip mobility, and balance, you can perform better in sports or other physical activities that require agility, speed, and coordination.
Tips for doing side to side leg swings safely
While side to side leg swings are generally safe for most people, there are some tips you should keep in mind to avoid injury:
- Start with a small range of motion and gradually increase it over time.
- Don't swing your legs too hard or too fast, as this can strain your muscles and joints.
- Keep your supporting leg straight and your upper body stable throughout the exercise.
- If you have any existing injuries or medical conditions, consult your doctor before doing side to side leg swings.
Conclusion
Side to side leg swings is a simple yet effective exercise that can benefit your body in many ways. By doing this exercise regularly, you can improve your hip mobility, balance, and athletic performance, while reducing your risk of injury. Remember to start slowly, follow the proper technique, and listen to your body's signals to avoid any discomfort or pain.
Related video of Side To Side Leg Swings: How To Do It Correctly And Its Benefits

Climbing is a challenging and physically demanding sport that requires a great deal of strength and endurance. One of the most important areas of the body for climbers to focus on is the core. A strong core is essential for maintaining stability, balance, and control while climbing. In this article, we will discuss some of the best core workouts for climbers.
The Importance of Core Strength for Climbers

The core muscles are the group of muscles that make up the midsection of the body, including the abdominals, obliques, and lower back. These muscles are responsible for maintaining stability and balance while climbing. A strong core can help climbers maintain their balance on uneven terrain, prevent injuries, and improve their overall performance.
Best Core Workouts for Climbers

1. Plank: The plank is a great exercise for building core strength. Start by getting into a push-up position, then lower your forearms to the ground. Keep your body in a straight line from head to toe and hold the position for as long as you can.

2. Leg Raises: Lie on your back with your arms at your sides and your legs straight. Raise your legs straight up towards the ceiling, then slowly lower them back down. Repeat for several repetitions.

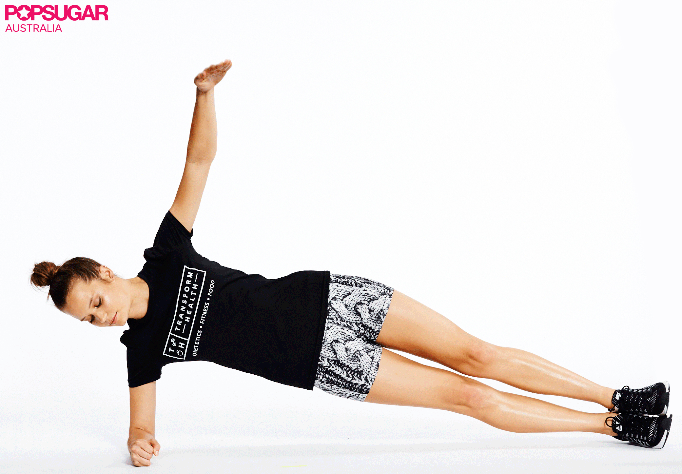
3. Side Plank: Lie on your side with your elbow directly under your shoulder and your legs straight. Lift your hips off the ground, keeping your body in a straight line from head to toe. Hold the position for as long as you can, then switch sides and repeat.

4. Crunches: Lie on your back with your knees bent and your hands behind your head. Lift your head and shoulders off the ground, then lower them back down. Repeat for several repetitions.
Conclusion
By incorporating these core workouts into your training routine, you can improve your climbing performance and reduce your risk of injury. Remember to always warm up properly before exercising and to consult with a professional trainer if you are new to climbing or have any underlying medical conditions.
Related video of Core Workout For Climbers

Yoga is a great way to improve your physical and mental well-being. It's a form of exercise that combines stretching, breathing, and meditation. One of the challenging yoga poses that can help you build core strength is the Thread The Needle Plank.
What is Thread The Needle Plank?

The Thread The Needle Plank is a variation of the traditional plank pose that targets the obliques, shoulders, and hips. To perform this pose, you need to start in a plank position with your arms straight and your feet hip-width apart. Then, lift your right arm and thread it under your left arm, reaching towards the left side of your mat. Hold this position for a few breaths, then repeat on the other side.
Benefits of Thread The Needle Plank

The Thread The Needle Plank is a challenging pose that can help you develop core strength, improve your balance and stability, and increase your flexibility. It also engages your shoulders and hips, which can help you improve your posture and relieve tension in these areas.
Tips for Performing Thread The Needle Plank

Performing Thread The Needle Plank can be challenging, especially if you're new to yoga. Here are some tips to help you perform this pose correctly:
- Start in a traditional plank position with your arms straight and your feet hip-width apart.
- Engage your core muscles and keep your hips level throughout the pose.
- As you thread your arm under your body, keep your elbow close to your ribcage.
- Twist your torso to the side as you reach your arm towards the opposite side of your mat.
- Keep your gaze down towards your mat to avoid straining your neck.
- Breathe deeply and hold the pose for a few breaths before releasing.
Precautions
While the Thread The Needle Plank is a great pose for building core strength, it's important to practice it safely. Here are some precautions to keep in mind:
- Avoid this pose if you have any shoulder or wrist injuries.
- Start slowly and gradually increase the intensity of the pose over time.
- Listen to your body and stop if you feel any pain or discomfort.
- If you're new to yoga, consider taking a class or working with a qualified instructor to learn the proper form.
Variations of Thread The Needle Plank

If you're looking to challenge yourself even further, there are several variations of the Thread The Needle Plank that you can try:
- Thread The Needle Plank with leg lift: Lift your top leg as you thread your arm under your body.
- Thread The Needle Plank with knee tap: Tap your top knee to your elbow as you thread your arm under your body.
- Thread The Needle Plank with side plank: From the Thread The Needle Plank position, lift your top arm towards the ceiling and open your chest into a side plank.
Conclusion
The Thread The Needle Plank is a challenging yoga pose that can help you build core strength, increase your flexibility, and improve your balance and stability. However, it's important to practice this pose safely and listen to your body. With practice, you can master this pose and enjoy its many benefits.
Related video of Thread The Needle Plank: A Challenging Yoga Pose for Core Strength

Performing chest warm up stretches before a workout is essential for preventing injuries and improving your range of motion. The chest muscles are responsible for a variety of movements, including pushing and pulling, and are used in many upper body exercises. In this article, we will discuss some effective chest warm up stretches that you can include in your routine.
Why Warm Up?
Warm up exercises are essential for preparing the body for physical activity. They help to increase blood flow, raise the body's temperature, and improve joint mobility. Warming up also helps to reduce the risk of injury by preparing the muscles and joints for the workout ahead.

Chest Warm Up Stretches
1. Arm Swings: Stand with your feet shoulder-width apart and swing your arms back and forth, gradually increasing the range of motion. This exercise helps to warm up the shoulders and chest muscles.
2. Wall Push-Ups: Stand facing a wall with your arms outstretched and your palms flat against the wall. Slowly lower your body towards the wall, then push back up. This exercise helps to warm up the chest and triceps muscles.

3. Chest Opener: Stand with your arms behind your back and your hands clasped together. Slowly raise your arms until you feel a stretch in your chest muscles. Hold the stretch for 15-20 seconds, then release. This exercise helps to loosen up tight chest muscles.
4. Shoulder Rolls: Stand with your arms at your sides and roll your shoulders forward and backward in a circular motion. This exercise helps to warm up the shoulder and chest muscles.

5. Cat-Cow Stretch: Begin on your hands and knees, with your hands directly under your shoulders and your knees under your hips. Inhale and arch your back, then exhale and round your spine. This exercise helps to warm up the entire spine and chest muscles.
Conclusion
Performing chest warm up stretches is an essential part of any workout routine. These exercises help to increase blood flow, raise the body's temperature, and improve joint mobility. By including these stretches in your pre-workout routine, you can prevent injuries and improve your overall performance.
Related video of Chest Warm Up Stretches

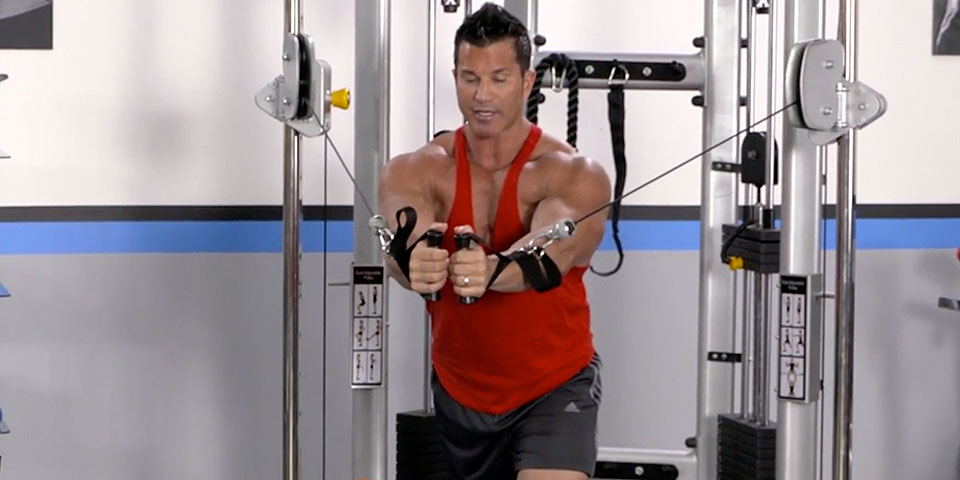
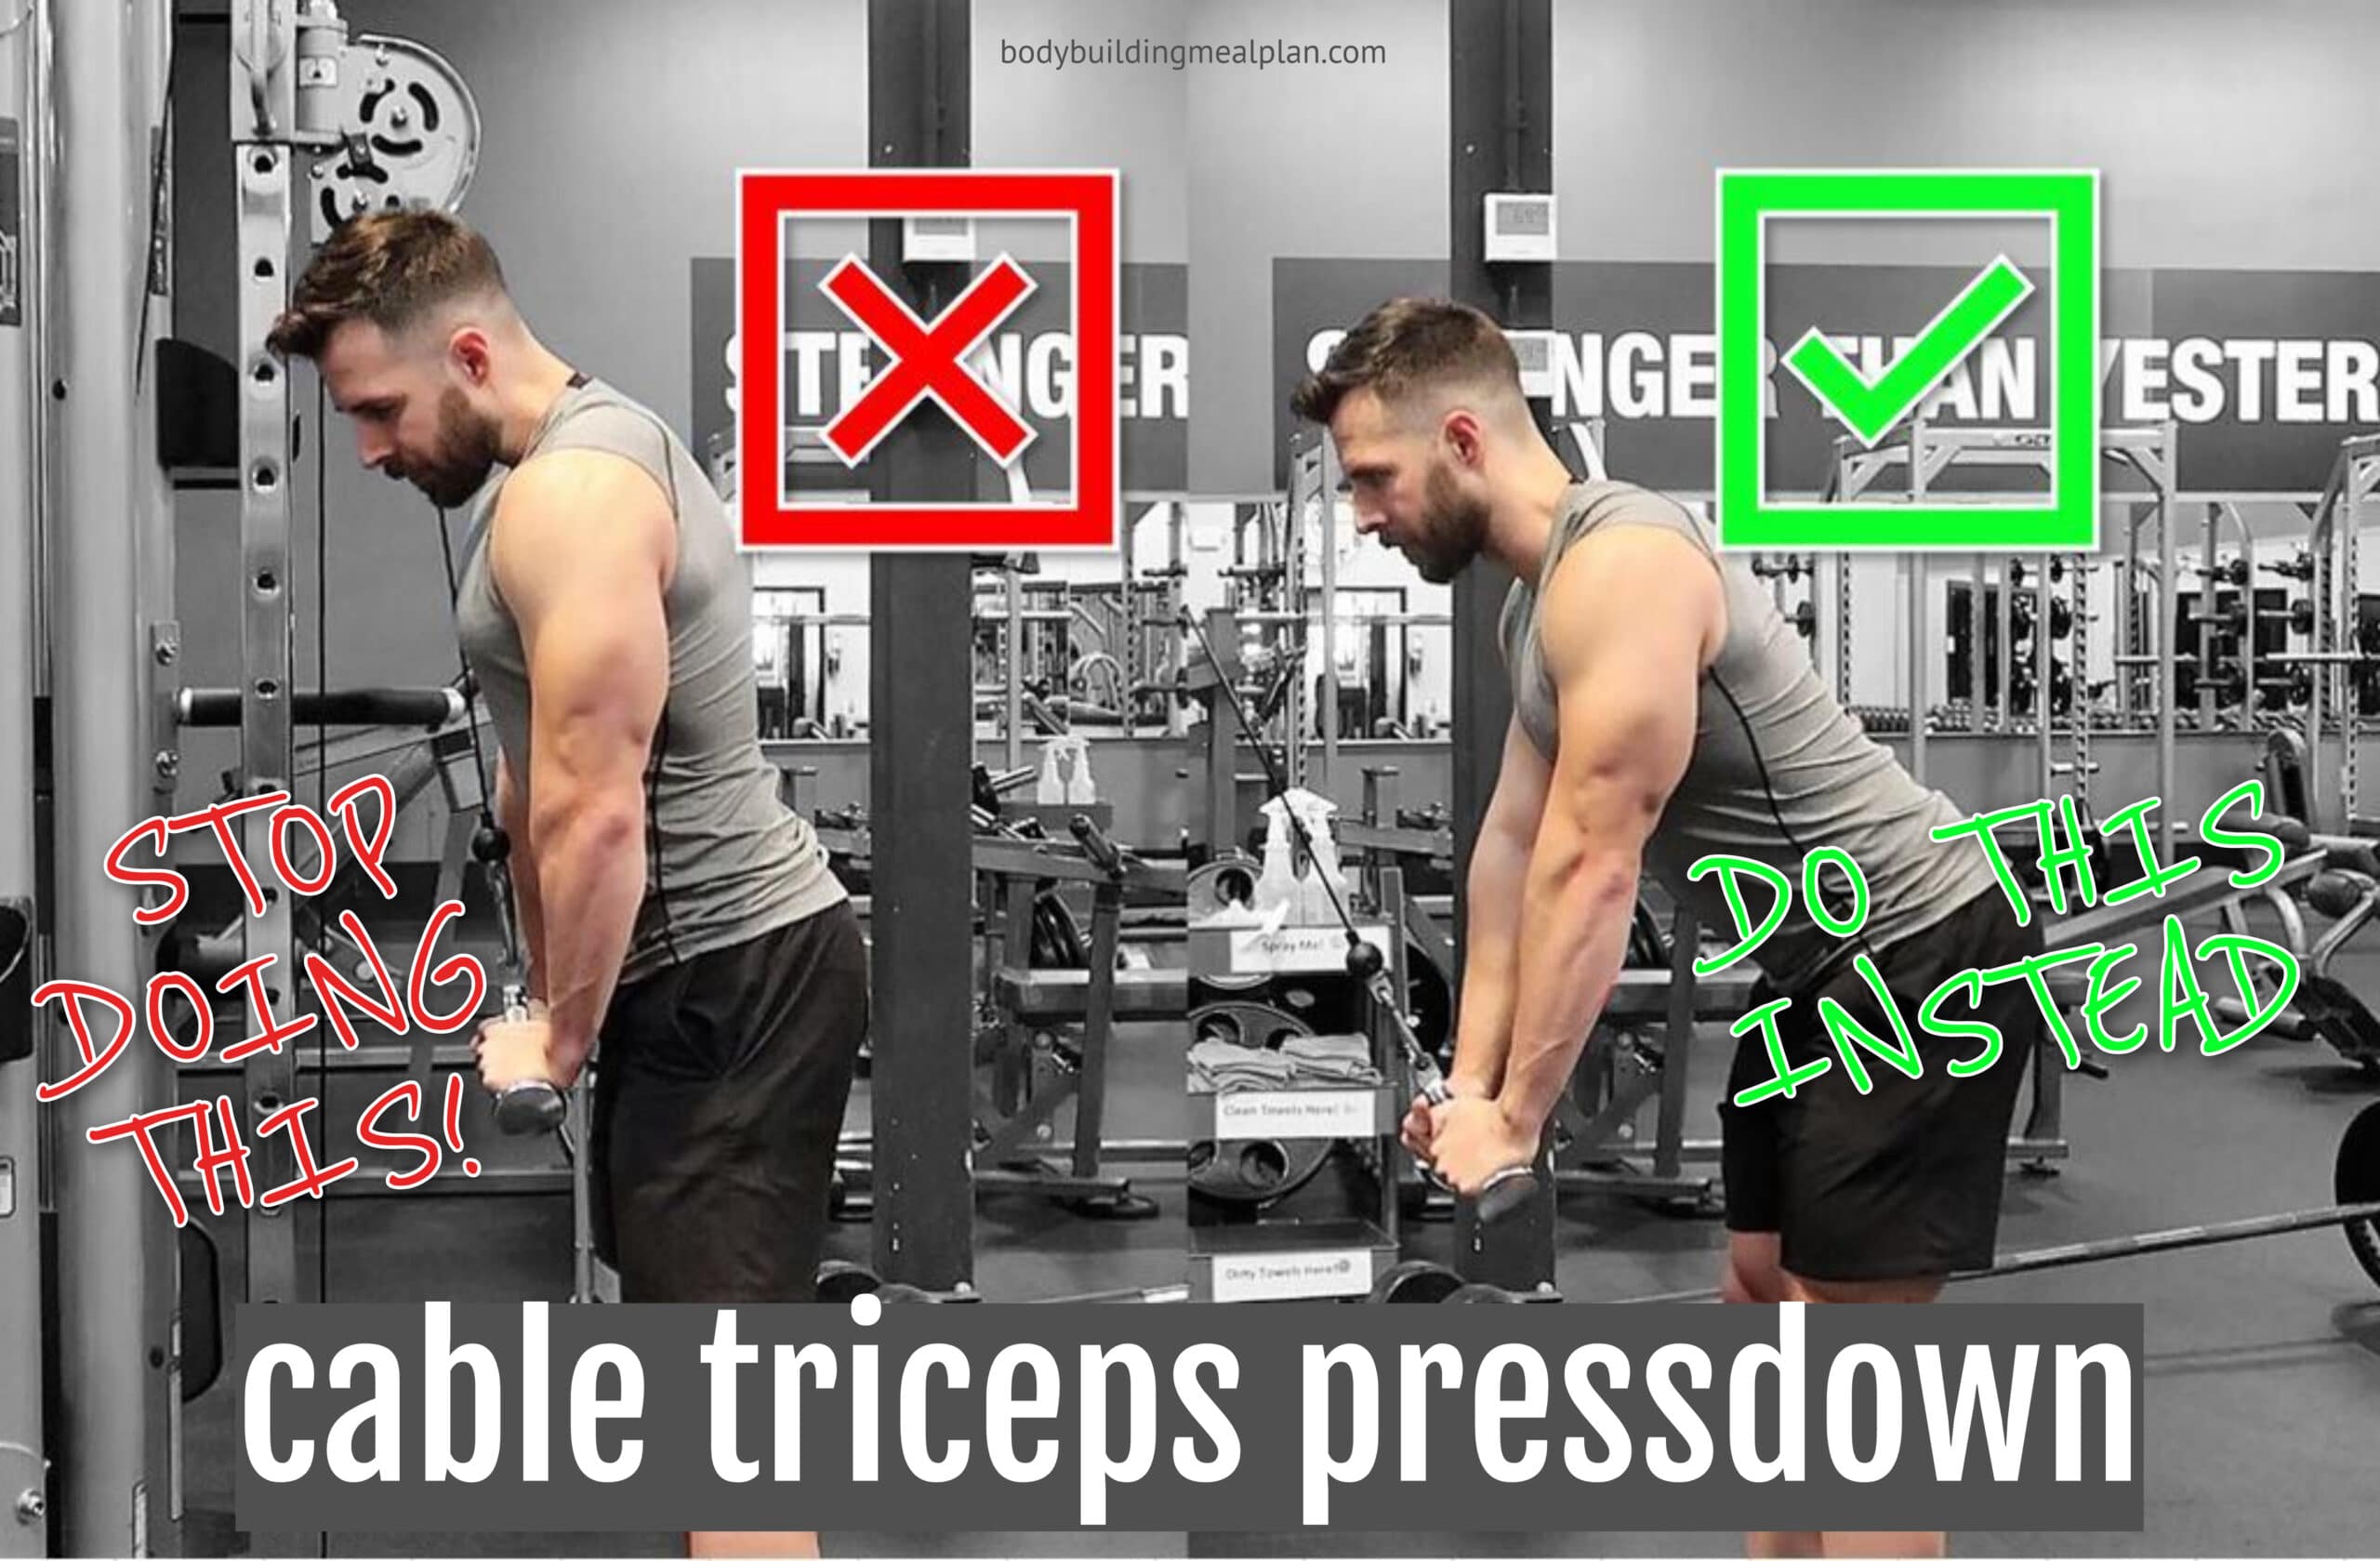
Are you looking for an effective triceps exercise? Look no further than the cable triceps press down. This exercise targets the triceps muscles, which are located at the back of the upper arm. By incorporating cable resistance, you can achieve a full range of motion and build strength in your triceps.
How to Perform Cable Triceps Press Down
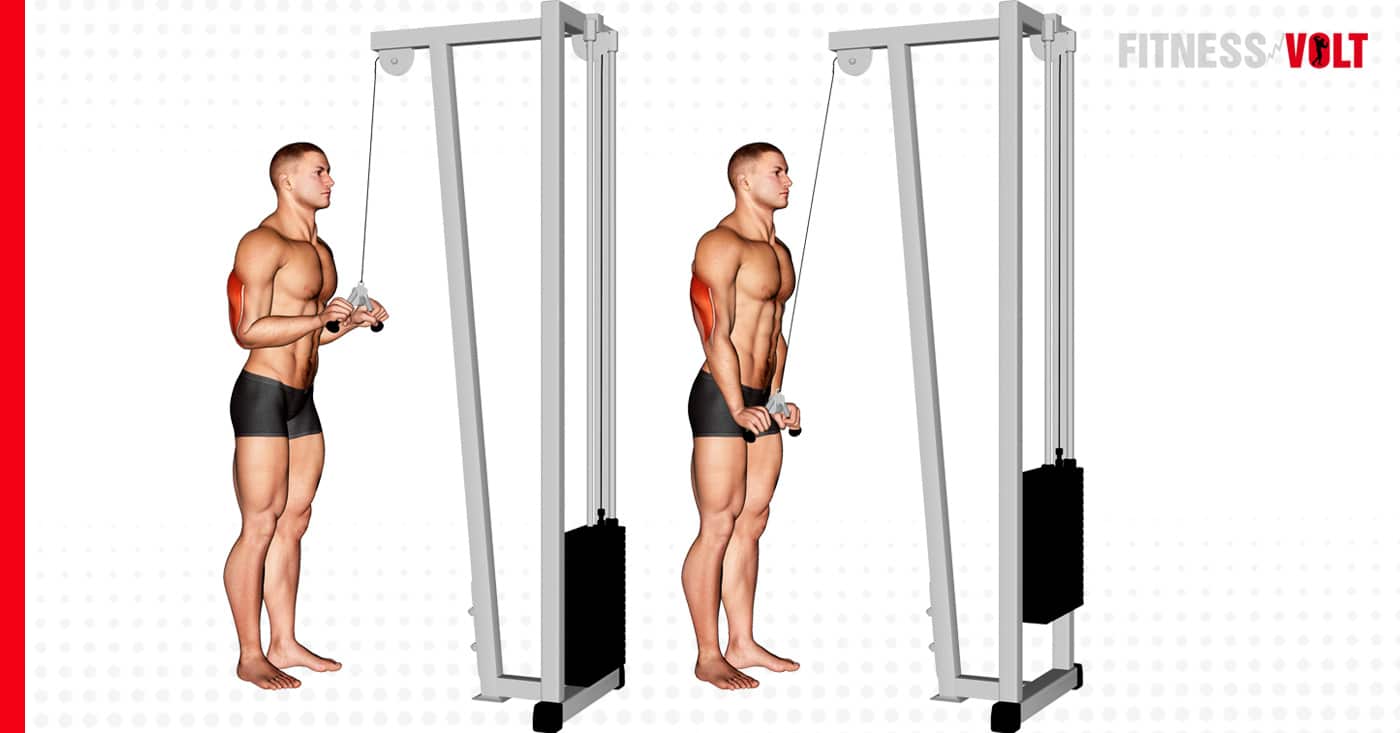
To perform the cable triceps press down, follow these steps:
- Stand facing a cable machine with a straight bar attached to the high pulley.
- Grasp the bar with an overhand grip and keep your palms facing down.
- Stand with your feet shoulder-width apart, and keep your back straight.
- Slowly lower the bar by bending your elbows until your hands reach your chest.
- Pause for a second and then slowly return the bar to its starting position by extending your arms.
- Repeat for the desired number of reps.
Variations of Cable Triceps Press Down

There are several variations of the cable triceps press down that you can try:
- Rope Triceps Press Down: Use a rope attachment instead of a straight bar for a different grip and range of motion.
- Reverse Grip Triceps Press Down: Use an underhand grip for a different angle and focus on the triceps.
- Single-Arm Triceps Press Down: Use one arm at a time for a unilateral exercise that targets each arm individually.
Tips for Cable Triceps Press Down

Here are some tips to keep in mind when performing cable triceps press down:
- Use a weight that allows you to maintain proper form and complete the desired number of reps.
- Keep your elbows close to your sides and avoid flaring them out.
- Focus on squeezing your triceps at the bottom of the movement.
- Breathe in as you lower the bar and exhale as you push it back up.
- Warm up your triceps with lighter weights before performing cable triceps press down.
Benefits of Cable Triceps Press Down

Cable triceps press down has several benefits, including:
- Strengthening the triceps muscles, which are important for pushing and pulling movements.
- Improving overall upper body strength and power.
- Increasing muscle endurance in the triceps.
- Targeting the long head of the triceps, which is often neglected in other triceps exercises.
- Providing a variety of exercises to prevent boredom and plateaus in your workout routine.
Incorporating Cable Triceps Press Down into Your Workout
You can add cable triceps press down to your workout routine in several ways:
- As a standalone exercise for 3-4 sets of 8-12 reps.
- As part of a superset with another triceps exercise, such as skull crushers or triceps dips.
- As part of a full-body or upper-body workout routine.
Conclusion
Cable triceps press down is an effective exercise for targeting the triceps muscles and building upper body strength. By following the proper form and incorporating variations, you can maximize the benefits of this exercise and prevent boredom in your workout routine.
Related video of Cable Triceps Press Down: A Complete Guide
Leg curls are a popular exercise that specifically targets the muscles in the back of your thighs, also known as the hamstrings. This exercise involves bending your knees and bringing your heels towards your buttocks while lying on your stomach or sitting on a machine. But what other muscles do leg curls work? Let's take a closer look.
The Hamstrings
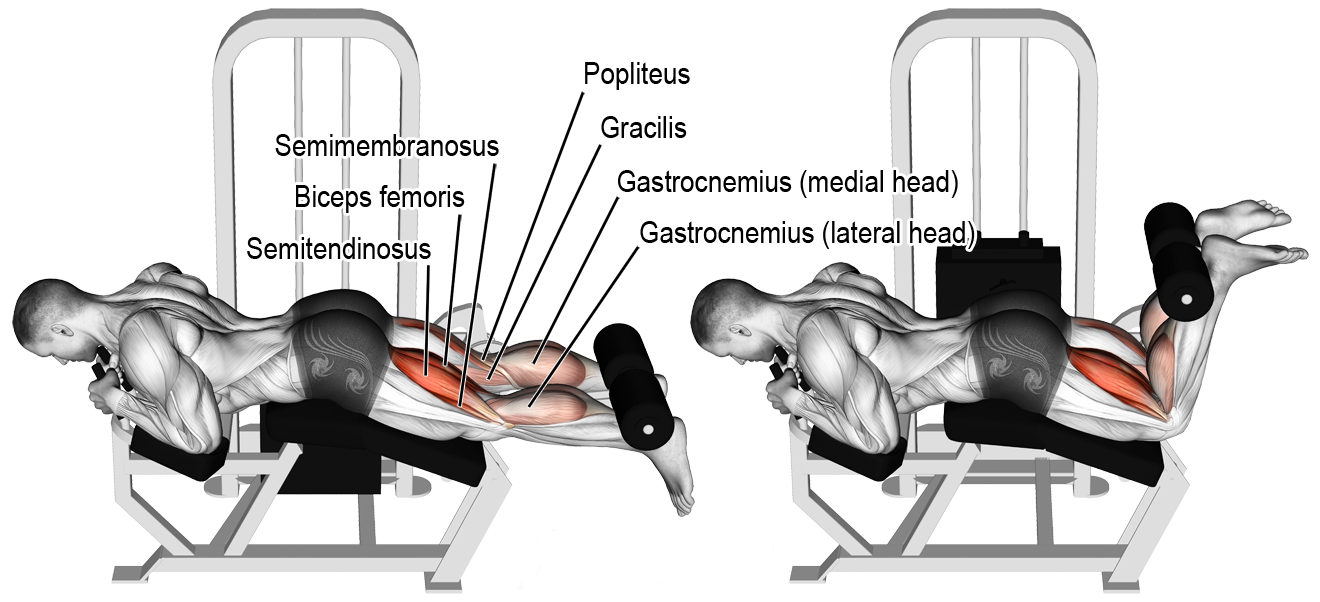
The hamstrings are a group of three muscles that run along the back of your thigh. They include the biceps femoris, semitendinosus, and semimembranosus. These muscles are responsible for extending your hip joint and flexing your knee joint, which is why they are the primary muscles targeted during leg curls.
The Glutes
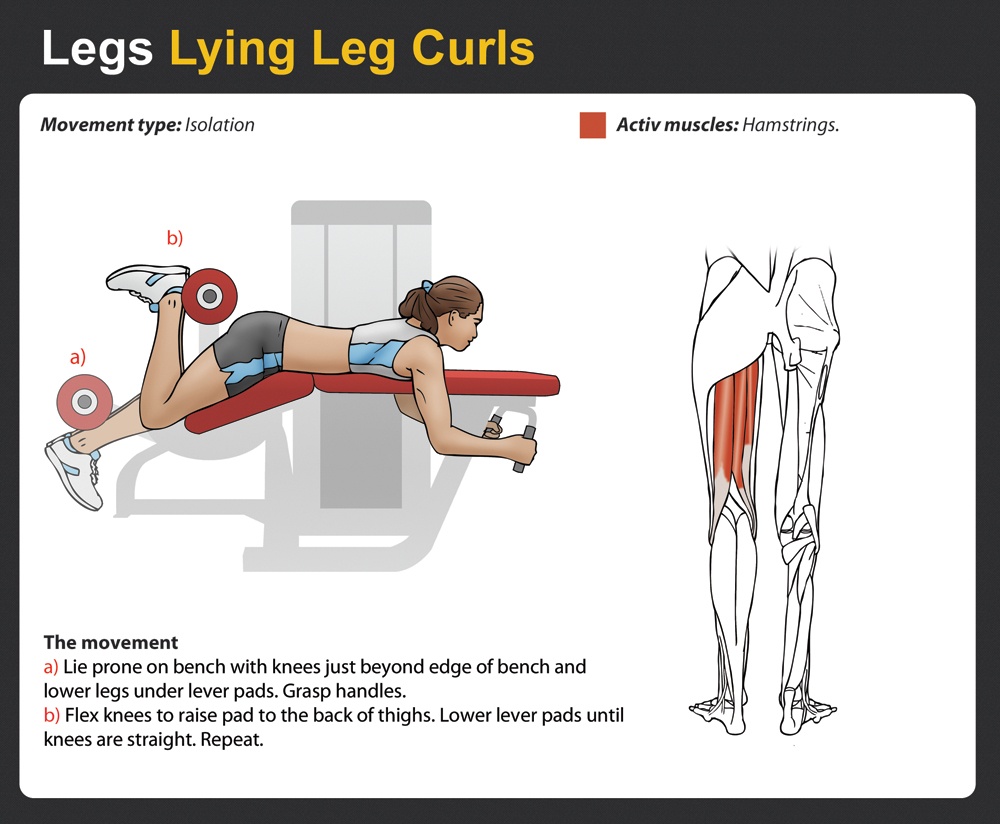
While leg curls primarily target the hamstrings, they also work the glute muscles to a lesser extent. The glutes, also known as the buttocks, are comprised of three muscles: the gluteus maximus, gluteus medius, and gluteus minimus. These muscles help to extend and externally rotate your hip joint, which is activated during the leg curl exercise.
The Calves

Although not the primary target, leg curls can also work your calf muscles to a lesser extent. The calves consist of two muscles: the gastrocnemius and soleus. These muscles are responsible for plantar flexion, which is the movement of pointing your toes downwards. This movement is activated during the leg curl exercise as your feet are flexed towards your buttocks.
The Quadriceps

While leg curls are mainly focused on the hamstrings, they can also work the quadriceps muscles to a lesser extent. The quadriceps, also known as the front of your thighs, are comprised of four muscles: the rectus femoris, vastus lateralis, vastus medialis, and vastus intermedius. These muscles are responsible for extending your knee joint, which is activated during the lowering phase of the leg curl exercise.
The Lower Back

Leg curls can also work the lower back muscles to a small degree. The lower back, also known as the lumbar region, consists of five vertebrae and several muscles that are responsible for stabilizing your spine and maintaining your posture. These muscles are activated during the leg curl exercise, particularly when you are lying on your stomach.
The Core

The core muscles are also activated during the leg curl exercise. The core includes several muscles, such as the rectus abdominis, obliques, and erector spinae, that work together to stabilize your spine and pelvis. These muscles are activated when you are lying on your stomach or sitting on a machine, as they help to maintain proper form and prevent injury.
Conclusion
Leg curls primarily target the hamstrings, but they also work several other muscles in your lower body, including the glutes, calves, quadriceps, lower back, and core. By working these muscles, leg curls can help to improve your overall lower body strength, stability, and flexibility. Remember to always use proper form and start with a weight that is appropriate for your fitness level to prevent injury and achieve the best results.
