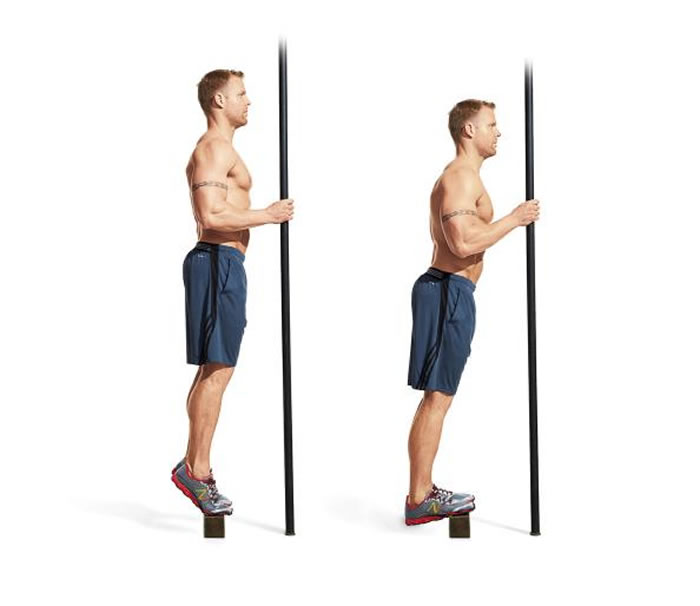
Calf raises with weights are an effective exercise for strengthening and toning your calf muscles. This exercise involves standing on your toes while holding weights, which puts additional stress on your calf muscles and helps them grow stronger. In this article, we will discuss the proper technique for doing calf raises with weights, as well as some tips and tricks to help you get the most out of this exercise.
What You Will Need

The first thing you will need is a pair of dumbbells or other weights. You don't need anything too heavy, just enough to provide some resistance. You will also need a sturdy surface to stand on, such as a weight bench or step. Make sure the surface is stable and won't wobble or tip over.
How To Do Calf Raises With Weights

The proper technique for doing calf raises with weights is as follows:
- Stand on the edge of a step or other stable surface with your toes hanging off the edge.
- Hold a weight in each hand, with your arms hanging straight down at your sides.
- Raise your heels up as high as you can, keeping your knees straight.
- Lower your heels back down to the starting position.
- Repeat for the desired number of repetitions.
Make sure to keep your back straight and your core engaged throughout the exercise. You should also try to keep your movements slow and controlled, rather than jerky or sudden.
Variations

There are several variations of calf raises with weights that you can try to target different parts of your calf muscles:
- Single-leg calf raises: Stand on one foot and lift your other foot off the ground. Hold a weight in the opposite hand and perform the exercise as usual.
- Toes-in calf raises: Turn your toes inward slightly and perform the exercise as usual.
- Toes-out calf raises: Turn your toes outward slightly and perform the exercise as usual.
Tips And Tricks
Here are a few tips and tricks to help you get the most out of your calf raises with weights:
- Start with a lighter weight and gradually work your way up as your calf muscles get stronger.
- Try to do calf raises with weights at least twice a week for best results.
- If you don't have access to weights, you can also do calf raises using just your bodyweight.
- Stretch your calf muscles before and after the exercise to prevent injury.
- Don't bounce or jerk your movements, as this can put unnecessary strain on your joints.
Conclusion
Calf raises with weights are a great exercise for strengthening and toning your calf muscles. By following the proper technique and incorporating some variations and tips, you can get the most out of this exercise and achieve strong, lean calf muscles.
Related video of How To Do Calf Raises With Weights

If you're looking for an effective exercise to strengthen your back and shoulders, look no further than the dumbbell rear lateral raise seated. This exercise targets the posterior deltoids, which are the muscles at the back of your shoulders, as well as the muscles in your upper back. By performing this exercise regularly, you can improve your posture, reduce your risk of injury, and enhance your overall athletic performance.
How to Perform the Dumbbell Rear Lateral Raise Seated

To perform the dumbbell rear lateral raise seated, follow these steps:
- Sit on a bench with your feet flat on the floor and your back straight.
- Hold a dumbbell in each hand with your palms facing each other.
- Lean forward slightly and let your arms hang down in front of you.
- Engage your shoulder blades and raise your arms out to the sides until they are parallel to the floor.
- Pause at the top of the movement and squeeze your shoulder blades together.
- Lower your arms back down to the starting position.
- Repeat for the desired number of reps.
Tips for Performing the Dumbbell Rear Lateral Raise Seated

Here are some tips to help you perform the dumbbell rear lateral raise seated safely and effectively:
- Start with light weights and focus on proper form.
- Keep your elbows slightly bent throughout the movement to reduce strain on your joints.
- Avoid swinging your arms or using momentum to lift the weights.
- Exhale as you lift the weights and inhale as you lower them.
- Perform the exercise in a controlled manner and avoid jerking or twisting your body.
- As you become stronger, gradually increase the weight of the dumbbells.
Benefits of the Dumbbell Rear Lateral Raise Seated

The dumbbell rear lateral raise seated offers a variety of benefits, including:
- Strengthening the muscles in your upper back and shoulders
- Improving your posture and reducing your risk of back pain
- Enhancing your athletic performance in sports that require upper body strength and stability
- Increasing your range of motion and flexibility in your shoulders
- Burning calories and promoting weight loss when combined with a healthy diet and regular exercise routine
Variations of the Dumbbell Rear Lateral Raise Seated

If you want to mix up your workout routine or target different muscles, you can try these variations of the dumbbell rear lateral raise seated:
- Perform the exercise standing instead of seated
- Use resistance bands instead of dumbbells
- Perform the exercise on a stability ball to engage your core muscles
- Perform the exercise with one arm at a time instead of both arms simultaneously
Conclusion
The dumbbell rear lateral raise seated is a simple yet effective exercise that can help you strengthen your back and shoulders. By following proper form and gradually increasing the weight of the dumbbells, you can improve your posture, reduce your risk of injury, and enhance your athletic performance. Try incorporating this exercise into your workout routine and see the results for yourself!
Related video of Dumbbell Rear Lateral Raise Seated: Strengthen Your Back and Shoulders
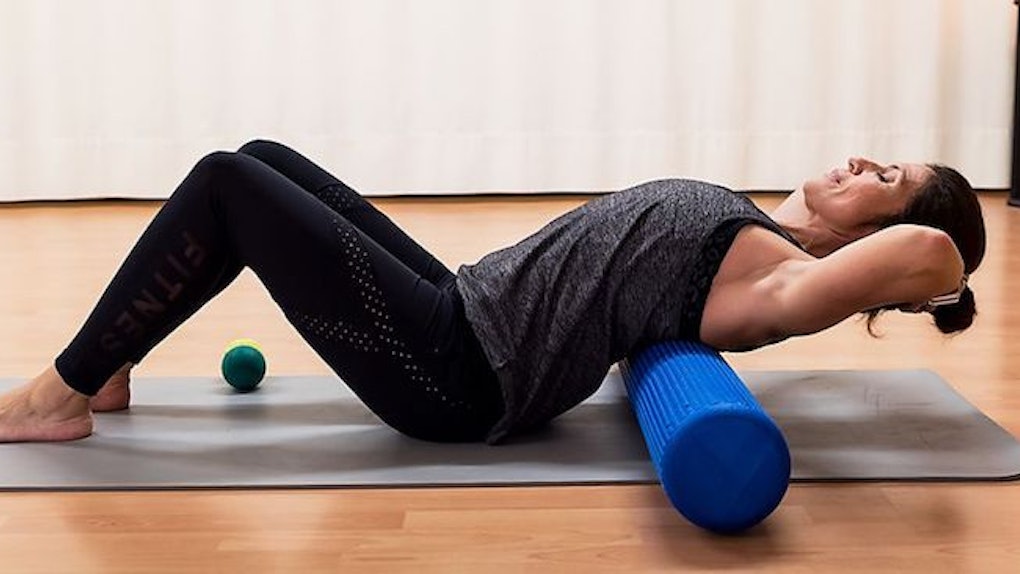
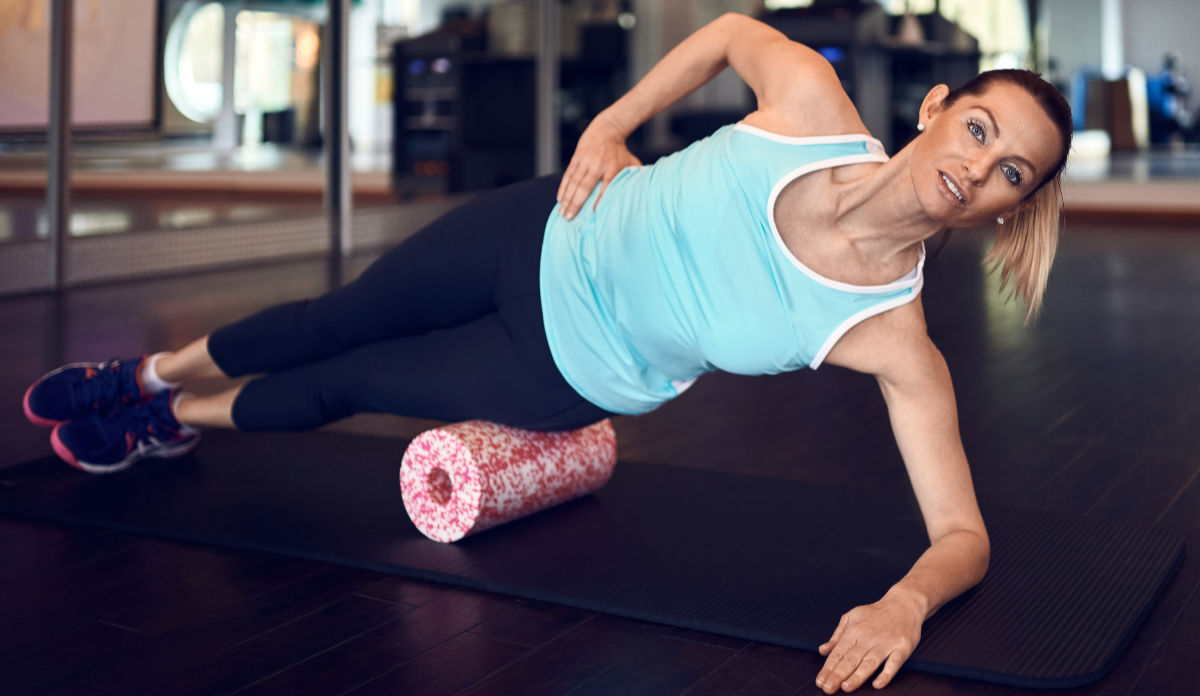
Back pain is a common problem for many people, and it can be caused by various factors such as poor posture, muscle imbalances, and injuries. If you're looking for a way to relieve the pain and tightness in your back, foam rolling might be the answer. Foam rolling is a form of self-massage that can help release tension and knots in your muscles, increase blood flow, and improve your flexibility. In this article, we'll discuss how foam rolling can benefit your back and how to do it properly.
What is Foam Rolling?

Foam rolling is a form of self-myofascial release (SMR) that involves using a foam roller to apply pressure to specific areas of your body. The foam roller is a cylindrical piece of foam that comes in various sizes and densities. It can be used to target different muscle groups and areas of your body, including your back.
How Does Foam Rolling Help Your Back?
Foam rolling can help relieve pain and tightness in your back by releasing tension in your muscles and improving blood flow. When you roll over a tight or knotted muscle, the pressure from the foam roller helps break up the adhesions and knots, allowing the muscle to relax and release tension. This can help improve your range of motion and flexibility, reduce pain and stiffness, and prevent future injuries.
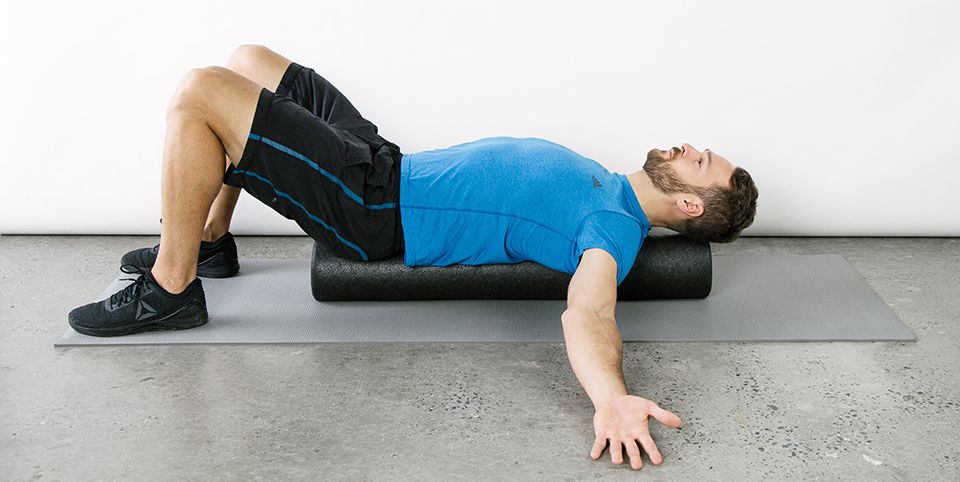
How to Foam Roll Your Back

Here are the steps to foam roll your back:
- Lie down on your back with the foam roller underneath your shoulder blades.
- Place your hands behind your head and lift your hips off the ground.
- Roll up and down your upper back, stopping at any tight or sore spots.
- When you find a tight spot, hold the foam roller in that area for 20-30 seconds.
- Repeat on the other side of your spine.
- Move the foam roller down to your mid-back and repeat the process.
- Finally, move the foam roller down to your lower back and repeat the process.
Tips for Foam Rolling Your Back
Here are some tips to keep in mind when foam rolling your back:
- Start slowly and gently, especially if you're new to foam rolling or have a lot of tightness in your back.
- Avoid rolling directly on your spine or any bony areas.
- Use your arms and legs to control the pressure on the foam roller.
- Breathe deeply and relax as you roll over tight spots.
- Don't overdo it – foam rolling can be intense, so listen to your body and stop if you feel any sharp or intense pain.
When to Foam Roll Your Back
You can foam roll your back at any time, but it's best to do it after a workout or at the end of the day when your muscles are warm and more pliable. Foam rolling can be a great way to relax and unwind before bed, and it can also help reduce soreness and tightness after a tough workout.
Conclusion
Foam rolling can be a great way to relieve pain and tightness in your back, improve your flexibility, and prevent injuries. By adding foam rolling to your daily routine, you can help keep your back healthy and pain-free. Just remember to start slowly, listen to your body, and be consistent with your practice. Happy rolling!
Related video of Foam Rolling For Back: How It Can Help You Relieve Pain and Tightness

Side to side squat is an excellent exercise that targets the lower body muscles, including the quads, glutes, and hamstrings. It is a functional movement that mimics the motion of daily activities, such as getting in and out of a car or picking up something from the ground. This article will discuss the benefits, steps, and variations of the side to side squat.
Benefits of Side To Side Squat

Side to side squat offers several benefits, including:
- Strengthening the lower body muscles
- Improving balance and coordination
- Burning calories and promoting weight loss
- Increasing flexibility and mobility
- Reducing the risk of injury
Moreover, side to side squat is a low-impact exercise that you can perform without putting stress on your joints.
Steps to Perform Side To Side Squat

Here are the steps to perform the side to side squat:
- Stand with your feet shoulder-width apart and your toes pointing forward.
- Place your hands on your hips or extend them in front of you.
- Take a big step to your right side and lower your body until your right thigh is parallel to the ground.
- Push through your right foot to return to the starting position.
- Repeat the same movement to your left side.
- Alternate sides for the desired number of repetitions or time.
Make sure to keep your back straight, chest up, and knees aligned with your toes throughout the exercise.
Variations of Side To Side Squat

Here are some variations of the side to side squat:
- Side to side squat with a resistance band: Place a resistance band around your thighs above your knees and perform the exercise as usual. The band will add extra resistance to your muscles.
- Side to side lunge: Instead of squatting, take a big step to your right side and bend your right knee to perform a lunge. Push through your right foot to return to the starting position and repeat the same movement to your left side.
- Jumping side to side squat: Perform the side to side squat as usual but add a jump to your movement when you return to the starting position. This variation will add a plyometric element to your workout.
Conclusion
Side to side squat is a simple yet effective exercise that you can perform anywhere without any equipment. It targets the lower body muscles and offers several benefits, including improving balance, burning calories, and reducing the risk of injury. Try different variations of the exercise to challenge your muscles and add variety to your workout routine.
Related video of Side To Side Squat: Benefits, Steps, and Variations

Are you looking for a way to strengthen your biceps and forearms? If so, then you might want to try doing incline db hammer curl. This exercise can help you achieve your fitness goals while also improving your overall health and well-being.
What is Incline Db Hammer Curl?

Incline db hammer curl is a type of exercise that targets the biceps and forearms. It involves using dumbbells while lying on an incline bench. The exercise is called "hammer curl" because of the way you hold the dumbbells - just like how you would hold a hammer.
One of the benefits of doing incline db hammer curl is that it puts less strain on your wrists compared to other bicep exercises. This is because the hammer grip allows your wrists to remain in a neutral position, which reduces the risk of injury.
How to Do Incline Db Hammer Curl

To perform incline db hammer curl, follow these steps:
- Adjust the incline bench to a 45-degree angle.
- Grab a pair of dumbbells with a neutral grip (palms facing each other).
- Lie down on the bench with your back and head flat against it.
- Extend your arms fully, with your elbows close to your sides.
- Curl the dumbbells towards your shoulders while keeping your elbows stationary.
- Pause, then slowly lower the dumbbells back to the starting position.
- Repeat for the desired number of reps.
Make sure to use a weight that you can manage comfortably. You should feel a slight burn in your biceps and forearms as you perform the exercise, but you should not feel any pain or discomfort.
Tips for Incline Db Hammer Curl

Here are some tips to help you get the most out of incline db hammer curl:
- Keep your elbows close to your sides throughout the exercise.
- Exhale as you curl the dumbbells up, and inhale as you lower them back down.
- Do not swing your arms or use momentum to lift the dumbbells.
- Focus on squeezing your biceps and forearms at the top of the movement.
- Slowly lower the dumbbells back down to the starting position - do not let them drop.
- Start with a lighter weight and gradually increase it as you get stronger.
Variations of Incline Db Hammer Curl

If you want to mix up your bicep workout, here are some variations of incline db hammer curl that you can try:
- Single-arm incline db hammer curl: Perform the exercise using one arm at a time.
- Preacher curl: This is a similar exercise, but it is performed on a preacher bench with a barbell.
- Concentration curl: This exercise isolates the biceps by curling one arm at a time while sitting on a bench.
Benefits of Incline Db Hammer Curl

Incline db hammer curl offers several benefits, including:
- Strengthening the biceps and forearms
- Improving grip strength
- Reducing the risk of wrist injury
- Increasing muscle definition in the arms
- Improving overall upper body strength
Conclusion
Incline db hammer curl is a simple yet effective exercise that can help you achieve stronger, more defined biceps and forearms. By following the tips and variations outlined in this article, you can take your bicep workout to the next level and achieve your fitness goals.
Related video of Incline Db Hammer Curl: A Comprehensive Guide

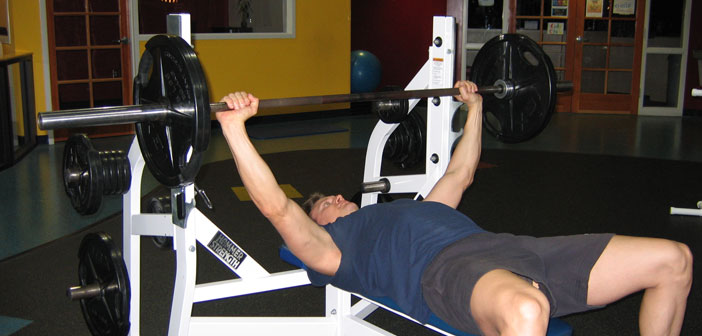
The bench press is one of the most popular exercises in the gym, and for good reason. It is an excellent exercise for building upper body strength and size, and it targets a variety of muscles, including the chest, shoulders, and triceps. However, if you want to get the most out of your bench press, it is essential to have a proper grip on the bar.
Why Is The Grip Important?

The grip is important because it affects the way you lift the weight. A proper grip will allow you to lift more weight, which means you can get stronger and build more muscle. It also helps to reduce the risk of injury by providing better control of the weight.
Types Of Grips

There are different types of grips you can use for the bench press. The most common grips are the narrow grip, the wide grip, and the medium grip. The narrow grip targets the triceps more, while the wide grip targets the chest more. The medium grip is a balance between the two.
How To Grip The Bar

To grip the bar, start by lying on the bench with your feet flat on the floor. Reach up and grab the bar with your palms facing away from your body. Your hands should be slightly wider than shoulder-width apart. Your thumbs should be wrapped around the bar, and your fingers should be wrapped around the bar as well.
Make sure your grip is tight, but not too tight. You want to be able to control the weight, but you don't want to be so tight that you can't release the bar if you need to.
The Importance Of Wrist Position
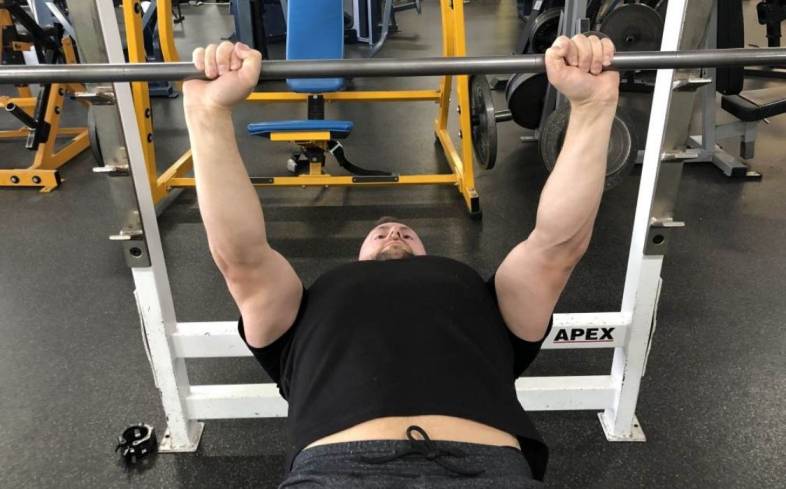
The position of your wrists is also important when gripping the bar for the bench press. Your wrists should be straight, not bent. If your wrists are bent, it can put unnecessary stress on your joints and increase the risk of injury.
Make sure your wrists are aligned with your forearms. This will help to distribute the weight evenly across your wrists and reduce the risk of injury.
How To Improve Your Grip Strength
If you struggle with your grip strength during the bench press, there are a few things you can do to improve it. One way is to do grip-specific exercises, such as wrist curls and grip squeezes.
You can also use equipment such as wrist straps and hand grippers to help improve your grip strength.
Conclusion
A proper grip on the bar is essential for getting the most out of your bench press. It allows you to lift more weight, reduce the risk of injury, and target specific muscles. Remember to choose the grip that is best for you, keep your wrists straight, and work on improving your grip strength.
Related video of How To Grip Bar Bench Press

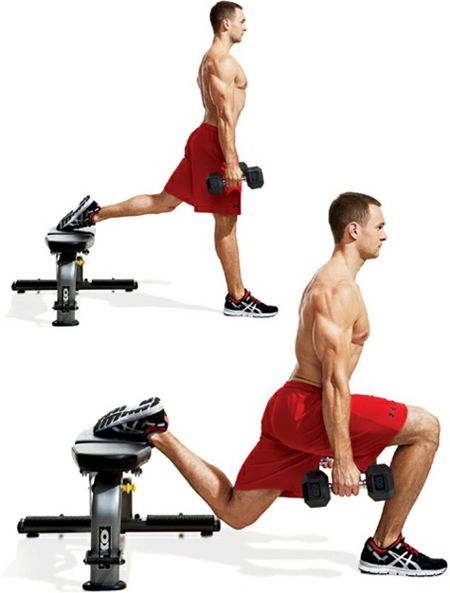
If you are looking for an effective way to tone your legs and glutes, the split squat with dumbbell is a great exercise to add to your workout routine. This exercise is a variation of the traditional squat that targets your quads, hamstrings, and glutes with the added resistance of a dumbbell. In this article, we will discuss the benefits of split squat with dumbbell, how to do it properly, and some tips for getting the most out of your workout.
Benefits of Split Squat With Dumbbell
Split squat with dumbbell is a compound exercise that targets multiple muscle groups at once. Here are some of the benefits of this exercise:
- Strengthens your legs and glutes
- Improves your balance and stability
- Increases your hip flexibility
- Helps to prevent injuries by strengthening your stabilizing muscles
- Burns calories and helps to lose weight
How to Do Split Squat With Dumbbell

Follow these steps to perform split squat with dumbbell:
- Stand with your feet shoulder-width apart and hold a dumbbell in each hand.
- Take a step forward with your right foot and lower your body until your right thigh is parallel to the ground.
- Make sure your left knee is hovering just above the ground.
- Push through your right heel to return to the starting position.
- Repeat on the other side.
- Do 2-3 sets of 10-12 reps on each side.
- Take a 30-60 second rest between sets.
Tips for Getting the Most Out of Your Workout

To get the most out of your split squat with dumbbell workout, keep these tips in mind:
- Start with a light weight and gradually increase as you get stronger.
- Keep your core engaged throughout the exercise.
- Focus on proper form to avoid injuries.
- Breathe in as you lower your body and exhale as you push back up.
- Include split squat with dumbbell in your leg day routine.
Conclusion
Split squat with dumbbell is a great exercise for toning your legs and glutes. By following the proper form and incorporating it into your workout routine, you can reap the benefits of this compound exercise. Remember to start with a light weight and gradually increase as you get stronger. Keep your core engaged and focus on proper form to avoid injuries. Include split squat with dumbbell in your leg day routine to get the most out of your workout.
Related video of Split Squat With Dumbbell

Are you looking to add some variation to your upper body workout routine? Look no further than the kneeling straight arm cable pullover. This exercise targets the lats, triceps, and shoulders, while also engaging the core and stabilizing muscles.
Step-by-Step Guide

1. Kneel in front of a cable machine with a straight bar attachment.

2. Grab the bar with straight arms, palms facing down, and hands shoulder-width apart.

3. Pull the bar down and behind your head, keeping your arms straight and elbows locked.

4. Return to the starting position by bringing the bar back to shoulder level.
Tips for Proper Form

Proper form is crucial for maximizing the benefits of this exercise and avoiding injury. Here are some tips:
- Keep your core engaged and back straight throughout the movement.
- Avoid arching your back or swinging the bar with momentum.
- Focus on pulling the bar down with your lats, not your arms or shoulders.
- Exhale as you pull the bar down, and inhale as you return to starting position.
- Start with a lighter weight and gradually increase as you become comfortable with the movement.
Variations

Looking for ways to mix up your workout routine? Try these variations:
- Single-arm cable pullover: Use one arm at a time to target each side of your back more effectively.
- Dumbbell pullover: Lie on a bench and perform a similar movement with a dumbbell instead of a cable machine.
- Seated cable row: Similar to the straight arm pullover, but with a wider grip and a rowing motion instead of a pullover.
Benefits of the Kneeling Straight Arm Cable Pullover

Adding the kneeling straight arm cable pullover to your workout routine can provide numerous benefits, including:
- Targeting the lats, triceps, and shoulders effectively.
- Engaging the core and stabilizing muscles for a full-body workout.
- Improving posture and upper body strength for daily activities.
- Providing a variation to traditional back exercises for increased muscle confusion and growth.
Conclusion
The kneeling straight arm cable pullover is a challenging exercise that can provide numerous benefits for your upper body workout routine. By following proper form and gradually increasing weight, you can target your lats, triceps, and shoulders while also engaging your core and stabilizing muscles. Mix up your routine with variations like the single-arm pullover or seated cable row for even more muscle confusion and growth. Give this exercise a try and see the results for yourself!
Related video of Kneeling Straight Arm Cable Pullover: A Comprehensive Guide

If you're looking to strengthen your abs and build a stronger core, you may want to try the Cross Legged Reverse Crunch. This exercise targets not only your abs, but also your obliques and lower back.
How to Perform the Cross Legged Reverse Crunch

To perform the Cross Legged Reverse Crunch, follow these steps:
- Lie on your back with your legs crossed and your hands behind your head.
- Engage your abs and lift your head, neck, and shoulders off the ground.
- At the same time, lift your hips off the ground and bring your knees towards your chest.
- Slowly lower your head, neck, shoulders, hips, and legs back down to the starting position.
- Repeat for the desired number of reps.
It's important to keep your movements slow and controlled throughout the exercise. Don't use momentum to lift your body off the ground.
Variations of the Cross Legged Reverse Crunch

If you want to add some variety to your ab workout, try these variations of the Cross Legged Reverse Crunch:
- Reverse Crunch with Single Leg Extension: After lifting your hips off the ground, extend one leg straight while keeping the other knee bent. Alternate legs with each rep.
- Reverse Crunch with Bicycle: After lifting your hips off the ground, bring one knee towards your chest while extending the other leg straight. Rotate your torso to bring your opposite elbow towards the lifted knee. Alternate sides with each rep.
- Reverse Crunch with Leg Raise: After lifting your hips off the ground, extend both legs straight up towards the ceiling. Lower your legs back down to the starting position without letting your feet touch the ground.
These variations can add some extra challenge to your ab workout and target different areas of your core.
Benefits of the Cross Legged Reverse Crunch

The Cross Legged Reverse Crunch has several benefits, including:
- Strengthening your abs, obliques, and lower back
- Improving your posture and balance
- Reducing your risk of lower back pain
- Increasing your overall core strength
By incorporating the Cross Legged Reverse Crunch into your workout routine, you can improve your overall core strength and achieve stronger, more defined abs.
Precautions and Tips

While the Cross Legged Reverse Crunch is generally a safe exercise, there are some precautions you should take:
- Avoid this exercise if you have a history of lower back pain or injury.
- Start with a small number of reps and gradually increase as you build strength.
- Keep your movements slow and controlled to avoid injury.
- Engage your abs throughout the exercise to maximize its effectiveness.
By following these tips and taking the proper precautions, you can safely and effectively perform the Cross Legged Reverse Crunch.
Conclusion
The Cross Legged Reverse Crunch is a challenging and effective exercise for strengthening your abs, obliques, and lower back. By incorporating it into your workout routine and trying its variations, you can achieve a stronger, more defined core.
Remember to start with a small number of reps and gradually increase as you build strength. Keep your movements slow and controlled, and engage your abs throughout the exercise to maximize its effectiveness. And as always, consult with a healthcare professional before starting any new exercise routine.
Related video of Cross Legged Reverse Crunch: A Guide to Stronger Abs

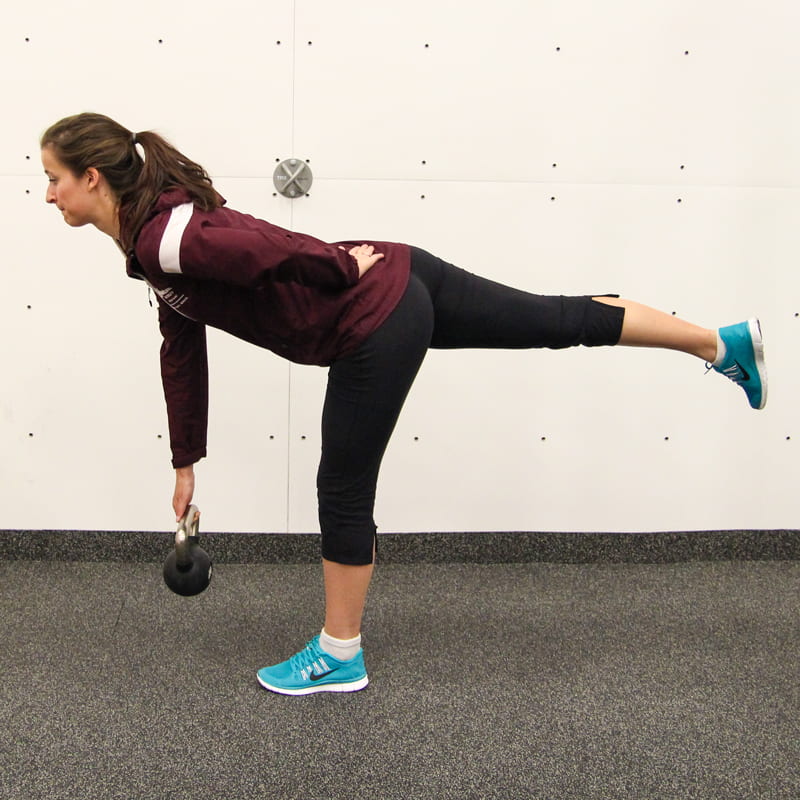
Single straight leg deadlift is a popular exercise that targets the hamstrings, glutes, and lower back. It is also known as the single-leg Romanian deadlift and is a variation of the traditional deadlift. In this article, we will discuss the proper technique, benefits, and variations of the single straight leg deadlift.
Proper Technique

The single straight leg deadlift requires a lot of balance and stability, so it's essential to perform it with proper form. Here's how to do it:
- Stand with your feet hip-width apart and hold a dumbbell or kettlebell in your right hand.
- Raise your left leg slightly off the ground and hinge at your hips, lowering the weight toward the ground.
- Keep your back flat and your chest up as you lower the weight towards the ground.
- Pause when the weight is just below your knee and then return to the starting position by squeezing your glutes and hamstrings.
- Repeat for the desired number of reps and then switch sides.
Benefits of Single Straight Leg Deadlift

The single straight leg deadlift offers a variety of benefits, including:
- Improved balance and stability
- Increased hamstring, glute, and lower back strength
- Reduced risk of injury by strengthening the stabilizing muscles
- Improved posture and alignment
Variations of Single Straight Leg Deadlift

There are several variations of the single straight leg deadlift that you can try to add variety to your workout:
- Single-leg deadlift with a barbell
- Single-leg deadlift with dumbbells or kettlebells
- Single-leg deadlift with resistance bands
- Single-leg deadlift with a stability ball
Common Mistakes to Avoid
While the single straight leg deadlift is an effective exercise, it's crucial to perform it correctly to avoid injury. Here are some common mistakes to avoid:
- Not keeping your back flat
- Bending your knee instead of hinging at your hips
- Not engaging your core
- Using too heavy of a weight
- Not maintaining proper balance and stability
Conclusion
The single straight leg deadlift is an excellent exercise for improving balance, stability, and lower body strength. By following the proper technique and avoiding common mistakes, you can perform this exercise safely and effectively. Try incorporating this exercise into your workout routine and experience the benefits for yourself!
