
The chin-up is a classic exercise that targets multiple muscles in your upper body. It's a great way to increase your strength and improve your overall fitness. However, many people struggle with performing a chin-up because it requires a lot of upper body strength. This is where the band assisted chin-up comes in.
What is a Band Assisted Chin Up?

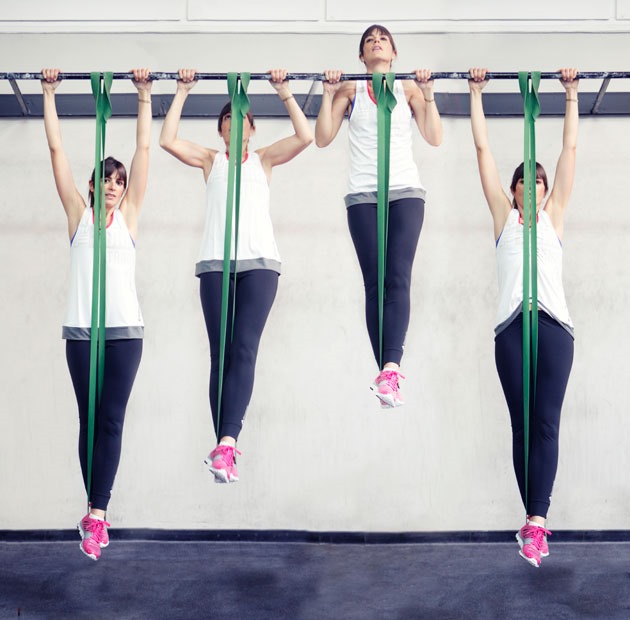
A band assisted chin-up is an exercise that uses a resistance band to help you perform a chin-up. The band is wrapped around the chin-up bar and then looped around your foot or knee. This provides you with assistance as you pull yourself up to the bar.
How to Perform a Band Assisted Chin Up

To perform a band assisted chin-up, follow these steps:
- Wrap the band around the chin-up bar and then step into the band.
- Grab onto the bar with an underhand grip, with your palms facing towards you.
- Engage your shoulder blades and pull your chest towards the bar.
- Lower yourself down to the starting position, with your arms extended.
- Repeat for the desired number of repetitions.
Benefits of a Band Assisted Chin Up
The band assisted chin-up has several benefits:
- It helps you build strength in your upper back, shoulders, and arms.
- It allows you to perform a chin-up even if you don't have the strength to do one on your own.
- It can be used as a stepping stone to performing unassisted chin-ups.
- It can be adjusted to provide more or less assistance, depending on your strength level.
Things to Keep in Mind

When performing a band assisted chin-up, there are a few things to keep in mind:
- Make sure the band is securely wrapped around the chin-up bar and your foot or knee.
- Engage your core muscles to maintain proper form throughout the exercise.
- Avoid swinging your body or using momentum to pull yourself up.
- Lower yourself down to the starting position in a controlled manner.
How to Progress from a Band Assisted Chin Up

Once you have mastered the band assisted chin-up, you can start working towards performing unassisted chin-ups. Here are some tips to help you progress:
- Gradually decrease the amount of assistance provided by the band.
- Perform negative chin-ups, where you start at the top of the exercise and lower yourself down slowly.
- Incorporate other exercises that target the muscles used in chin-ups, such as rows and pull-downs.
- Practice proper form and engage your muscles throughout the exercise.
Conclusion
The band assisted chin-up is a great exercise for anyone who wants to improve their upper body strength and perform chin-ups. By using a resistance band, you can gradually build up your strength and work towards performing unassisted chin-ups. Just remember to maintain proper form and gradually increase the difficulty of the exercise as you progress.
Related video of Band Assisted Chin Up
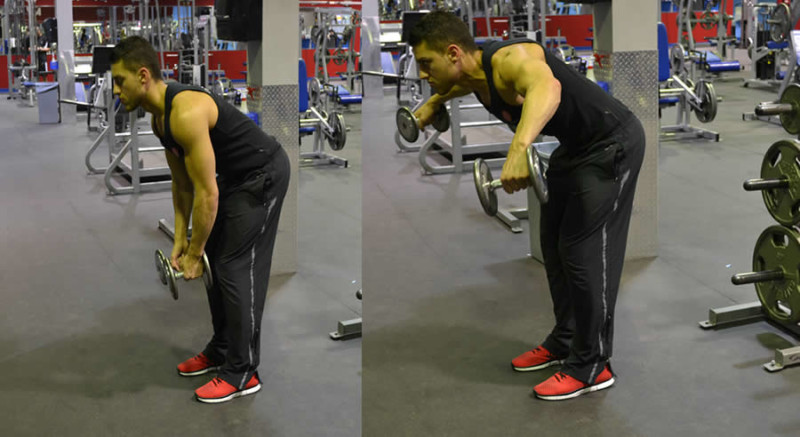
The Standing Bent-Over Lateral Raise is an exercise that targets the rear deltoids, the muscles located on the back of the shoulders. This exercise is effective in developing the shoulder muscles and improving posture. It is a great exercise for athletes, bodybuilders, and anyone looking to improve their upper body strength and appearance.
How to Perform Standing Bent-Over Lateral Raise

To perform the Standing Bent-Over Lateral Raise, follow these steps:
- Stand with your feet shoulder-width apart and your knees slightly bent.
- Bend forward at the waist, keeping your back straight and your abs tight.
- Hold a dumbbell in each hand with your palms facing in towards your legs.
- Keeping your elbows slightly bent, raise your arms out to the sides until they are parallel to the ground.
- Pause for a moment at the top of the movement, then lower your arms back down to the starting position.
- Repeat for the desired number of repetitions.
It is important to keep your back straight and your abs tight throughout the exercise to avoid injury and maximize the effectiveness of the movement.
Variations of Standing Bent-Over Lateral Raise

There are several variations of the Standing Bent-Over Lateral Raise that you can incorporate into your workout routine to target different areas of the shoulder muscles.
Reverse Fly

The Reverse Fly is a variation of the Standing Bent-Over Lateral Raise that targets the rear deltoids and upper back muscles. To perform the Reverse Fly, start in the same position as the Standing Bent-Over Lateral Raise, but instead of raising your arms out to the sides, raise them straight back behind you.
Incline Bench Rear Delt Fly

The Incline Bench Rear Delt Fly is a variation that targets the rear deltoids and upper back muscles. To perform this exercise, lie face down on an incline bench with a dumbbell in each hand. Raise your arms out to the sides until they are parallel to the ground, then lower them back down to the starting position.
Benefits of Standing Bent-Over Lateral Raise

The Standing Bent-Over Lateral Raise offers several benefits, such as:
- Developing shoulder muscles
- Improving posture
- Strengthening upper body
- Preventing shoulder injuries
- Increasing range of motion
By incorporating the Standing Bent-Over Lateral Raise into your workout routine, you can improve your upper body strength and appearance while also reducing your risk of injury.
Common Mistakes to Avoid
While the Standing Bent-Over Lateral Raise is a relatively simple exercise, there are some common mistakes that you should avoid to ensure proper form and maximum effectiveness.
- Using too much weight
- Not keeping your back straight
- Not keeping your abs tight
- Raising your arms too high
- Not pausing at the top of the movement
By avoiding these mistakes, you can make the most of your Standing Bent-Over Lateral Raise and achieve your fitness goals more quickly and effectively.
Conclusion
The Standing Bent-Over Lateral Raise is a highly effective exercise for developing the shoulder muscles and improving posture. By performing this exercise correctly and incorporating variations into your routine, you can achieve a stronger, healthier upper body and reduce your risk of injury. Remember to start with a light weight and gradually increase as you become more comfortable with the movement, and always consult a fitness professional before starting a new exercise routine.
Related video of Standing Bent-Over Lateral Raise
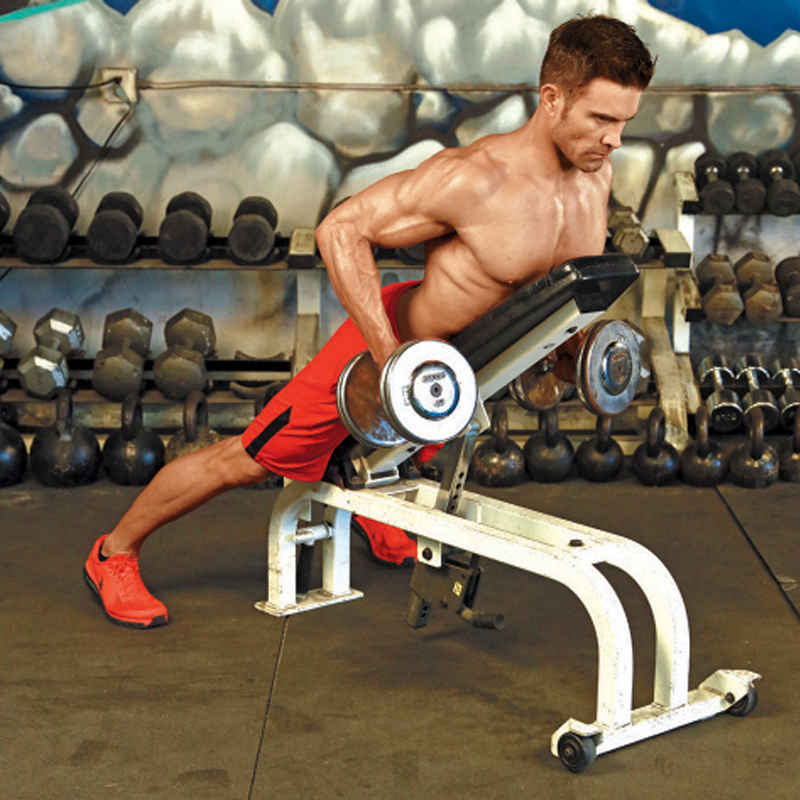
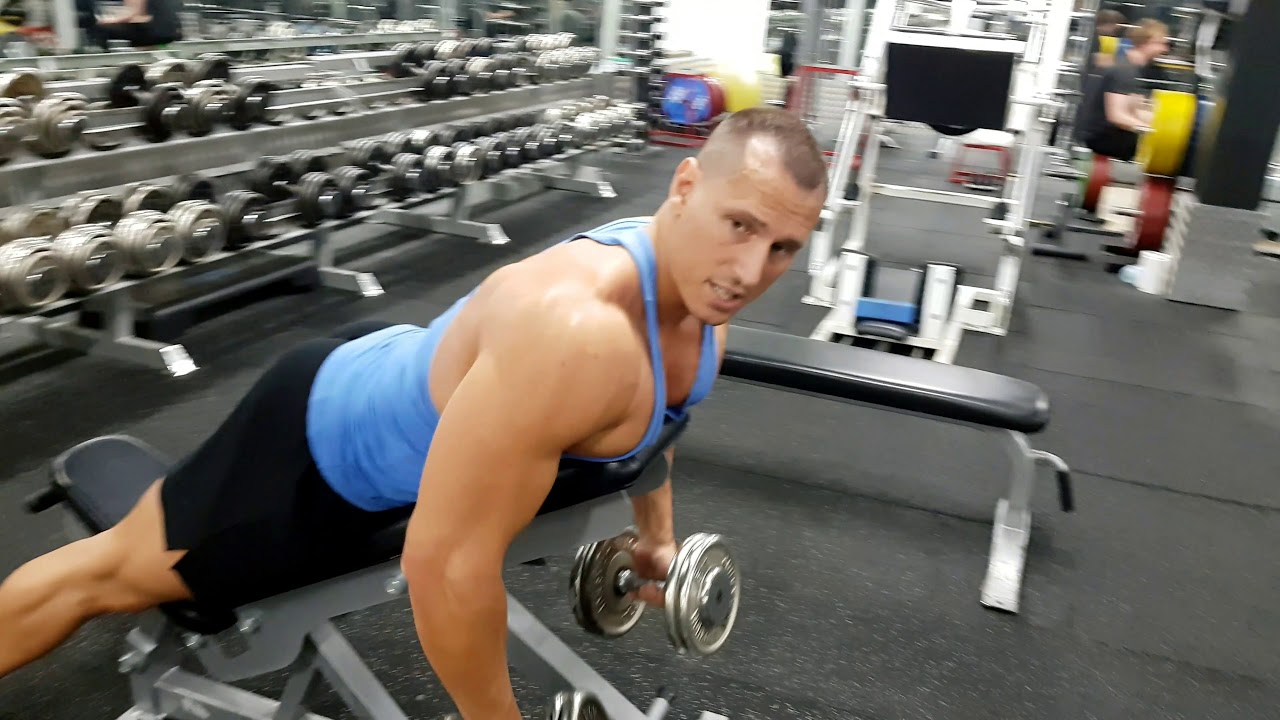
Chest supported dumbbell rows are a great exercise for building upper back muscles. This exercise is done by lying face down on an incline bench and rowing two dumbbells towards your chest. This exercise can be done by beginners and advanced lifters alike, and can help improve posture and overall back strength.
Why Should You Do Chest Supported Dumbbell Rows

There are many benefits to doing chest supported dumbbell rows. One of the primary benefits is that it helps to build upper back muscles, which can improve posture and reduce the risk of injury. This exercise also helps to strengthen the rhomboids, which can help to prevent shoulder injuries.
Another benefit of chest supported dumbbell rows is that it is a compound exercise, which means that it works multiple muscle groups at once. This can help to save time in the gym and also improve overall strength.
Finally, chest supported dumbbell rows are a great exercise for people who may have back issues or pain. Because you are lying face down on an incline bench, there is less pressure on your lower back, which can help to alleviate pain and discomfort.
How to Do Chest Supported Dumbbell Rows

To do chest supported dumbbell rows, you will need an incline bench and a set of dumbbells. Follow these steps:
- Adjust the incline bench to a 45-degree angle.
- Lie face down on the bench with your chest against the pad.
- Grab a dumbbell in each hand and let your arms hang straight down towards the floor.
- Keeping your elbows close to your body, pull the dumbbells up towards your chest.
- Pause at the top of the movement, then slowly lower the dumbbells back down to the starting position.
- Repeat for your desired number of reps.
Tips for Doing Chest Supported Dumbbell Rows
Here are a few tips to help you get the most out of chest supported dumbbell rows:
- Make sure your chest is firmly against the pad of the incline bench.
- Keep your elbows close to your body throughout the movement.
- Don't let your shoulders shrug up towards your ears.
- Focus on pulling the dumbbells towards your chest using your back muscles.
- Exhale as you pull the dumbbells up, and inhale as you lower them back down.
Variations of Chest Supported Dumbbell Rows
There are several variations of chest supported dumbbell rows that you can do to add variety to your workouts:
- Single arm chest supported dumbbell rows
- Wide grip chest supported dumbbell rows
- Close grip chest supported dumbbell rows
Conclusion
Chest supported dumbbell rows are a great exercise for building upper back muscles, improving posture, and reducing the risk of injury. By following the tips outlined in this article, you can ensure that you are doing this exercise correctly and safely. Incorporate chest supported dumbbell rows into your workouts today to see the benefits for yourself.
Related video of Chest Supported Dumbbell Rows
Foam rolling is a popular technique used to help relieve tension in muscles, increase flexibility, and reduce the risk of injury. The lats, or latissimus dorsi muscles, are a commonly foam rolled area for athletes and fitness enthusiasts. Here's how to foam roll your lats:
Choose the Right Foam Roller
Before you begin, make sure you have the right foam roller for the job. A soft foam roller is recommended for beginners or those with more sensitive muscles, while a firmer roller is better for experienced rollers or those with denser muscle tissue.

Position Yourself Correctly
Lie on your side with your bottom arm extended overhead and your foam roller positioned under your armpit. Your top arm can be used to stabilize you and help control the pressure of the foam roller.

Roll Slowly and Carefully
Begin rolling slowly and carefully down the side of your body, stopping just above your waistline. If you feel any areas of tension or tightness, pause and hold the roller on that spot for a few seconds before continuing.
Breathe Deeply and Relax
Remember to breathe deeply and relax your body as you roll. Tensing up your muscles can make the foam rolling less effective and more painful.

Repeat on the Other Side
Once you've finished one side, switch over and repeat the process on the other side.

Try Different Angles
You can also try foam rolling your lats at different angles to target different areas of the muscle. For example, turning your body slightly towards your stomach can help target the upper lat muscles.

Don't Overdo It
Remember, foam rolling should feel good and relaxing. If you're experiencing pain or discomfort, stop and take a break. Overdoing it can lead to injury or increased soreness.

Stretch Afterwards
After foam rolling your lats, it's important to stretch the muscle to help increase flexibility and prevent injury. Simple stretches like reaching your arm overhead or pulling your elbow across your chest can be effective.

Incorporate Foam Rolling into Your Routine
Foam rolling your lats can be done before or after a workout, or even on a rest day. Incorporating foam rolling into your routine can help improve overall muscle health and recovery.

Listen to Your Body
Everyone's body is different, and what works for one person may not work for another. Listen to your body and adjust the pressure and technique as needed.

Consult a Professional
If you have any concerns or questions about foam rolling your lats, consult a professional like a physical therapist or personal trainer. They can provide guidance and help ensure you're using proper form and technique.

Conclusion
Foam rolling your lats can be a great way to improve muscle health and recovery. Remember to choose the right foam roller, position yourself correctly, roll slowly and carefully, breathe deeply and relax, try different angles, and stretch afterwards. Don't overdo it, incorporate foam rolling into your routine, listen to your body, and consult a professional if needed.
Related video of How To Foam Roll Lats

The single arm biceps curl is a popular exercise that targets the biceps muscles in the arms. This exercise is typically performed with a dumbbell or a barbell, and it involves lifting the weight with one arm while keeping the other arm stationary. In this article, we'll take a closer look at the single arm biceps curl, including how to perform it, its benefits, and some common mistakes to avoid.
How to Perform the Single Arm Biceps Curl
To perform the single arm biceps curl, you'll need a dumbbell or a barbell. Here are the steps to follow:
- Stand with your feet shoulder-width apart and hold the weight in one hand.
- Keep your other arm by your side or resting on your hip.
- Slowly lift the weight towards your shoulder, keeping your elbow close to your body.
- Pause for a moment at the top of the movement, then slowly lower the weight back down to the starting position.
- Repeat for the desired number of repetitions, then switch to the other arm.

It's important to maintain good form when performing the single arm biceps curl. Keep your back straight, your abs engaged, and your elbow close to your body throughout the movement. This will help you avoid injury and ensure that you're targeting the biceps muscles effectively.
Benefits of the Single Arm Biceps Curl
The single arm biceps curl is a great exercise for building strength and size in the biceps muscles. Since you're only using one arm at a time, you're able to focus more on the contraction of the biceps and ensure that they're working as hard as possible. Additionally, the single arm biceps curl can help correct muscle imbalances between your left and right arms, which can improve your overall strength and performance in other exercises.

Common Mistakes to Avoid
When performing the single arm biceps curl, there are a few common mistakes that you'll want to avoid:
- Using momentum to lift the weight instead of relying on your biceps muscles.
- Allowing your elbow to move away from your body, which can put stress on your shoulder joint.
- Arching your back or leaning forward, which can strain your lower back.
- Not using a full range of motion, which can limit the effectiveness of the exercise.
To avoid these mistakes, focus on using slow, controlled movements and maintaining good form throughout the exercise. If you're not sure if you're performing the exercise correctly, consider working with a personal trainer who can provide guidance and feedback.
Variations of the Single Arm Biceps Curl
There are several variations of the single arm biceps curl that you can try to keep your workouts challenging and avoid plateaus. Here are a few to consider:
- Concentration curls: Sit on a bench and rest your elbow on your knee, then perform the single arm biceps curl with a dumbbell.
- Hammer curls: Hold the weight with your palm facing your body instead of facing up, which targets the brachialis muscle in addition to the biceps.
- Incline curls: Perform the single arm biceps curl on an incline bench, which shifts the focus to the upper portion of the biceps muscle.

Conclusion
The single arm biceps curl is a simple but effective exercise that can help you build strength and size in your biceps muscles. By following the proper form and avoiding common mistakes, you can ensure that you're getting the most out of this exercise. And by incorporating variations into your workouts, you can keep your routine fresh and challenging.
Related video of Single Arm Biceps Curl: A Comprehensive Guide

The shoulder press machine is a popular piece of equipment at most gyms, including Planet Fitness. This machine is specifically designed to target the muscles in your shoulders and upper arms, making it an excellent addition to any upper body workout routine.
What is a Shoulder Press Machine?
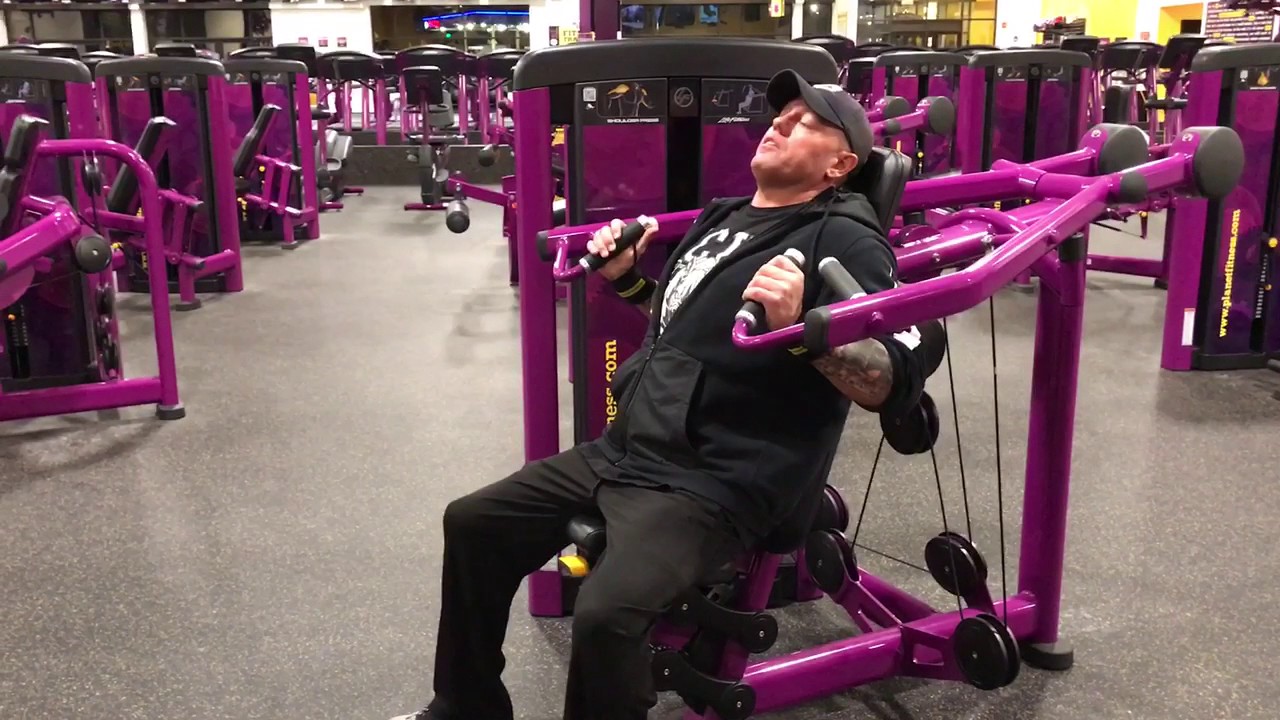
A shoulder press machine is a weight-training machine that targets the muscles in your shoulders and upper arms. The machine features a seat and a set of handles that are attached to a weight stack. The user sits on the seat, grasps the handles, and lifts the weight stack by pressing upwards with their arms.
How to Use the Shoulder Press Machine at Planet Fitness

When using the shoulder press machine at Planet Fitness, it's important to first adjust the seat to the appropriate height. The handles should be at shoulder level when you are seated on the machine. Next, select a weight that is appropriate for your fitness level.
Once you are seated and have selected your weight, grasp the handles and press upwards with your arms. Keep your back straight and your core engaged throughout the exercise. Lower the weight back down slowly and repeat for the desired number of repetitions.
Benefits of Using the Shoulder Press Machine

Using the shoulder press machine at Planet Fitness can provide numerous benefits, including:
- Increased strength in the muscles of the shoulders and upper arms
- Improved posture
- Reduced risk of injury to the shoulders and upper back
- Increased stability in the shoulder joint
Alternatives to the Shoulder Press Machine

If the shoulder press machine is not available or if you want to switch up your workout routine, there are several alternative exercises that target the same muscles:
- Dumbbell Shoulder Press
- Barbell Shoulder Press
- Arnold Press
- Push Press
Tips for Using the Shoulder Press Machine Safely

When using the shoulder press machine at Planet Fitness, it's important to follow these safety tips:
- Start with a lower weight and gradually increase as you become stronger
- Keep your back straight and your core engaged throughout the exercise
- Avoid locking your elbows at the top of the movement
- Use slow, controlled movements
- Consult with a personal trainer if you are unsure about proper form or technique
Conclusion
The shoulder press machine is an effective piece of equipment for targeting the muscles in your shoulders and upper arms. Whether you're a beginner or an experienced weightlifter, using this machine at Planet Fitness can help you achieve your fitness goals. Remember to use proper form and technique, and always listen to your body.
Related video of Shoulder Press Machine at Planet Fitness: A Comprehensive Guide

Are you looking for a new and challenging exercise to add to your workout routine? Look no further than the side plank with crunch. This exercise targets your obliques, shoulders, and core while also improving your balance and stability.
How to Do a Side Plank With Crunch

Start by lying on your side with your elbow directly beneath your shoulder and your legs straight. Lift your hips off the ground and hold the position. Then, bring your top elbow and knee together underneath your body, performing a crunch. Return to the starting position and repeat on the other side.
Make sure to keep your body in a straight line from your head to your heels throughout the exercise. Engage your core and breathe deeply as you perform each repetition.
Variations of the Side Plank With Crunch

If you want to switch up your workout, try these variations of the side plank with crunch:
- Side plank with leg lift: Lift your top leg while holding the side plank position to target your glutes.
- Side plank with arm reach: Reach your top arm toward the ceiling while holding the side plank position to target your shoulders and upper back.
- Side plank with hip dip: Dip your hips down toward the ground before returning to the starting position to target your obliques even more.
Benefits of the Side Plank With Crunch

Adding the side plank with crunch to your workout routine can provide a range of benefits, including:
- Strengthening your obliques: The side plank with crunch targets your oblique muscles, which are important for rotational movements.
- Improving your balance and stability: Holding the side plank position requires you to engage your core and maintain your balance.
- Engaging multiple muscle groups: In addition to your obliques, the side plank with crunch also works your shoulders, core, and glutes.
Incorporating the Side Plank With Crunch Into Your Workout Routine

The side plank with crunch can be incorporated into your workout routine in a variety of ways. Here are a few suggestions:
- Add it to your core workout: Perform 3 sets of 10-15 repetitions on each side, alternating sides between sets.
- Include it in a full-body workout: Perform 3 sets of 10-15 repetitions on each side as part of a circuit, alternating between the side plank with crunch and other exercises.
- Use it as a warm-up or cool-down exercise: Hold the side plank position for 30-60 seconds on each side, performing a few crunches during each hold.
Conclusion
The side plank with crunch is a challenging exercise that targets multiple muscle groups while improving your balance and stability. With a few variations and some creativity, it can be incorporated into a variety of workout routines.
Related video of Side Plank With Crunch: A Complete Guide
When it comes to building strong, defined calves, many people think only of calf raises. However, there is another exercise that can help you achieve that goal: the leg press calf raise. This exercise is a great way to target your calves in a different way and can be done using a leg press machine.

What Are Leg Press Calf Raises?
Leg press calf raises are a variation of the traditional calf raise exercise. Instead of standing with your feet on the ground and lifting your body weight up onto your toes, you are seated in a leg press machine with your toes on the platform. You then perform calf raises by pushing the platform up with your toes.
How to Do Leg Press Calf Raises
To do leg press calf raises, follow these steps:
- Adjust the leg press machine so that the seat is at a comfortable height for you.
- Place your toes on the platform with your heels hanging off.
- Sit up straight with your back against the seat.
- Engage your core and keep your feet parallel to each other.
- Push the platform up with your toes, lifting your heels off the ground.
- Pause at the top of the movement for a second or two.
- Slowly lower your heels back down to the starting position.
- Repeat for the desired number of reps.

Tips for Doing Leg Press Calf Raises
Here are some tips to help you get the most out of your leg press calf raises:
- Start with a light weight and gradually increase as you get stronger.
- Keep your feet parallel to each other throughout the exercise.
- Focus on pushing through your toes rather than your entire foot.
- Don't lock your knees at the top of the movement.
- Keep your core engaged and your back against the seat.
- Breathe in as you lower the weight and exhale as you push it up.
Benefits of Leg Press Calf Raises
Leg press calf raises offer several benefits:
- They target the calf muscles in a different way than traditional calf raises.
- They can help improve your balance and stability.
- They are a great exercise for people with knee problems who can't do standing calf raises.
- They can help you achieve stronger, more defined calves.

When to Do Leg Press Calf Raises
Leg press calf raises can be done as part of a leg day workout or on their own. Here are some guidelines:
- Do them after your main leg exercises, such as squats or leg presses.
- Perform 3-4 sets of 10-15 reps.
- Rest for 30-60 seconds between sets.
- Do them 2-3 times per week.
Conclusion
Leg press calf raises are a great exercise for anyone looking to build stronger, more defined calves. They are easy to do and can be done using a leg press machine. Remember to start with a light weight and gradually increase as you get stronger, and keep your feet parallel to each other throughout the exercise. With consistency and dedication, you can achieve the strong, defined calves you've always wanted!
Related video of Leg Press Calf Raises: A Step-by-Step Guide to Stronger Calves

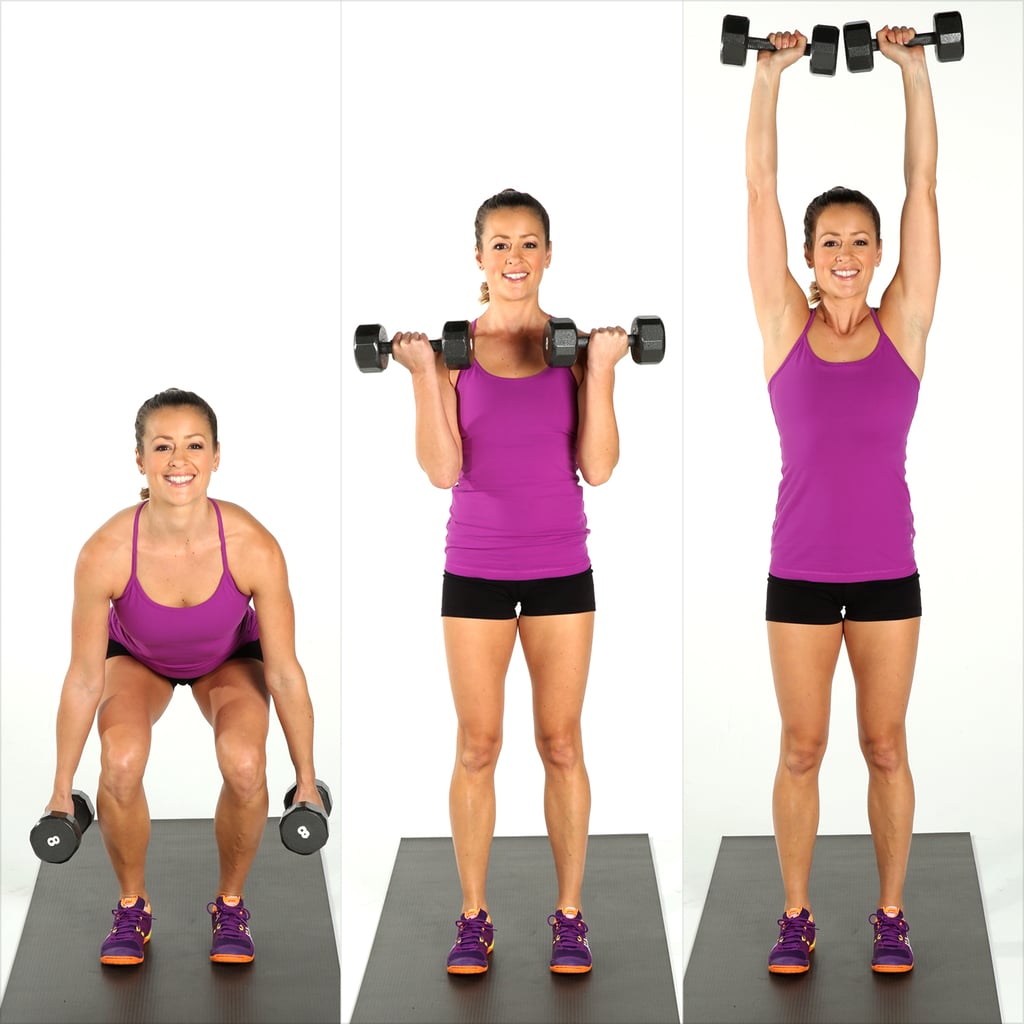
The dumbbell curl and press is a popular exercise among fitness enthusiasts who want to tone their upper body. It is a combination of two exercises, the dumbbell curl and the overhead press, which target the biceps, triceps, and shoulders. This exercise is ideal for those who want to build lean muscle mass, increase strength, and improve their overall fitness level.
How to Perform Dumbbell Curl and Press

To perform the dumbbell curl and press, follow these steps:
- Stand with your feet shoulder-width apart, back straight, and core engaged.
- Hold a dumbbell in each hand, palms facing forward.
- Curl the weights towards your shoulders, keeping your elbows close to your body.
- Once the weights reach your shoulders, rotate your palms towards your body.
- Press the weights overhead, extending your arms fully.
- Lower the weights back to your shoulders, and then slowly lower them to your sides.
- Repeat for the desired number of reps.
It's important to maintain proper form throughout the exercise to avoid injury and maximize results. Keep your elbows close to your body during the curl, and extend your arms fully during the press. Avoid swinging your arms or arching your back.
Variations of Dumbbell Curl and Press
Here are some variations of the dumbbell curl and press:
- One-arm dumbbell curl and press: This variation is performed with one arm at a time, allowing you to focus on each arm individually.
- Alternating dumbbell curl and press: This variation is performed by alternating arms with each rep, providing a full-body workout.
- Seated dumbbell curl and press: This variation is performed while seated, providing additional stability and targeting the core muscles.
Benefits of Dumbbell Curl and Press

The dumbbell curl and press offers many benefits, including:
- Increased upper body strength: This exercise targets the biceps, triceps, and shoulders, helping to build lean muscle mass and increase strength.
- Improved posture: Strengthening the upper body muscles can help improve posture and reduce the risk of injury.
- Burns calories: This exercise is a great way to burn calories and improve overall fitness level.
- Improved balance and coordination: The dumbbell curl and press requires balance and coordination, helping to improve these skills over time.
Conclusion
The dumbbell curl and press is a highly effective exercise for toning the upper body, building strength, and improving overall fitness level. It can be performed in a variety of ways to suit individual preferences and fitness goals. By adding this exercise to your workout routine, you can achieve a lean, toned upper body and improve your overall health and well-being.
